Showing posts with label Kaisercraft. Show all posts

Wednesday, August 28, 2019

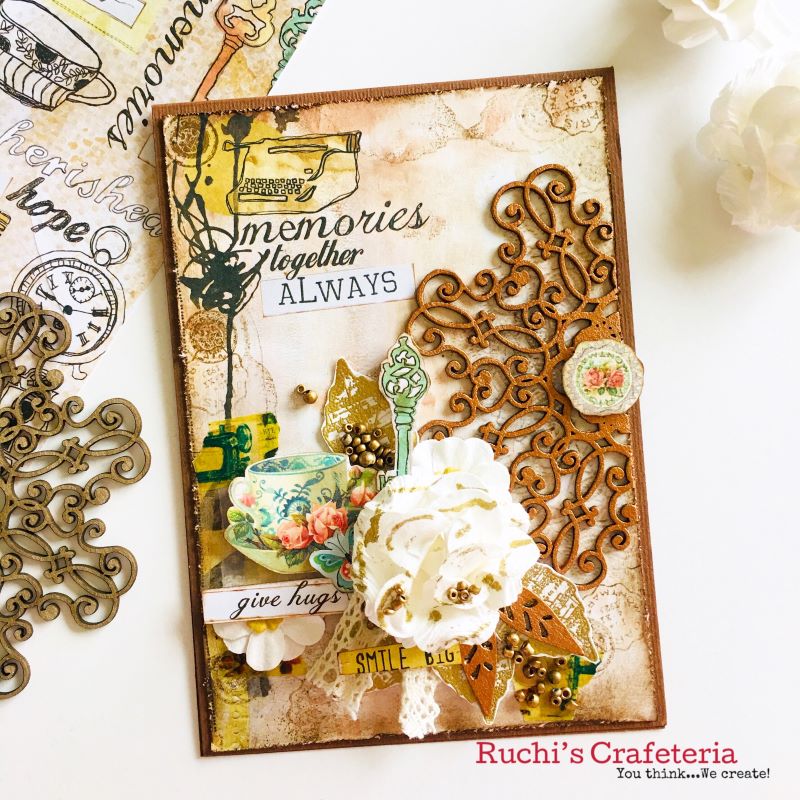
Mixed Media Card - Memories with Ruchi

Hello friends!! Ruchi here from Ruchi's Crafeteria and I'm back with my inspirational project.


Today I've created a mixed media card.


Took a card stock and adhered Prima paper on that. It's already printed in vintage look so didn't add any texture. Just distressed the edges using Walnut Stain distress ink.


Picked SRTC Delicate Lace Doily and SRTC Foliage Pieces chipboards and applied Expressions Craft 'Bronze Moon' metallic paint.


Arranged all the elements like SRTC chipboards, Prima flowers, Kaisercraft flowers, some fussy cut elements from the same Prima papers, stamped and gold embossed leaves and some embellishments.


That’s it for today!! Hope you like my today's project. Don’t forget to check SRTC shop for these chipboards and some other awesome designs.

Southern Ridge Trading Company Supplies Used:


Other Supplies Used:

- Prima Marketing:  Papers, flowers
- Ranger Ink: Rose Gold Embossing Powder
- Tim Holtz for Ranger Ink: Walnut Stain Distress Ink
- Imagine Crafts: Versamark Ink
- Expressions Craft: Bronze Moon metallic paint
- Kaisercraft: Flowers
- JustRite stamp (for leaves)
- Cardstock, tiny beads, lace, double sided tape are from my stash.

See ya next time.
Till then happy crafting!!
Ruchi


Thursday, August 1, 2019

Under The Sea Layout with Reverse Stenciling and Dylusions with Karla Yungwirth

Hello friends! Karla here today with a fun summer layout using the fabulous Southern Ridge Mermaid Mix Chipboard Set and the Fish Net Stencil. These were perfect to pair with my beachy pics from a recent camping trip to Little Bow Provincial Park in Alberta! Be sure to watch the video linked at the bottom of the post to see exactly how I put it together with the help of my lovely assistant, my 12 year old daughter Amie!


I used the negative image of the stencil by spritzing Dylusions Ink on my craft mat, dipping the stencil in, and then laying it on my background and diecut circle. This stencil is so cool! I kept the layout title simple by covering it with a layer of Tattered Angels Chalk Mist for a translucent glimmer.


There are 18 awesome images in the Mermaid Mix chipboard set – and they are cut so fine and detailed! We decided to paint the silhouettes with Dylusions paints, which are bright and fun – matching the summer vibe and those colourful towels and beach floaties.


We added some more colour with ink splatters and painted more fish, shells and the wonderful seahorse.


Be sure to check out the process VIDEO here! 

https://youtu.be/d2lmBi2-a6M

Southern Ridge Trading Company Supplies Used:


Other Supplies Used:

- Dylusions Ink Sprays and Paints
- Wild Whisper Designs: Watercolor Papers by Pam Bray
- Project Life App to print photos and journaling
- Tattered Angels Chalk Mist
- Dies by Lawn Fawn & Kaisercraft
- Scrapbook Sketch by Scrapbook & Cards Today

Thanks so much for stopping by! I hope you have a wonderful week – don’t forget to head over to the Southern Ridge Trading Company shop to see what inspires you to create!

Hugs,
Karla

Monday, July 29, 2019

Mixed Media Card- Totes Adorbs! with Ruchi

Hello friends!! Ruchi here from Ruchi's Crafeteria and I'm back with my inspirational project.


Today I've created a simple mixed media card with minimum supplies.


I picked a grey card stock and stamped some demask design using Altenew Warm Gray inks. Then glued Prima ATC tag Totes Adorbs which means Totally Adorable!! 


Picked SRTC Damask Corners chipboard and heat embossed it with Ranger Black embossing powder. I just applied Prima Heavy Gesso Black on SRTC Foliage Leaf Branch chipboard.


Arranged all the elements like SRTC chipboards, paper flowers, die cut leaves and glued them on my card base. Sprinkled some Diamond Dust and Finnabair Glass Glitters on them.


That’s it for today!! Hope you like my today's project. Don’t forget to check SRTC shop for these chipboards and some other awesome designs.

Southern Ridge Trading Company Supplies Used:


Other Supplies Used:

- Prima Marketing:  ATC Tags and Heavy Gesso Black
- Ranger Ink: Black Embossing Powder
- Versamark embossing ink
- Finnabair: Glass Glitters
- Altenew: Warm Gray Mini Cube Set
- KaiserKraft Flowers
- Demask stamp, sequins, grey cardstock, diamond dust, glue, die cut leaves are from my stash


See ya next time.
Till then happy crafting!!
Ruchi


Monday, December 17, 2018

Christmas Ornaments with Karla Yungwirth

Well, we are definitely getting close to the big day, and I’m so excited!! Karla here today with some pretty ornaments created with the Southern Ridge Ornament Chipboard Set, Snowflakes 712 and Mini Sleighs wood veneer. I’ve even created a video for you below showing how I layered on some pretty paints, embossing powders and mists to customize them.


Here’s a link to the video where you can see my process. 


I had so much fun with these ornaments. They are quick and easy to decorate and would be great as package toppers, perfect to embellish a Christmas scrapbook page, as an ornament gift set, or even on your own tree! I’ll bet the kids would even love to help and it would be a lovely Christmas activity.


Southern Ridge Trading Company Supplies Used:

Other Supplies Used: 

- Emerald Creek Craft Supplies: Soft Fallen Snow Embossing Powder, Hammered Metal Embossing Powder, Doubloon Embossing Powder and Rita Barakat: Magical Mysteries - Mermaid Fin Embossing Powder
- Ranger Ink: Matte Medium and Snow Cap Paint Dabber
- Paper Artsy Paints: Steele Grey, Buff, Glacier Ice, Magic Moss, Venice Blue, Butter, Mahogany and Terracotta
- Tattered Angels Mists: Dark Vintage Green, Iridescent Gold, Splash, Sterling, Woven Burlap and Lobster
- Kaisercraft: First Noel

Thanks so much for stopping by today! I hope you have a very Merry Christmas and a wonderful and Happy New Year!

Hugs, Karla

Wednesday, November 14, 2018

Adventure Scrapbook Layout with Katelyn Grosart

Hey Southern Ridge Trading Company fans, Katelyn here. It's hard to believe that November is here and it's time for me to start thinking about creating my Christmas Cards. For today's post though, I've created this Adventure Scrapbook Layout which features a variety of our popular chipboard pieces. You'll want to read below as I share with you how I embellished the chipboard elements for my layout.


To start, you'll need both of the Swirl Corners #2. Apply Emboss It Ink to the entire surface of each corner. Sprinkle Weathered Wood embossing powder over top of each corner. Tap off the excess powder and emboss with a heat tool. 


Next, you'll need the large frame from the Abstract Frame Set. Apply Emboss It Ink to the entire surface of each corner. Sprinkle Midnight Black embossing powder over top of each corner. Tap off the excess powder and emboss with a heat tool. 


Take the Adventure Word out of the package. Apply Emboss It Ink to the entire surface of each corner. Sprinkle Gun Metal embossing powder over top of each corner. Tap off the excess powder and emboss with a heat tool. 


Next you'll need the small cedar tree from the Cedar Trees package. Apply two coats of Walnut Stain Distress Paint to the bottom of the cedar tree. Apply two coats of Pine Needles Distress Paint to the top half of the cedar tree. 


The last chipboard element you'll need is a chipboard tag. Trace the tag around a piece of coordinating patterned paper.  


Adhere the patterned paper tag to the chipboard tag. Ink the edges of the chipboard tag using Black Soot Distress Ink.


Once the patterned papers have been layered together, adhere one swirl corner to the left of the banner element. Adhere the patterned papered chipboard tag to the right of the banner element.


The other swirl corner is adhered in the top left side of the banner element and then the other patterned papers are layered over top of the corners.


The abstract frame gets adhered over the photo. The cedar tree gets adhered to the bottom left of the abstract frame.


Once the border strips were adhered, adhere the adventure word to the right of the frame using adhesive and foam squares.


Here's the finished Adventure Scrapbook Layout.


Southern Ridge Trading Company Supplies Used:

- Chipboard Tags

Other Supplies Used:

- Emerald Creek Craft Supplies: Weathered Wood Embossing Powder, Gun Metal Embossing Powder and Midnight Black Embossing Powder
- Tim Holtz for Ranger Ink: Distress Oxide Ink - Black Soot, Distress Paint - Walnut Stain & Pine Needles and Blending Tool with Foam
- Ranger Ink: Emboss It Ink Dabber
- Kaisercraft: Mountain Air - Tree Trunks, Rugged, Strong and Adventure
- Tombow: Mono Multi Liquid Glue
- Misc: Heat Tool

Until Next Time!

- Katelyn


Wednesday, August 29, 2018

Congrats Wedding Card with Katelyn Grosart

Hey Southern Ridge Trading Company fans, Katelyn here. For today's post, I'm thrilled to share with you this Congrats Wedding Card that was given away last weekend to the happy couple.  To embellish my Congrats Wedding Card, I featured a variety of our popular frames and border chipboard pieces. You'll want to read below as I share with you how I embellished the chipboard pieces for my card.


To start, you'll need to cut out the two hearts from the Classy frame. Apply a layer of Emboss It Ink to the two chipboard hearts. Sprinkle Glacier White Embossing Powder overtop of the hearts and tap off the excess powder. Emboss with a heat tool. Apply a layer of Emboss It Ink to the now embossed hearts. Sprinkle White Satin Pearl Embossing Powder overtop of the hearts and tap off the excess powder. Emboss with a heat tool.


Next you'll need one Scroll Border. Cut the border in half. Apply a layer of Emboss It Ink to both Scroll Border pieces. Sprinkle Glacier White Embossing Powder overtop of the scroll pieces and tap off the excess powder. Emboss with a heat tool. Apply a layer of Emboss It Ink to the now embossed scroll borders. Sprinkle White Satin Pearl Embossing Powder overtop of the scroll pieces and tap off the excess powder. Emboss with a heat tool.


The last chipboard element I needed for my card was the large Abstract Heart Frames. Using a blending tool with foam and Ground Espresso Distress Ink, blend the ink over the entire surface of the heart frame.


Once all the patterned papers have been layered together and the lace has been added, I then adhere one scroll border to the bottom right side of the heart frame and the other scroll border to the top left corner of the heart frame. Adhere the traced paper heart to the abstract heart frame. Foam square the abstract heart to the middle of the patterned papers. Adhere your sentiment to the middle of the patterned paper heart. Adhere a few pearls at the top of the word and at the bottom of the word. 


In the bottom right side of the heart, I adhered one extra large white flower, three large cream roses, three medium white flowers and three white small flowers as well as one of the chipboard hearts.


In the top left corner of the heart, I adhered one extra large white flower, three large cream roses, three medium white flowers and four white small flowers as well as the other chipboard heart.


Here's the finished Congrats Wedding Card.


Southern Ridge Trading Company Supplies Used:

- Classy Frame Set
- Roses: 2 extra large flowers, 20mm white flowers, 10mm white flowers and small white flowers

Other Supplies Used:

- Emerald Creek Craft Supplies: Glacier White Embossing Powder and White Satin Pearl Embossing Powder
- Tim Holtz for Ranger Ink: Distress Ink - Ground Espresso and Blending Tool with Foam
- Ranger Ink: Emboss It Ink Dabber
- Stamperia Patterned Paper
- Kaisercraft: Pearls - China
- Elizabeth Craft Designs - Words 1 - Celebration
- Tombow: Mono Multi Liquid Glue
- Misc: Lace, White Cardstock and Heat Tool

Until Next Time!

- Katelyn


Monday, July 23, 2018

Remember This Scrapbook Layout with Charlene Byrd

Hello bloggers!
Charlene here! Thanks for joining me today!

Today I’m sharing a gorgeous layout with a precious picture of my sweet great niece. I love vintage style so this picture was so fun to work with.


The chipboard pieces were all coloured with Walnut Distress Stain.


I cut the key into 2 pieces so I could tuck them at the top and the bottom of the page.


I also cut the decorative border in half and then into 2 pieces (again so I could tuck it)

Southern Ridge Trading Company Products Used:

Other Products Used:
- Kaisercraft paper and diecuts
- Paper bag
- Lace
- Cheesecloth
- Flowers
- Pearls
- Buttons
- Paper doilies

Thanks for joining me today!
Until Next time
Charlene


Friday, June 29, 2018

Memories Wall Hanging with Katelyn Grosart

Hey Southern Ridge Trading Company fans, Katelyn here. For today's post, I'm excited to share with you my Memories Wall Hanging that's perfect to add to your home decor.  My Memories Wall Hanging features a variety of our chipboard pieces. You'll want to read below as I share with you how to recreate my Memories Wall Hanging at home.


To start, you'll need a 5"x7" canvas. Apply two coats of Walnut Stain Distress Paint Ink around the edges of the canvas. Rub Ground Espresso Distress Crayon around the edges of the canvas.


Apply two coats of Black Paint to the Memories Fun Word. After the paint has dried, rub Aged Brass and Brushed Iron Art Alchemy Metallique Wax over top of the word.


Take one Drifting Feathers out of the package. Apply two coats of Walnut Stain Distress Paint on the feather. Once the paint has dried, rub Ground Espresso Distress Crayon along the edges of the feather.


Take two Fern Leaf Foliage pieces out of the package. Apply two coats of Peeled Paint Distress Paint to the fern pieces. After the paint has dried, rub Peeled Paint Distress Crayon along the edges of both fern pieces. 


Next you'll need is the Doily Frame. Apply Emboss It Ink to the frame and sprinkle Oil Rubbed Bronze Embossing Powder overtop of the piece. Tap off the excess powder and emboss with a heat tool.


The last chipboard piece you'll need is the Delicate Lace Doily. Cut the piece in half and then in quarters. Apply two coats of Walnut Stain Distress Paint to two of the doily quarters.


Choose a Found Relative. Die cut the found relative using the 3" Stitched Circle Die. Ink the edges of the circle using Ground Espresso Distress Ink and a blending tool with foam.


Choose one of the Anthology papers and die cut the 3 1/2" stitched circle out of it. Ink the edges of the circle using Ground Espresso Distress Ink and a blending tool with foam. 


From a second Anthology paper, cut a piece that measures 4 1/4" x 6 1/4". Ink the edges of the circle using Ground Espresso Distress Ink and a blending tool with foam. At the top right of the piece of paper, tear a bit down and do the same at the bottom left of the paper.


From a third Anthology paper, cut a piece that measures 4 1/2" x 6 1/2". Ink the edges of the circle using Ground Espresso Distress Ink and a blending tool with foam. At the top right of the piece of paper, tear a bit down and do the same at the bottom left of the paper.


From the same piece of Anthology paper that you cut the circle out of, cut a piece that measures 4 3/4" x 6 3/4". Ink the edges of the circle using Ground Espresso Distress Ink and a blending tool with foam. 


Adhere the 4 3/4" piece of patterned paper to the canvas. Adhere one piece of the doily chipboard to the top right side of the canvas. Adhere the other piece of doily chipboard to the bottom left side of the canvas.


Adhere the 4 1/2" piece of patterned paper overtop of the 4 3/4" patterned paper piece. Adhere the 4 1/4" patterned paper piece overtop of the the 4 1/2" patterned paper piece.


If desired, adhere the lace to the middle of the patterned paper. Adhere the found relatives to the 3 1/2" circle. Foam square the 3 1/2" circle to the middle of the canvas.


Adhere the doily frame overtop of the circles. Adhere one of the fern leaf foliage piece to the top left portion of the frame. Adhere the other fern leaf foliage piece and feather in the bottom right side of the frame.


Adhere the Memories word underneath the photo.


In the top left side of the frame, adhere one large cream rose, two brown roses, four black roses and two cream roses.


In the bottom right hand side of the frame, adhere one large cream rose, two cream roses, two brown roses and two black roses.


To finish off the memories wall hanging, add a black ribbon hanger.


Here are a few close up photos of the wall hanging.


Southern Ridge Trading Company Supplies Used:

- Doily Frame
- 10mm Roses: Brown and Black
- 15mm Roses: Cream
- 20mm Roses: Cream

Other Supplies Used:

- Emerald Creek Craft Supplies: Oil Rubbed Bronze Embossing Powder
- Tim Holtz for Ranger Ink: Distress Ink - Ground Espresso, Distress Crayons - Peeled Paint and Ground Espresso, Distress Paint - Ground Espresso and Peeled Paint and Blending Tool with Foam
- Ranger Ink: Emboss It Ink Dabber
- Elizabeth Craft Designs: Stitched Circles
- PaperArtsy: Little Black Dress Paint
- Prima Marketing: Art Alchemy Metallique Wax - Brushed Iron and Aged Brass
- Kaisercraft: Anthology - Apothecary, Herbs and Botanist
- Tim Holtz Ideaology: Found Relatives
- Tombow: Mono Multi Liquid Glue
- Misc: Lace, 5"x7" Canvas, Black Ribbon and Heat Tool

Until Next Time!

- Katelyn