Showing posts with label Delicate Lace Doily. Show all posts

Friday, December 20, 2019

Merry Christmas Card with Ruchi

Hello friends! Merry Christmas in advance and enjoy this festive season :) 
Ruchi here from Ruchi's Crafeteria and I'm back with my inspirational project.

Today I've created a Christmas card with beautiful SRTC chipboards.


  • First I've created my card base and applied a piece of pattern paper from Dress My Craft- Christmas Bells paper collection.
  • Picked SRTC Delicate Lace Doily and Snowflakes chipboards and applied Prima White Gesso.
  • When Gesso dried, heat embossed them using Ranger- Gold and different WOW embossing powder.


  • Stamped and embossed some Mudra Craft Stamps- leaves and fussy cut them. 
  • Arranged all the elements like SRTC chipboards, flowers, stamped images, lace, fussy cut images together.
  • Lastly added sentiment and sprinkled Finnabair Glass Glitters.


That’s it for today!! Hope you like my today's project. Don’t forget to check SRTC shop for these chipboards and some other awesome designs.

Southern Ridge Trading Company Supplies Used:


Other Supplies Used:

- Dress My Craft: Christmas Bells Paper Collection
- Prima Marketing: White Gesso, Art Gel Medium and Finnabair Glass Glitter
- Imagine Crafts: Versamark Ink
- Ranger Ink: Embossing Powder
- WOW: Embossing Powders
- Mudra Craft Stamps: Leaves... stamp designed by me :)
- Lace, glue, cardstock, half pearls, double-sided tape are from my stash.  

Happy Holidays! 
See ya next time.
Till then happy crafting!!
Ruchi


Wednesday, August 28, 2019

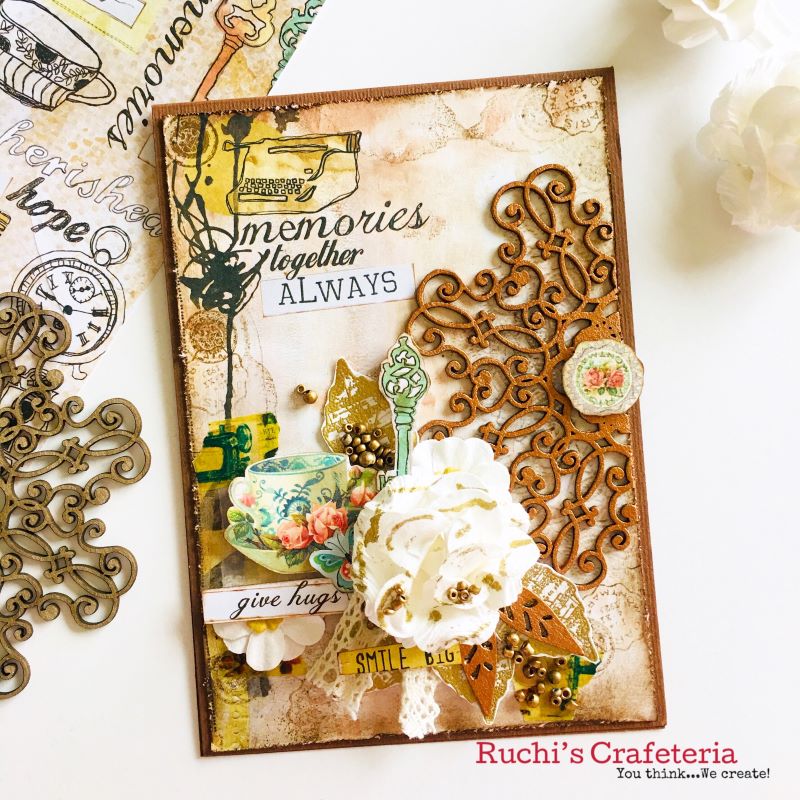
Mixed Media Card - Memories with Ruchi

Hello friends!! Ruchi here from Ruchi's Crafeteria and I'm back with my inspirational project.


Today I've created a mixed media card.


Took a card stock and adhered Prima paper on that. It's already printed in vintage look so didn't add any texture. Just distressed the edges using Walnut Stain distress ink.


Picked SRTC Delicate Lace Doily and SRTC Foliage Pieces chipboards and applied Expressions Craft 'Bronze Moon' metallic paint.


Arranged all the elements like SRTC chipboards, Prima flowers, Kaisercraft flowers, some fussy cut elements from the same Prima papers, stamped and gold embossed leaves and some embellishments.


That’s it for today!! Hope you like my today's project. Don’t forget to check SRTC shop for these chipboards and some other awesome designs.

Southern Ridge Trading Company Supplies Used:


Other Supplies Used:

- Prima Marketing:  Papers, flowers
- Ranger Ink: Rose Gold Embossing Powder
- Tim Holtz for Ranger Ink: Walnut Stain Distress Ink
- Imagine Crafts: Versamark Ink
- Expressions Craft: Bronze Moon metallic paint
- Kaisercraft: Flowers
- JustRite stamp (for leaves)
- Cardstock, tiny beads, lace, double sided tape are from my stash.

See ya next time.
Till then happy crafting!!
Ruchi


Friday, June 29, 2018

Memories Wall Hanging with Katelyn Grosart

Hey Southern Ridge Trading Company fans, Katelyn here. For today's post, I'm excited to share with you my Memories Wall Hanging that's perfect to add to your home decor.  My Memories Wall Hanging features a variety of our chipboard pieces. You'll want to read below as I share with you how to recreate my Memories Wall Hanging at home.


To start, you'll need a 5"x7" canvas. Apply two coats of Walnut Stain Distress Paint Ink around the edges of the canvas. Rub Ground Espresso Distress Crayon around the edges of the canvas.


Apply two coats of Black Paint to the Memories Fun Word. After the paint has dried, rub Aged Brass and Brushed Iron Art Alchemy Metallique Wax over top of the word.


Take one Drifting Feathers out of the package. Apply two coats of Walnut Stain Distress Paint on the feather. Once the paint has dried, rub Ground Espresso Distress Crayon along the edges of the feather.


Take two Fern Leaf Foliage pieces out of the package. Apply two coats of Peeled Paint Distress Paint to the fern pieces. After the paint has dried, rub Peeled Paint Distress Crayon along the edges of both fern pieces. 


Next you'll need is the Doily Frame. Apply Emboss It Ink to the frame and sprinkle Oil Rubbed Bronze Embossing Powder overtop of the piece. Tap off the excess powder and emboss with a heat tool.


The last chipboard piece you'll need is the Delicate Lace Doily. Cut the piece in half and then in quarters. Apply two coats of Walnut Stain Distress Paint to two of the doily quarters.


Choose a Found Relative. Die cut the found relative using the 3" Stitched Circle Die. Ink the edges of the circle using Ground Espresso Distress Ink and a blending tool with foam.


Choose one of the Anthology papers and die cut the 3 1/2" stitched circle out of it. Ink the edges of the circle using Ground Espresso Distress Ink and a blending tool with foam. 


From a second Anthology paper, cut a piece that measures 4 1/4" x 6 1/4". Ink the edges of the circle using Ground Espresso Distress Ink and a blending tool with foam. At the top right of the piece of paper, tear a bit down and do the same at the bottom left of the paper.


From a third Anthology paper, cut a piece that measures 4 1/2" x 6 1/2". Ink the edges of the circle using Ground Espresso Distress Ink and a blending tool with foam. At the top right of the piece of paper, tear a bit down and do the same at the bottom left of the paper.


From the same piece of Anthology paper that you cut the circle out of, cut a piece that measures 4 3/4" x 6 3/4". Ink the edges of the circle using Ground Espresso Distress Ink and a blending tool with foam. 


Adhere the 4 3/4" piece of patterned paper to the canvas. Adhere one piece of the doily chipboard to the top right side of the canvas. Adhere the other piece of doily chipboard to the bottom left side of the canvas.


Adhere the 4 1/2" piece of patterned paper overtop of the 4 3/4" patterned paper piece. Adhere the 4 1/4" patterned paper piece overtop of the the 4 1/2" patterned paper piece.


If desired, adhere the lace to the middle of the patterned paper. Adhere the found relatives to the 3 1/2" circle. Foam square the 3 1/2" circle to the middle of the canvas.


Adhere the doily frame overtop of the circles. Adhere one of the fern leaf foliage piece to the top left portion of the frame. Adhere the other fern leaf foliage piece and feather in the bottom right side of the frame.


Adhere the Memories word underneath the photo.


In the top left side of the frame, adhere one large cream rose, two brown roses, four black roses and two cream roses.


In the bottom right hand side of the frame, adhere one large cream rose, two cream roses, two brown roses and two black roses.


To finish off the memories wall hanging, add a black ribbon hanger.


Here are a few close up photos of the wall hanging.


Southern Ridge Trading Company Supplies Used:

- Doily Frame
- 10mm Roses: Brown and Black
- 15mm Roses: Cream
- 20mm Roses: Cream

Other Supplies Used:

- Emerald Creek Craft Supplies: Oil Rubbed Bronze Embossing Powder
- Tim Holtz for Ranger Ink: Distress Ink - Ground Espresso, Distress Crayons - Peeled Paint and Ground Espresso, Distress Paint - Ground Espresso and Peeled Paint and Blending Tool with Foam
- Ranger Ink: Emboss It Ink Dabber
- Elizabeth Craft Designs: Stitched Circles
- PaperArtsy: Little Black Dress Paint
- Prima Marketing: Art Alchemy Metallique Wax - Brushed Iron and Aged Brass
- Kaisercraft: Anthology - Apothecary, Herbs and Botanist
- Tim Holtz Ideaology: Found Relatives
- Tombow: Mono Multi Liquid Glue
- Misc: Lace, 5"x7" Canvas, Black Ribbon and Heat Tool

Until Next Time!

- Katelyn


Friday, July 21, 2017

Feminine Happy Birthday Tag with Katelyn Grosart

Hey there Southern Ridge Trading Company fans, Katelyn here. Today, I've created for you a beautiful Happy Birthday tag, that's perfect to give to that special woman in your life for their birthday. You'll want to read below as I share with you how I transformed each of my chipboard pieces to create my Feminine Happy Birthday Tag.


To start, you'll need a half a piece of the Delicate Lace Doily. Once you have a half piece of the doily, cut the doily in half again. Apply two coats of Spun Sugar Distress Paint to each delicate lace doily piece. Set the pieces aside to dry. After the pieces have dried, apply the Spun Sugar Distress Crayon to portions of the doily. Rub the crayon in with your finger. 


Pull out two Mini Wood Feathers. Apply three coats of Bundled Sage Distress Stain to each feather. Set the feathers aside to dry. 


From the Leaves set, cut out one leaf of your choice. Apply three coats of Weathered Wood Distress Stain to the leaf. Set the leaf aside to dry.


Cut out one of the Happy Birthday Sentiments from the Birthday Greetings package. Apply two coats of Victorian Velvet Distress Paint to the Happy Birthday sentiment. Set the sentiment aside to dry. Once the sentiment has dried, go over it with a Victorian Velvet Distress Crayon. Rub the crayon in with your finger.


Trace the top portion of the dress form onto a piece of patterned paper. Cut the dress form image out. Using Antique Linen Distress Paint, paint both dress form pieces. Once the paint has dried, apply Antique Linen Distress Crayon to the chipboard piece. Rub the crayon in with your finger. Adhere the patterned paper dress form piece to the chipboard dress form. 


Adhere the wire portion of the dress form to the dress form. 


Now you can assemble your Feminine Happy Birthday tag. Start by adhering the large patterned paper piece to the tag. Adhere the doily pieces onto the patterned paper. Adhere the smaller patterned paper piece overtop of the large patterned paper piece.


Embellish and add whatever else you might want to your wire dress form. Foam square the wire dress form to the middle of the tag.
Adhere the Happy Birthday sentiment to the bottom portion of the wire dress form.


To finish off your tag, add a light pink ribbon bow to the top of the tag. Your Feminine Happy Birthday Tag is now complete. 


Southern Ridge Trading Company Supplies Used:

- Butterflies (coming soon)
- Leaves (coming soon)
- 10mm Roses: Light Pink 
-  15mm Roses: Cream

Other Supplies Used:

- Tim Holtz for Ranger Ink: Distress Ink - Black Soot, Distress Paint -  Victorian Velvet, Antique Linen and Spun Sugar, Distress Stains - Weathered Wood and Bundled Sage and Distress Crayons - Victorian Velvet, Antique Linen and Spun Sugar.
- Tombow: Aqua Mono Liquid Glue
- Bo Bunny: Serendipity - Serendipity and Love
- May Arts Ribbon: Light Pink and White Ribbon
- Graphic 45: Large Ivory Tag Album

Until Next Time!

-Katelyn 


Friday, June 2, 2017

Dandelion Sunrise Mixed Media Panel with Deb Riddell

Hello everyone and happy June!  It’s Deb Riddell here today and I’ve created a mixed media panel celebrating the onset of summer to share with all of you.


I made my Dandelion Sunrise panel with a page from Southern Ridge Trading Company’s Zen Dragonfly Journal, Dandelion Seed Stems, Delicate Lace Doily, Small Bird Mix and Clouds stencil.  I`ve some step out photos on how I made it so read on for my how to.

I started with one of the blank chipboard pages from Southern Ridge`s Zen Dragonfly Journal and slip slapped on a coat of DecoArt Americana Cool White acrylic paint.  Stenciling came next through the Clouds stencil with Broken China Distress Oxide ink and a bit of spritz and flick with water.


I needed to cover the ring binder holes on the right side of my stenciled panel so I tore a length of Therm O Web Rebekah Meier Art Tape in half and inked it with Twisted Citron and Broken China Distress inks.  I then stamped some dandelion images and dragonflies with a discontinued Crafty Secrets stamp set and Vintage Photo Archival ink and added a bit of shading to the edges of the art tape with Frayed Burlap Distress ink.


The inked and stenciled Art Tape was adhered to the right side of the panel (the Art Tape has an adhesive backing so easy-peasy to apply) and I then stippled some Therm O Web Deco Foil Liquid Adhesive all around the edges of the panel.  After letting the Liquid Adhesive set up till it was tacky, Amber Watercolor Deco Foil was applied overtop (remember, silver side down!) and rubbed on with my finger.  Love the lost and found distressed look of the gilding around the edges.

I had half of the Delicate Lace Doily left over from a previous project and when I saw it in my stash it reminded me of a rising sun.  So I painted the doily with Tarnished Brass Distress paint


and once it had dried, applied some Deco Foil adhesive to the painted doily with the Therm O Web Deco Foil Adhesive Pen.  I used the pen on this delicate piece as I had more control over where the adhesive was being applied.  Once the adhesive had set up, I applied more of the Amber Watercolor Deco Foil over top, again rubbing it on with my fingers for a lost and found effect.

The Dandelion Seed Stem heads were painted with Americana Cool White acrylic paint and while the paint was still wet, Iridescent Shimmer embossing powder was sprinkled on.  Once the paint had dried, I heated the embossing powder to melt it.


I neglected to take an in process photo but after heating the embossing powder I coloured the dandelion stems with a diluted wash of Americana Avocado Dip acrylic paint.

One of the birds from the Small Bird Mix was painted with Americana Slate Green acrylic paint.  After assembling the panel I found the bird`s colour to be a little too prominent so added a wash of white to tone it down before adhering it.


And finally, a phrase from Tim Holtz`s Small Talk Occasions stickers was cut in half, lightly coloured with Old Paper Distress ink and edged with Frayed Burlap.

The panel was then assembled, the Dandelion Seed Stems were adhered first with bits of black fun foam under the medium and small stems to pop them up slightly.  Love the sparkle from the Iridescent Shimmer embossing powder complementing the Amber Watercolor Deco Foil.


The Delicate Lace Doily half was then adhered overtop of the Dandelion Seed Stems along the bottom edge of the panel with a few wee pieces of fun foam underneath the central medallion to stabilize it.  Anyone else see the rising sun?


And finally, the bird from the Small Bird Mix and the sentiment were adhered at the top of the panel.


I had forgotten to seal the Distress Oxide ink on the background panel before adhering the sentiment so didn’t want to do any shading with inks and water as it would reactivate the Distress Oxide ink.  A simple HB pencil came to the rescue, adding just enough of a ‘shading’ line to bring some attention to the sentiment.

This was the first time I’d used the Rebekah Meier Art Tape and love how it is ever so slightly transparent, you can still see a bit of the stenciled background underneath it which I love.  It tears beautifully as well for that wonderful ragged distressed edge.


I hope that you have enjoyed seeing how my Dandelion Sunrise mixed media panel came together and that I’ve given you some ideas on different ways to use some of Southern Ridge’s wonderful chipboard pieces.


Southern Ridge Trading Company Supplies Used:


Other Supplies Used:

- Therm O Web: iCraft Deco Foil, iCraft Deco Foil Liquid Adhesive, iCraft Deco Foil Adhesive Pen, Rebekah Meier Art Tape and Rebekah Meier Mixed Media Medium
- Tim Holtz for Ranger Ink: Distress Oxide Ink, Distress Ink, Distress Paint and Distress Archival ink
- Tim Holtz / Advantus: Small Talk Occasions Stickers
- DecoArt: Americana Acrylic Paint
- Emerald Creek Craft Supplies: Iridescent Shimmer Embossing Powder
- Miscellaneous: Black fun foam, HB pencil, Crafty Secrets clear stamps, paint brush and stippling brush

Thanks again for stopping by today and happy creating!