Friday, October 28, 2016

Thank You Card with Katelyn Grosart

Hey Southern Ridge fans, Katelyn here and I'm back on the blog today to share some more inspiration from our current monthly challenge which is "Fall".  Today I've got a Fall Thank you card for you that will be sure to inspire you to create. Grab a cup of coffee or tea and learn how I transformed my chipboard pieces to create the perfect additions to my Fall card. Don't forget, there's only 4 days left to play along in our challenge!


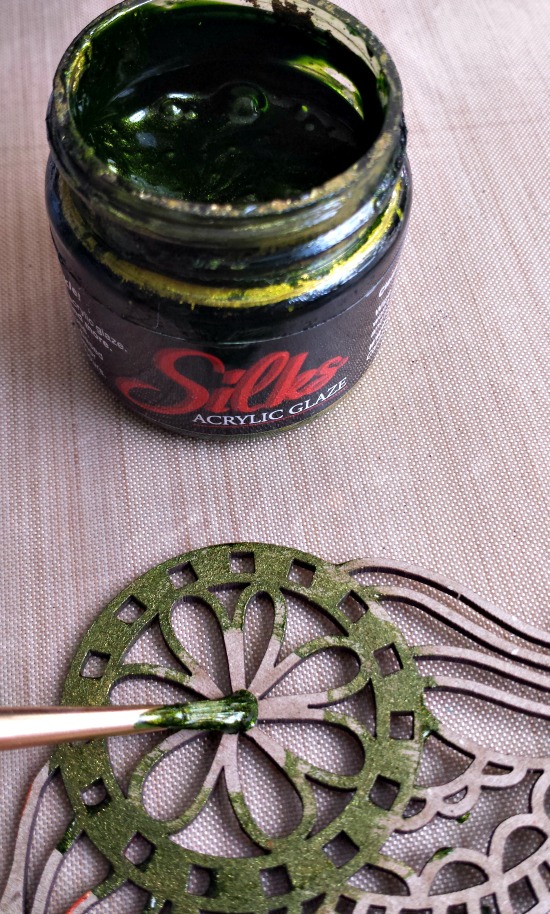
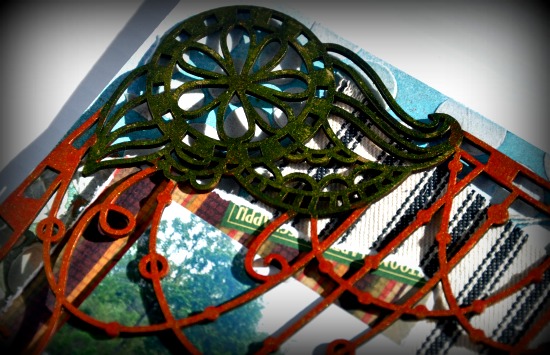
To start, you'll want to take out the small frame from the Victorian Lace Frame set. With the small frame out, cover the frame in a layer of VersaMark Ink. Once the frame is covered in ink, sprinkle Burnt Copper Leaves Embossing Powder. Tap off the excess powder and emboss with a heat tool. Once the powder has cooled down, if there are spots that didn't get embossed, go back over them with a layer of VersaMark Ink. Sprinkle the Burnt Copper Leaves Embossing Powder over top, tap off the excess and emboss with your heat tool. 


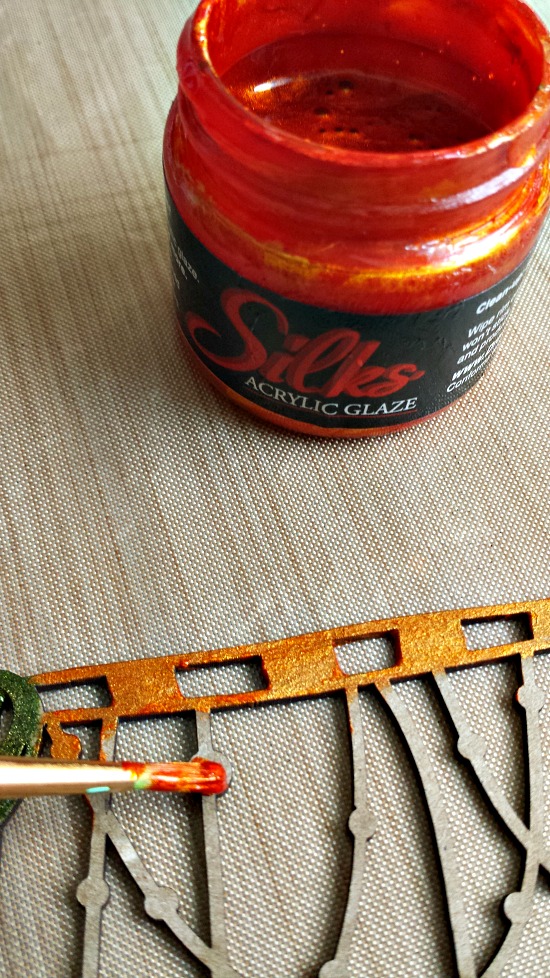
Next, select whichever three leaves you'd like from the Skeleton Leaves set. The first leaf will be painted with Spiced Marmalade Distress Paint, the second leaf will be painted with Mustard Seed Distress Paint and the third leaf will be painted with Seedless Preserves Distress Paint. Each leaf will need two coats of paint. Once the paint has dried, apply a layer of VersaMark Ink to each leaf and sprinkle Fine Clear Embossing Powder overtop of each leaf. Tap off excess and emboss with your heat tool.


Cut two pieces from the Honeycomb Pattern. Once your happy with the size of your honeycomb pieces, paint them using Walnut Stain Distress Paint. You'll need at least two coats of paint on each piece. 


The last pieces that will need to be embossed are two of the Bare Branches. First cover each branch in two coats of Walnut Stain Distress Paint. Once the paint has dried, cover each branch in a layer of VersaMark Ink. With the ink on the branches, sprinkle Fine Clear Embossing Powder overtop of the branches. Tap off the excess and emboss with a heat tool.


For the sentiment, I cut a circle using my Elizabeth Craft Stitched Circles Dies and 100lb White Cardstock. Once the circle had been cut,  apply Potting Soil Archival Ink to the Thank You Sentiment and stamp in the middle of the circle. Adhere the sentiment circle to the Victorian Frame. Note: You'll notice in the picture, the sentiment was stamped in black. I decided to change the colour and re-stamp my sentiment, but forgot to take a new picture. 


Before adhering all the layers to the card base, I adhered the Honeycomb pattern to the top left and bottom right hand corners overtop of the first layer of patterned paper. In order to show more of the honeycomb pattern, I tore the paper in the bottom right hand corner up and laid the pieces flat. In the top left hand corner, I did the same thing, except tore the paper down and laid the pieces flat. 


Here's a close up of how the centre of the card looks once the frame, leaves and branches have been added. To finish around the frame, I added a variety of brown roses in 10mm and 15mm sizes. The flowers still looked bare, so I added some leaves to certain flowers. To finish the flower area, I added small pinecone charms in amongst the flowers. 


Southern Ridge Trading Company Supplies Used:

- Thank You Stamp (Coming Soon)
- 15mm Brown Roses
- 10mm Dark Brown Roses
- Leaves


Other Supplies Used:

- Emerald Creek Craft Supplies: Burnt Copper Leaves Embossing Powder, Fine Clear Embossing Powder, Pinecone Charms and 100lb White Cardstock
- Tim Holtz for Ranger Ink: Distress Ink - Walnut Stain, Distress Paint - Spiced Marmalade, Mustard Seed and Seedless Preserves
- Wendy Vecchi for Ranger Ink: Potting Soil Archival Ink
- Tsukineko/Imagine Crafts: VersaMark Ink
- Elizabeth Crafts Design: Stitched Circles
- Paper House: Autumn Woods
- Simple Stories: Oh Snap Decorative Paper
- Misc: Heat Tool

Remember to play along in the monthly challenge over on the 
Southern Ridge Trading Company blogEach month enter for your chance to win 4 designs from the online store - chipboard.ca -$20 (before tax) retail value of YOUR OWN CHOOSING! 

Until Next Time!

-Katelyn  


Wednesday, October 26, 2016

Thailand Scrapbook Layout with Ava Gavloski

Hello, Ava here to share with you another project featuring an embellishment and stencil from Southern Ridge Trading Company.  I used the Bubble Wrap Stencil which you can find in the Stencil section of the shop.  The Dreamcatcher Corner chipboard piece can be found in the Frames, Borders and Corners section of the shop.

Capturing travel adventures is something that takes time to publish and when the essence of the memories are displayed endorphins are always returned to the beholders.

Thailand never to be forgotten

full thai LO.jpg

This Dreamcatcher Corner is the perfect embellishment for an adventure never to be forgotten.

green silks paint.jpg

Apply Silks Acrylic Glaze to the Dreamcatcher chipboard.

orange silks.jpg

While this is drying time to prepare the background of the layout using the Bubblewrap Stencil.

stencil paste.jpg

Sample photo
This photo above shows you to tape down your stencil if needed or when using the Bubble wrap 6x6 stencil, you can apply the paste, lift and move around your page.

Allow to dry over night.  Then next day, apply mists and paints to your liking to get the look you are wanting.

Here are some close-ups.

stencil top.jpg

stencil bottom.jpg

A close-up of the Dreamcatcher.

circle closeup.jpg

This Dreamcatcher corner is one of my favourite chipboard pieces from Southern Ridge Trading Co.  I think everyone should pick up about 3 when you visit the store, you will really like the feel of this corner embellishment on any of your layouts.

full thai.jpg

Capture your memories with this Dreamcatcher corner and remember the moment.

Southern Ridge Trading Company Supplies Used:


Other Supplies Used:

- Canvas Corp Brands
- Tattered Angels
- 7 Gypsies

Remember to play along in the monthly challenge on the Southern Ridge Trading Company blogEach month enter for your chance to win 4 designs from the online store - chipboard.ca -$20 (before tax) retail value of YOUR OWN CHOOSING! 


Monday, October 24, 2016

Happiness Card with Corina Finley


Hello!

Corina here, hosting the blog today, to share my Happiness Card. My sentiment fits perfectly in with my Life! I love creating projects with these awesome To-Go Paper Coffee Cup!


Above is a close up picture of the Paper Coffee Cups. When you purchase these Paper Coffee Cup Combo, they come with 3 different sizes. I used the small and medium from the set here on my card. 


In November, I will be sharing a Hot Chocolate card using the Paper Coffee Cups (Exlarge). With the colder weather and the Holiday Season upon us, you can create wonderful Gift Card Holders and/or Home Decor projects with these!


Southern Ridge Trading Company Supplies Used:


Paper Coffee Cup Combo

- Tag

Remember to play along in the monthly challenge on the Southern Ridge Trading Company blogEach month enter for your chance to win 4 designs from the online store - chipboard.ca -$20 (before tax) retail value of YOUR OWN CHOOSING! 

Thanks for joining me today!

Take care,

Live, Laugh & Create!

Friday, October 21, 2016

Happy Halloween Pop Up Box with Deb Riddell

Hello and welcome to all you guys and ghouls!  It’s Deb here today to share with you a Happy Halloween pop up box I made with Southern Ridge’s Happy Halloween chipboard collection.


Boo-tiful!  I love this Happy Halloween collection, you get five chipboard embellishments that make for a spook-tacular Halloween display, don’t you agree?  I’ve a few step out photos of how I made it so grab a cup of your favourite potion and read on.

I started out by die cutting the box using Eileen Hull’s Box/Cube/Bank die from heavy chipboard packaging and covered the box inside and out with a combination of Graphic 45 Steampunk Spells paper (Tick-Tock) and black cardstock.


The chipboard embellishments were painted with DecoArt Americana acrylic paint (Ebony Black, Cool White and Canyon Orange) front and back and given a coat of satin varnish to seal them.


The outside of the box was decorated with a variety of images from Tim Holtz’s Frightful Ephemera pack and images cut from Graphic 45’s Steampunk Spells Nevermore paper.


A 1½” circle cut from cardstock was coloured with several shades of yellow Distress inks (Squeezed Lemonade, Mustard Seed and Fossilized Amber) to make a full moon and the ‘craters’ on the moon were stenciled with the Speckles layering stencil and Hickory Smoke DI.  The moon was mounted onto some fun foam and glued to the open lid of the pop up box.


To pop up the chipboard pieces, I glued them onto pieces of twisted rusty wire that were attached to bases made from more heavy chipboard packaging.  I used two bases so that the chipboard embellishments were staggered in the box for some depth and dimension.


And then I just slipped the bases inside the box and gently bent the curled wire until I had the chipboard embellishments placed where I wanted them.  I was going to glue the bases inside the box but they fit snuggly so I left them loose so I could remove them or reposition them as needed.  Here are a few closeups of the finished box.


I love the witch silhouetted against the full moon!  And I have to tell you that this witch chipboard piece is amazing, the detail and delicacy is incredible.


I hope that you have enjoyed seeing my Happy Halloween pop up box, I had a lot of fun making it.


Southern Ridge Trading Company Supplies Used:


Other Products Used:

- Eileen Hull: Block/Cube/Bank die
- Graphic 45: Steampunk Spells paper
- Tim Holtz Idea-ology: Frightful Ephemera Pack
- DecoArt Americana Acrylic Paint
- Distress Ink
- Speckles Layering stencil

I also hope that you have been inspired to join in our current challenge, you have a chance to win four designs from the online store - chipboard.ca - a $20.00 (before tax) retail value of YOUR OWN CHOOSING!  Can’t wait to see what you link up, happy haunting!

Deb xo


Wednesday, October 19, 2016

Grungy Rust Butterfly Scrapbook Layout with Karen Bearse

Karen Bearse here today with a grungy, rust effect butterfly layout. I got to use lots of fun Southern Ridge Trading Co. chippies on this one. It has been a long time since I made a scrapbook layout but here it is!

I played with rust effects for the first time & will definitely be using this product more. Mixed in some crackle paste just to see what would happen. I did get some small cracks which you can see on the doily. Fun!


Here are some detail shots. My chipboard pieces were painted with black acrylic paint & either distressed with paint or the rust effects. I also did some pen work to highlight some of the images.


I am still trying to figure out where July went but I did use fall colours on my layout as this month’s challenge is anything fall so I hope you join in!!

Southern Ridge Trading Co. Supplies Used:


Other Supplies Used:

- Prima Marketing: Flowers, Finnabair Mechanicals & Rust Effect Paste
- Ranger Ink: Distress Paint-Black Soot, Mermaid Lagoon
- Tim Holtz for Sizzix: Tim Holtz Gearhead
- Emerald Creek Craft Supplies:Silver & Blue Rhinestone Brad
- The Paper Studio: Newsworthy Paper
- Posca pen


Remember to play along in the monthly challenge over on the 
Southern Ridge Trading Company blogEach month enter for your chance to win 4 designs from the online store - chipboard.ca -$20 (before tax) retail value of YOUR OWN CHOOSING! 

- Karen


Monday, October 17, 2016

More Cute than Spooky Scrapbook Layout with Charlene Byrd

Hello Everyone!


Who doesn’t love a good costume?!! I know I sure do! My nephew’s family is so adorable, I love them all! How adorably cute are these 3 little hunters who are getting ready to shoot some ducks! (It takes a confident man to put on tights! Haha!)
So let’s get started on how I created this ‘More Cute then Spooky’ page.


I simply stained the spider web with Black Soot Distress stain. I glued it where I wanted the spider web and cut off the excess. That allowed me to have a piece for the bottom corner.


To make the sign post I first wanted to distress the bottom to give it texture so that it looked a bit more weathered and worn. To do this I used an x-acto knife and made little cuts along the bottom of the chipboard. (Make sure to not cut all the way through).


From there I started playing. I knew I wanted it to look a bit like patina. I started by painting the entire piece with Antique White paint. Then I dry brushed some brown and blue paint. At this point it looked good but I just wasn’t completely pleased yet. So then I remembered I had some Perfect Pearls Powder. I added some VersaMark to the top and used a dry paint brush to randomly add 3 colours of Perfect Pearls. Now it was perfect!


I continued the look of the Perfect Pearls onto the gate. I started by staining the gate black. Then I added the VersaMark Ink and 3 colours of Perfect Pearls. The look was a little more subtle than the sign which is what I wanted.


The word Cute was first stained with Black Soot Distress Stain and then I added some Clear UTEE to make it pop.

Southern Ridge Trading Company Products Used:


Other Products Used:

- Pink Paislee paper
- Black mesh
- String
- Paint
- Ranger Ink: Perfect Pearls & Clear UTEE
- Tsukineko/Imagine Crafts: Versamark Ink
- Tim Holtz for Ranger Ink: Black Soot Distress stain


Remember to play along in the monthly challenge over on the Southern Ridge Trading Company blogEach month enter for your chance to win 4 designs from the online store - chipboard.ca -$20 (before tax) retail value of YOUR OWN CHOOSING! 

Thanks for joining me!
Happy Halloween!

Live, Be Happy and Create!
Charlene