Wednesday, February 28, 2018

Sparkle Wall Hanging with Sandy McTier


SPARKLE!!

SPRING! SPRING! SPRING!
I am so ready for spring aren’t you?

Butterflies, bees, flowers and warmer weather are just a few of the things I love about SPRING – oh and all the COLOUR!

Here’s what I did to create my “Sparkle” Tag

Prepping the Surface:
  • I painted the surface with DecoArt’s All Purpose Sealer and let completely dry.
  • Then, I painted a smooth layer of DecoArt Media Gesso and let completely dry.
  • Next, I spritzed the surface with DecoArt Media Shimmer Mister Turquoise and Yellow Green and let it drip down the surface. Once dried, I painted a layer of watered down Gesso over it and wiped it back with a soft paper towel. This helped tone down the background colours.


  • I laid the Southern Ridge Trading Company Intersecting Circle Stencil (small) in place and stenciled some Titanium White on the surface.


Design Elements:
  • I drew out and painted the shape of a butterfly on the surface and then outlined it with an Identi-Pen.
  • I painted the wings and chipboard butterflies with Gesso and let dry.
  • Once dried, I spritzed the Shimmer Mister Turquoise and Purple on the chip board butterflies and Purple on the butterfly wings. I laid a paper towel on the wings to soften and lift some of the color.
  • Next, I loaded the toe of a 3/8” Angle brush with Phthalo Blue and shaded around the inside edge of the wings. I lightly brushed some of this colour on the wings as well.


  • Then I stenciled on some elements from an M2 stencil (M2-5) that screamed, ‘butterfly wing adornment’!
  • I decided to outline the elements with the Identi-Pen, and well… let’s just say thank goodness for hand sanitizer and a Mezzaluna brush because I was able to get the pen markings off and re-stroke some of the white back in place.
  • I painted the body with a mixture of Green Gold and Titanium White and then shaded each section with Sap Green.  Then I added a small highlight of white on each section.
  • I shaded underneath the wings and left side of the body with Paynes Grey to lift the design a bit from the surface.
  • I re-outlined the wings, the antenna and body with the Identi-Pen.
  • I added another element of texture with drywall tape and Titanium White in the background.
I spritzed the circle stencil with the Shimmer Mister Turquoise and then pressed it on the background here and there – to add a reversed image from the stencil.


  • I added some details to the chipboard butterflies with the Identi-Pen.
  • I painted the ‘Sparkle’ chipboard piece with a mixture of DecoArt Metallic Lustre – White Frost and Shimmer Mister Purple.
  • I loaded a wet brush with a touch of Metallic Lustre – White Frost and painted over the chipboard butterflies as well as the butterfly wings on the surface to give them more of a sparkle.

Finishing Touches:
  • I splattered some Shimmer Mister Purple and Titanium White on the surface and then laid a paper towel over the surface to soften the look.
  • I glued both of the butterfly pieces in place with E6000 glue. Notice that I cut the little butterflies off the one chipboard piece.
  • Once everything was painted, glued and dried, I painted the surface with Soft Touch Varnish to protect the painted design.
I hung mine with green floral wire.

Southern Ridge Trading Company Supplies Used:

- Butterflies

Other Supplies Used:

- Surface: Scallop Dome Ornament #31-L206 (available – www.cdwood.com )
- M2-5 Stencil (available – www.sandymctierdesigns.com )
- DecoArt Media Fluid Acrylics: Titanium White, Phthalo Blue, Paynes Grey, Sap Green & Green Gold
- DecoArt Media Metallic Lustre: White Frost
- DecoArt Media Misters: Shimmer Mister Turquoise, Purple & Yellow Green
- DecoArt All Purpose Sealer, Media Gesso & Soft Touch Varnish
- Dynasty Brushes: Black Gold 3/4", #8 Shader, 3/8" Angle, 1/4" Angle, Stencil Brush and a liner brush of choice. (Available from TheBrushGuys.com – use promo code: sandymc for an additional discount)
- Identi-Pen
- E6000 Glue
- Drywall Tape
- Green Floral Wire


©2018 SPARKLE, Sandy McTier Designs ~ all rights reserved

Y’all have a GREAT day; Happy Creating!!  Sandy

Tuesday, February 27, 2018

Happy Birthday Tag with Katelyn Grosart

Hey there Southern Ridge Trading Company fans, Katelyn here. I'm ready for spring to arrive here on Vancouver Island and with the sun shining all weekend, it feels like there might be a bit of hope that Spring will be arriving soon. So, with the nice weather as inspiration, I've created a spring themed Happy Birthday Tag. You'll want to read below as I share with you how I embellished the chipboard elements on my Happy Birthday Tag.


For the background I covered the Chipboard Tag in a piece of book page from an old book. With the book page down, I layered on Broken China, Mustard Seed and Cracked Pistachio Distress Paint on the book page. After the paint had dried, I laid the Tiny Bubbles Stencil over top of the tag and went over the stencil with a baby wipe that had white paint on it. Lift up the stencil and you end up with little areas of white showing. Rub Walnut Stain Distress Crayon along the edges of the tag.


At the bottom of the tag, I used Vintage Photo Distress Ink to ink the Heart o Graph Drop. The Happy Birthday chipboard sentiment was embossed with Burnt Copper Leaves Embossing Powder. For the butterfly I applied two coats of Cracked Pistachio Distress Paint. Once the butterfly dried, I embossed it with a thin layer of Fine Clear Gloss Embossing Powder. 


To embellish the Dandelion Seed Stems, paint the stem with two coats of Peeled Paint Distress Paint and paint the fluff part with two coats of white gesso.


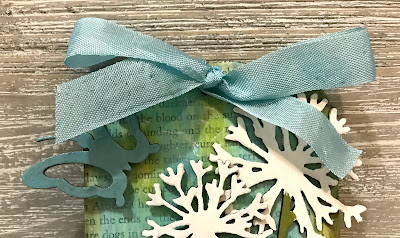
On the top portion of the tag, I applied two coats of Broken China Distress Paint to a butterfly. Once the butterfly dried, I embossed it with a thin layer of Fine Clear Gloss Embossing Powder. To finish the tag, add a ribbon bow.


And here's the finished Happy Birthday tag.


Southern Ridge Trading Company Supplies Used:

- Tiny Bubbles Stencil

Other Supplies Used:

- Emerald Creek Craft Supplies: Burnt Copper Leaves Embossing Powder and Fine Clear Gloss Embossing Powder
- Ranger Ink: Emboss It Ink Dabber
- Tim Holtz for Ranger Ink: Distress Ink - Vintage Photo, Distress Crayon - Walnut Stain, Distress Paint - Cracked Pistachio, Mustard Seed, Broken China & Peeled Paint, Distress Collage Medium - Matte and Blending Tool with Foam
- Dylusions: White Linen Paint
- Prima Marketing: Art Basics - Heavy Gesso: White
- Tombow: Mono Multi Liquid Glue
- Misc: Book Page and Heat Tool 

Until Next Time!

- Katelyn


Friday, February 23, 2018

Spring Joy Mixed Media Reverse Canvas with Deb Riddell

Hello everyone, Deb Riddell here with you today to share a mixed media reverse canvas I made with Southern Ridge Trading Company’s Pussy Willows, Elegant Vintage Flourishes, Berry Branch Set and Bare Branches chipboard.


I started out with a 6” x 8” stretched artists canvas I had in my stash from a previous project that hadn’t gone quite as planned!


I finished off the edges of the wrapped canvas with some lengths of Tim Holtz Design tape.

The butterflies on the background of the canvas recess made me think of Spring so I painted Southern Ridge’s new Pussy Willow chipboard with Gathered Twigs Distress Stain.  While the stain was still damp, I added dabs of diluted Yellow Green Light and Titanium White DecoArt Media Liquid acrylic paint to the buds on the pussy willows for a ‘fuzzy’ appearance.  The white was a little too stark so I toned it down with a bit of Golden Titan Buff.


A Berry Branch got the same treatment and I also added some dabs of Liquid Glass to a few of the berries for a little shine.

And finally, a Bare Branch was also painted in the same manner but only a few touches of Yellow Green Light and Titanium White were added to this piece.


Two Elegant Vintage Flourishes were painted with Titan Buff and then a bit of DecoArt Media Interference Gold was added overtop for a touch of shimmer.

The best part of Spring for me is the return of the songbirds, so I decided to add a wee robin to my canvas.  A Fragment was inked with a combination of Mushroom and Latte alcohol inks and then a drop or two of rubbing alcohol was added to the middle of the inked Fragment to from a ‘window’.


A bird stamp (this is from a discontinued Crafty Secrets stamp set) was stamped onto the Fragment with StazOn Jet Black ink on the same side as the alcohol ink.

After the StazOn had thoroughly dried, the bird was coloured here and there with alcohol inks (Rust, Red Pepper and Ginger) with Ranger’s Alcohol Ink Blending Pen on the same side as the stamping.


To continue the bird theme, some vintage bird and egg images were printed and punched out with a ¾” punch and made into tags with Tim Holtz’s Tag Press.  The Tap Press rings were coloured with Rust and Ginger alcohol inks before compressing them with the Tag Press.

Typography letters to spell the word ‘Spring’ were coloured with Ginger alcohol ink and adhered to one of the long edges of the reverse canvas.


A Quote Chip was coloured with Antique Linen and Vintage Photo Distress ink and adhered to the opposite long edge.

One of the Elegant Vintage Flourishes was adhered to the top edge of the canvas and a couple of paper flowers were inked and added to each corner. A tag was added to the center of each flower.  For a bit more shimmer, a touch of Indian Gold Nuvo Mousse was brushed onto the Elegant Vintage Flourish.


A piece of light beige paper was added to the back of the Fragment with Glossy Accents and once dry the Fragment was adhered onto the top right corner of the reverse canvas recess.


The Pussy Willows, Berry Branch and Bare Branch were added under the bottom edge of the reverse canvas.  I had some Nuvo Mousse left over on my craft mat so I diluted it with some water and spattered it over the canvas, also adding a few touches of Platinum Stickles Glitter glue here and there on the Pussy Willows, Berry Branch and Bare Branch.


And finally, the second Elegant Vintage Flourish was added along the bottom edge of the canvas along with a couple more paper flowers and the remaining tags.


I hope that you’ve enjoyed seeing my Spring Joy mixed media reverse canvas, I’m hoping that it will help bring Spring early to us here in B.C.!


Southern Ridge Trading Company Supplies Used:


Other Supplies Used:

- 6” x 8” stretched artists canvas
- Spring themed scrapbook paper
- Tim Holtz/Advantus: Design Tape, Fragments, Tag Press and Rings, Typography Letters and Quote Chips
- DecoArt Media Fluid Acrylics: DecoArt Media Liquid Glass - DecoArt
- Ranger Ink: Distress Ink, Alcohol Ink, Alcohol Ink Blending Pen, Platinum Stickles Glitter Glue and Glossy Accents
- Sizzix: ¾” Circle Punch
- Golden: Titan Buff High Flow Acrylic Paint
- Tonic Studios: Nuvo Mousse
- Imagine Crafts: StazOn Ink
- Miscellaneous: Vintage Images, Bird Stamp and Paper Flowers

Thank you for stopping by today and think Spring!


Wednesday, February 21, 2018

I'm Sorry - Winter Canvas with Erin Quiding-Sampson

I saw this saying and thought it was really funny!! I knew I must make something using it. Sooo today's project is for those of us that are done with winter and are anxiously awaiting the arrival of spring.


To create the background, I pre-moistened a 5 by 7 canvas with a bit of water and painted acrylic paints on the diagonal.


I used Gesso on the large snowflake frame and the small sign, over that I added distress glitter and then melted UT embossing powder over top.   


I stamped the girl image on 110 lb card stock and cut her out. I used water colours and a water brush to colour her in.


Stickers were used on the same 110 lb cardstock then cut I out the words to add to the sign.

I used a small amount of distress glitter on all the small snowflakes then I melted silver embossing powder to give it that “icy look”


I layered everything onto the canvas using gel medium to adhere it.
I hope you enjoyed my canvas as much as I enjoyed making it!
Still chuckling every time I see it.


Southern Ridge Trading Company Supplies Used:

- Chipboard Sign
- Chipboard Snowflakes

Other Supplies Used:

- 5" x 7" Canvas
- Paint brushes
- DecoArt Acrylic Paint: Barely Green, Peacock Blue and Dark Turquoise
- Tim Holtz for Ranger Ink: Distress Glitter - Tumbled Glass
- Ranger Ink: Ultra Thick Embossing Powder
- White Gesso
- Prima Girl stamp
- Imagine Crafts: Memento - Tuxedo Black Ink
- Water colour pencils and a water brush
- Matte gel medium
- Silver Embossing Powder
- Embossing Pad
- Heat Gun
- Stickers
- 110 lb Cardstock

~ Erin