Showing posts with label Snowflakes 712. Show all posts

Monday, February 11, 2019

Chilly Days Scrapbook Layout with Karla Yungwirth

Hello friends! Karla back today with a Chilly Days layout using two different sizes of snowflake chipboard pieces, a beautiful Snow Flourish Chipboard Frame and a Chicken Wire Stencil from the Southern Ridge Trading Company Shop. It has been very chilly lately here in Calgary, Alberta, and a great time to stay inside and do some cozy crafting! The February sketch from the Creative Scrapbooker Sketchy Gallery was the perfect starting point for this layout.


I picked out some wintery papers and embellishments from the Simple Stories Freezin’ Season collection. I love the soft colours and fun sentiments in this collection!


I used some BoBunny stitching stamps to add a faux zigzag stitch around my layout. Then I added some ink around the edges of my layers to add even more interest. The large snowflakes from the Snowflake 714 pack just pop with some Distress Oxide Ink and Ranger Bridal Tinsel embossing powder. I love the packs of Snowflakes from the SRTC Shop!


I chose two of the smaller snowflakes from the Snowflakes 712 pack and embossed them with Ranger Snowflake Tinsel embossing powder – a fun white powder with silver flecks. I recently picked up some Ranger Liquid Pearls and decided to try them as embellishments along with some fun sequins. I love how they dry!


I added just a bit of Distress Oxide Ink through the SRTC Chicken Wire Stencil in a couple of places on the layout. Here you can see it just peeking out on the white cardstock above the frame. I love that you can get this stencil in 3 different sizes! Just like the large snowflakes, I inked the Snow Flourish Oval Frame with Distress Oxide Inks and embossed it with Ranger Bridal Tinsel embossing powder, which is a translucent powder that allows the ink colours to show through – so pretty!


Southern Ridge Trading Company Supplies Used:


Other Supplies Used:

- Ranger Ink: Embossing Powders - Bridal Tinsel, Snowflake TinselDistress Oxide Inks
and Liquid Pearls
- Simple Stories: Freezin’ Season Paper & Embellishments
- Sequins by Brutus Munroe, Pretty Pink Posh, Studio Katia
- BoBunny Stitching Stamps
- Bazzill Cardstock

Thanks so much for stopping by today. I hope you’re keeping warm and cozy, and doing lots of crafting too! Have a great week friends.
Hugs,
Karla


Monday, December 17, 2018

Christmas Ornaments with Karla Yungwirth

Well, we are definitely getting close to the big day, and I’m so excited!! Karla here today with some pretty ornaments created with the Southern Ridge Ornament Chipboard Set, Snowflakes 712 and Mini Sleighs wood veneer. I’ve even created a video for you below showing how I layered on some pretty paints, embossing powders and mists to customize them.


Here’s a link to the video where you can see my process. 


I had so much fun with these ornaments. They are quick and easy to decorate and would be great as package toppers, perfect to embellish a Christmas scrapbook page, as an ornament gift set, or even on your own tree! I’ll bet the kids would even love to help and it would be a lovely Christmas activity.


Southern Ridge Trading Company Supplies Used:

Other Supplies Used: 

- Emerald Creek Craft Supplies: Soft Fallen Snow Embossing Powder, Hammered Metal Embossing Powder, Doubloon Embossing Powder and Rita Barakat: Magical Mysteries - Mermaid Fin Embossing Powder
- Ranger Ink: Matte Medium and Snow Cap Paint Dabber
- Paper Artsy Paints: Steele Grey, Buff, Glacier Ice, Magic Moss, Venice Blue, Butter, Mahogany and Terracotta
- Tattered Angels Mists: Dark Vintage Green, Iridescent Gold, Splash, Sterling, Woven Burlap and Lobster
- Kaisercraft: First Noel

Thanks so much for stopping by today! I hope you have a very Merry Christmas and a wonderful and Happy New Year!

Hugs, Karla

Monday, December 3, 2018

First Snow Day Scrapbook Layout with Karla Yungwirth

Hello friends! Karla back today with a frosty layout using the gorgeous Large Snowflake Wreath from Southern Ridge Trading Company, a snowflake from the Snowflakes 712 pack, some Mini Wood Sleighs and my favourite Soda Fizz Stencil to document our first snowfall this year in Calgary, Alberta! 


I customized the Snowflake Wreath by painting it first with some beautiful, creamy Paper Artsy Paints by Seth Apter and then added Ranger Matte Medium to each part that I wanted to emboss with Emerald Creek Embossing Powders. After I added the embossing to the snowflakes and swirls with Winters Mistake, Mermaid Fin and Kiss Of The Fairy Embossing Powders I then embossed the whole frame with Fractured Ice Powder. I printed my photo as a 3x4 and it framed it beautifully. 


I used one of the kits from Scrap Shotz Kit Club from last year that featured the Carta Bella Cabin Fever Collection and I painted the tiny Mini Wood Sleighs to match the colours with the Paper Artsy Paints. They are so adorable!!


I embossed the pretty snowflake from the Snowflakes 712 pack with Emerald Creek Mermaid Fin powder and used some Shimmerz clear sparkly texture paste over the Soda Fizz Stencil to give a snowy effect at the top and bottom of the page. 


I just love how I’m able to easily and beautifully customize the SRTC embellishments to match my projects! There is such a wide assortment of Chipboard and Wood Veneer available in the shop that you’ll be sure to find just the right one for your own project! Thanks so much for stopping by, and have a wonderful week ahead!


Southern Ridge Trading Company Supplies Used:


- Karla


Monday, November 5, 2018

Christmas Greetings Tags with Karla Yungwirth

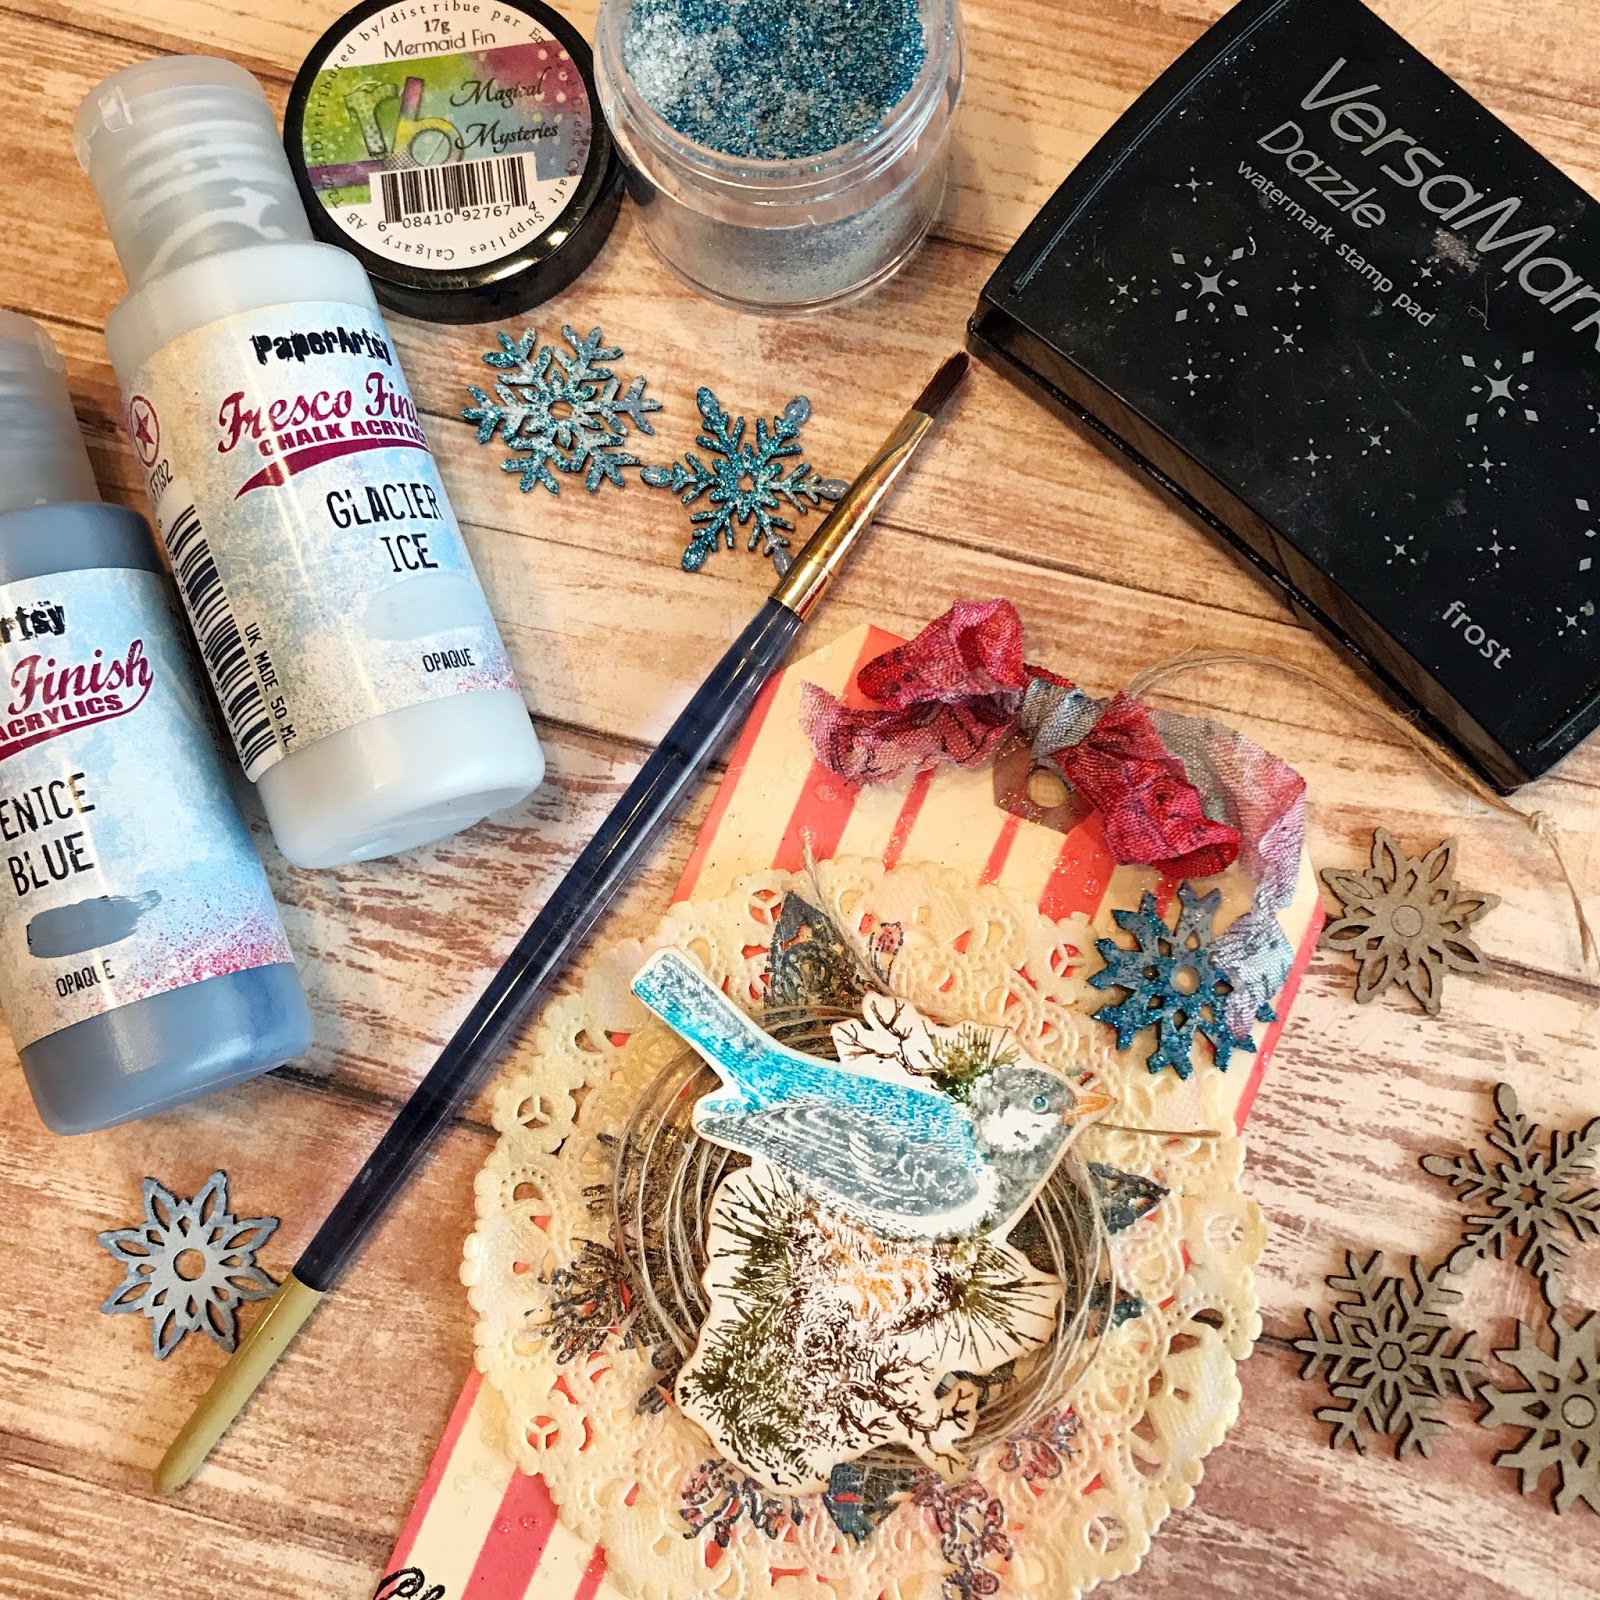
Hello friends! It’s Karla back today with a pretty set of Christmas tags using the lovely Chipboard Snowflakes #712 and Soda Fizz Stencil from the Southern Ridge Trading Company Shop. There are 12 - 1” snowflakes included in the pack, with 3 each of 4 different varieties! These are going to be a must-have for your Christmas and winter crafting!


Here are the steps I used to create these tags:


1) First, I used a Tim Holtz striped stencil to create a candy cane effect with Festive Berries Distress Oxide Ink. 


2) I used the STAMPtember Tim Holtz stamp set for most of the stamping. I heat embossed the Christmas Greetings sentiment using Emerald Creek Black Cherry Embossing Powder. 


3) Next I used the fabulous Southern Ridge Soda Fizz Stencil and some shimmery paste to add a textured, shiny detail to the upper part of the tag, above the sentiment. I think this stencil is one of my favs!! You can use it for snow, stars, bubbles, texture... so awesome!


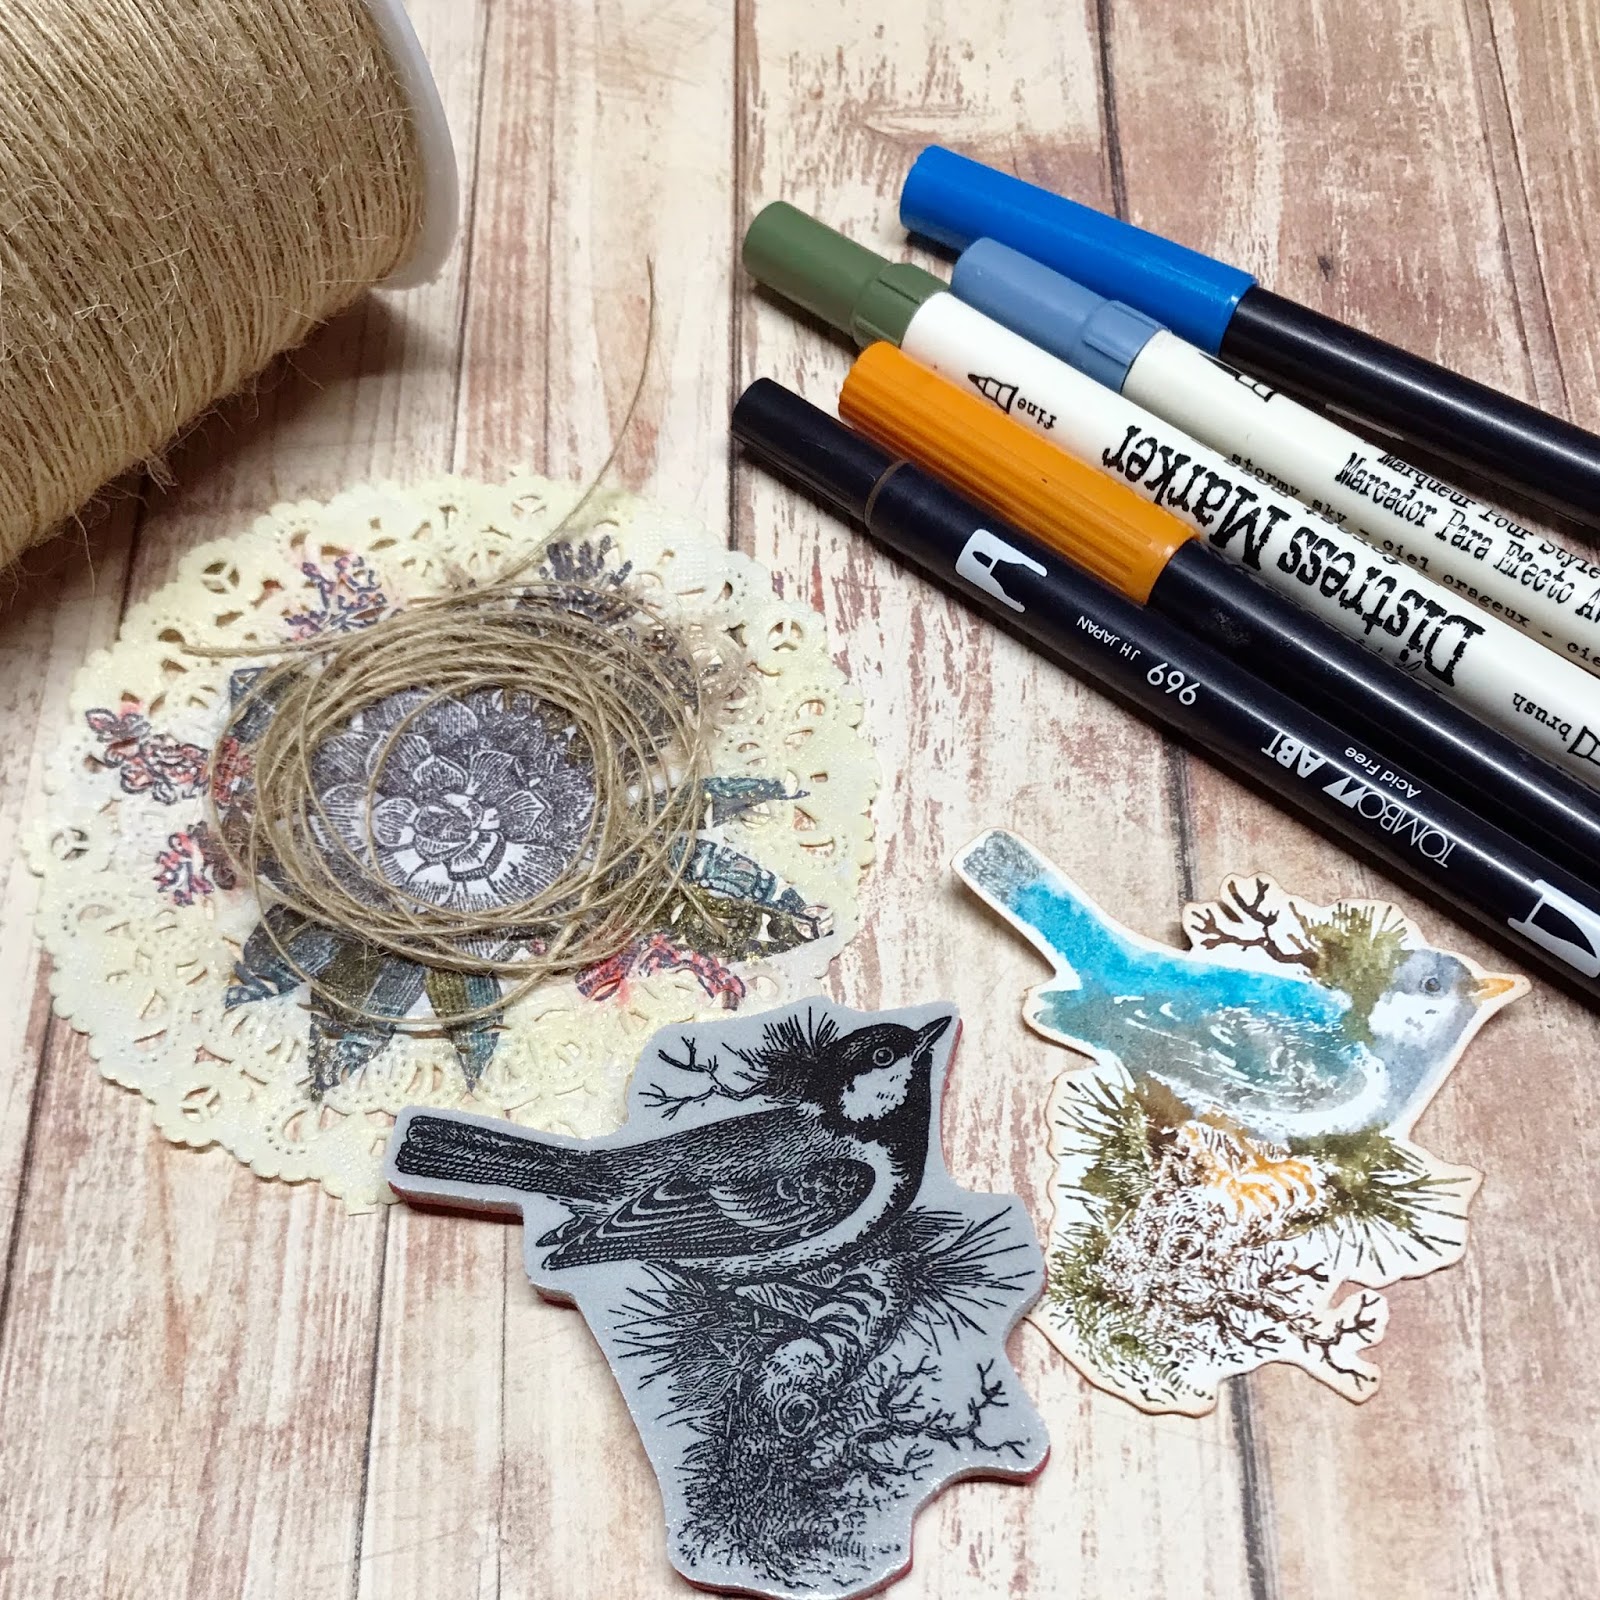
4) I stamped the floral stamp on a white doily using black Archival Ink and then coloured in the outer leaves and flowers with Tombow and Distress Markers. I sponged Scattered Straw Distress Oxide around the edge of the doily and then misted it with Tattered Angels Iridescent Gold Glimmer Mist to add shine and blend the colours. 


5) I coloured directly on the bird stamp using Distress and Tombow Markers and then misted it lightly to create a watercolour effect when stamped. I then looped some twine and glued it to the center of the doily to create a nest. 


6)I used BoBunny stitching stamps to stamp directly on the red rick-rack and then again on the bottom of the tag. Then I stamped two buttons with Distress Oxide Ink and used foam tape to attach the bird to the doily, which I glued down with Tacky Glue. 


7) I used Archival Ink to stamp the music notes on seam binding ribbon before misting with red and blue Glimmer Mist. After misting, I crinkled it up and let it dry before tying it in a bow at the top of the tag. 


8) I painted the chipboard snowflakes with Paper Artsy paints and then heat embossed them with Emerald Creek Mermaid Fin Embossing Powder. I used some Ranger Matte Medium to glue the snowflake to the top of the tag. 


9) I finally added some SpiegelMom Scraps sequins and some Stickles for glimmer. My tags are now ready to send off for a fun little Christmas tag swap!

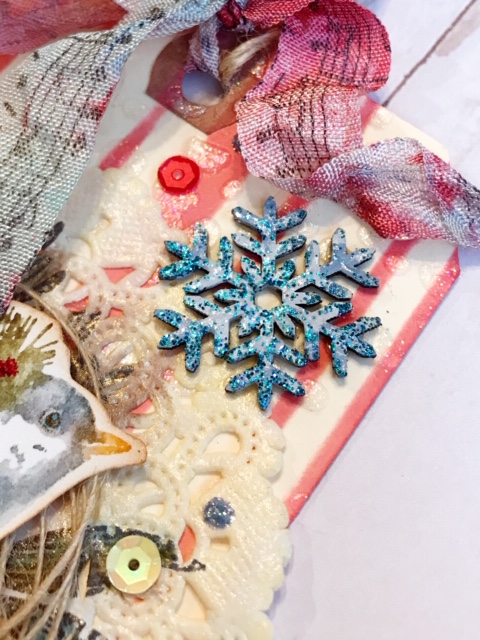
Here are some closeups for you. The glittery paste through the Soda Fizz stencil looks like icy drops on the background - so pretty!


I just love the detail on these snowflakes, and that you can easy customize them however you like. The blues i used in the paints and embossing powder coordinate with the ribbon, the stamped buttons and the bird. 


I really love the layered details of the stencils, stamps and embellishments. Don’t be afraid to alter, embellish and have fun!


Southern Ridge Trading Company Supplies Used:


Other Supplies Used:

- Tim Holtz for Ranger Ink: Distress Oxide Ink - Festive Berries & Scattered Straw, Blending Tool with Foam and Distress Markers
- Ranger Ink: Jet Black Archival Ink, Matte Medium and Stickles
- Imagine Crafts: VersaMark Ink
- Tim Holtz for Stampers Anonymous: Stamptember Stamp Set and Shifter Mint Layering Stencil
- Emerald Creek Craft Supplies: Black Cherry Embossing Powder and Magical Mysteries - Mermaid Fin Embossing Powder
- PaperArtsy: Fresco Finish Acrylic Paint - Venice Blue and Glacier Ice
- Tombow: Markers
- Bo Bunny: Stitching Stamps
- Tattered Angels: Glimmer Mist
- SpiegelMom Scraps - Sequins
- Misc: Shimmery Paste, Doily, Twine, Crinkle Ribbon and Red Rick-Rack

Thanks so much for stopping by today! Hope you have an awesome and super crafty week ahead! 

Hugs,
Karla


Wednesday, February 21, 2018

I'm Sorry - Winter Canvas with Erin Quiding-Sampson

I saw this saying and thought it was really funny!! I knew I must make something using it. Sooo today's project is for those of us that are done with winter and are anxiously awaiting the arrival of spring.


To create the background, I pre-moistened a 5 by 7 canvas with a bit of water and painted acrylic paints on the diagonal.


I used Gesso on the large snowflake frame and the small sign, over that I added distress glitter and then melted UT embossing powder over top.   


I stamped the girl image on 110 lb card stock and cut her out. I used water colours and a water brush to colour her in.


Stickers were used on the same 110 lb cardstock then cut I out the words to add to the sign.

I used a small amount of distress glitter on all the small snowflakes then I melted silver embossing powder to give it that “icy look”


I layered everything onto the canvas using gel medium to adhere it.
I hope you enjoyed my canvas as much as I enjoyed making it!
Still chuckling every time I see it.


Southern Ridge Trading Company Supplies Used:

- Chipboard Sign
- Chipboard Snowflakes

Other Supplies Used:

- 5" x 7" Canvas
- Paint brushes
- DecoArt Acrylic Paint: Barely Green, Peacock Blue and Dark Turquoise
- Tim Holtz for Ranger Ink: Distress Glitter - Tumbled Glass
- Ranger Ink: Ultra Thick Embossing Powder
- White Gesso
- Prima Girl stamp
- Imagine Crafts: Memento - Tuxedo Black Ink
- Water colour pencils and a water brush
- Matte gel medium
- Silver Embossing Powder
- Embossing Pad
- Heat Gun
- Stickers
- 110 lb Cardstock

~ Erin

Monday, December 25, 2017

Believe Wall Hanging with Katelyn Grosart

Hey Southern Ridge Trading Company fans, Katelyn here and I'm back on the blog today to share with you some Christmas inspiration. To start, I want to wish you and your loved ones a very Merry Christmas and a Happy New Year. Today I get to share with you my Believe Wall Hanging that will be sure to inspire you to recreate it for your own home. Grab a cup of your favourite Christmas beverage and learn how to recreate my wall hanging at home.


To start, take the Believe Flourish Sign out of the package. You'll need the back piece first. Apply one coat of White Gesso to the entire sign. Once the gesso has dried, apply two coats of Titanium White Acrylic paint over the entire sign. With the white paint dry, run Walnut Stain Distress Stain over the entire sign. Before the stain dries, wipe off a bit of the stain to allow the white paint to show through. Once the stain has thoroughly dried, apply Jet Black Archival Ink to the script word stamp and randomly stamp over the back piece. To finish off the back piece of the sign, lightly apply Ground Espresso Distress Ink over the entire sign. Set the back piece aside.


Now you'll need the believe portion of the sign. To start, apply one coat of White Gesso to the entire sign. Once the gesso has dried, apply two coats of Titanium White Acrylic paint over the entire sign. With the white paint dry, run Gathered Twigs Distress Stain over the parts on the sign that don't have the snowflakes. Before the stain dries, wipe off a bit of the stain to allow the white paint to show through. Once the stain has thoroughly dried, apply Jet Black Archival Ink to the script word stamp and randomly stamp over the believe piece. Lightly apply Ground Espresso Distress Ink over the believe sign that is already brown. 

For the "Believe" word, apply Emboss It Ink to the entire Believe word. Sprinkle Charred Gold Embossing Powder over the entire word. Tap off the excess powder and emboss with a heat tool. For the snowflakes, apply Emboss It Ink to each snowflake. Sprinkle Fractured Iced Embossing Powder over each snowflake. Tap off the excess powder and emboss with a heat tool. 
To add some highlights to the believe sign, add some White Gold wax over the entire sign with your finger.


Adhere the Believe part of the sign to the back of the sign with glue.

From the Snowflakes 714 package, you'll need all of the snowflakes. For the large snowflakes, apply two coats of Brushed Pewter Distress Stain. Set those snowflakes aside to dry.
Take out five Snowflakes from the Snowflakes 712 package. Apply two coats of Brushed Pewter Distress Stain to each snowflake. From the same package, take out five snowflakes and apply Emboss It Ink to each snowflake. Sprinkle Fracture Ice Embossing Powder over each snowflake. Tap off the excess powder and emboss with a heat tool. 
Adhere the three of the small snowflakes around the believe word. You'll want to layer the large and small snowflakes and then adhere them onto the larger snowflakes. 


In the bottom right hand corner of the sign by the snowflake adhere four aqua roses, two dark brown roses, two light brown roses and three cream roses.


In the top left hand corner of the sign by the "B" in believe adhere two aqua roses, three dark brown roses, one light brown roses and three cream roses.


To finish off the top of the wall hanging, punch two holes and tie ribbon through.


Here are a few close up shots of my Believe Wall Hanging.


And here's the finished Believe Wall Hanging.


Southern Ridge Trading Company Supplies Used:

- 10mm Roses: Aqua and Dark Brown
- 15mm Roses: Light Brown and Cream
- 20mm Roses: Cream

Other Supplies Used:

- Emerald Creek Craft Supplies: Charred Gold Embossing Powder and Fractured Ice Embossing Powder 
- Ranger Ink: Emboss It Ink Dabber and Jet Black Archival Ink
- Tim Holtz for Ranger Ink: Distress Stain - Brushed Pewter, Walnut Stain & Gathered Twigs, Distress Ink - Ground Espresso and Blending Tool with Foam
- Tim Holtz for Stampers Anonymous: Papillon Stamp
- DecoArt: White Gesso, Antiquing Cream - Titanium White and Fluid Acrylics - Titanium White
- Prima Marketing: Art Alchemy Metallique Wax - White Gold
- Hug N' Snug Seam Binding Ribbon: Light Brown
- Tombow: Mono Multi Liquid Glue 
- Misc: Heat Gun and Spray Bottle

Until Next Time!

-Katelyn