Monday, September 30, 2019

Blessed Wall Hanging with Katelyn Grosart

Hey Southern Ridge Trading Company fans, Katelyn here. Fall has arrived and I'm loving the cooler weather that comes with it. I've been busy thinking about starting to decorate my home for Fall,  so I've created this Blessed Wall Hanging that is perfect to add to any place in my home. You'll want to read below as I share with you how to embellish the chipboard pieces for my Blessed Wall Hanging at home.


To start, you'll need the Blessed Fun Word. Apply a coat of Emboss It Ink to the word. Sprinkle Weathered Wood Embossing Powder over the entire surface of the word. Tap off the excess powder and emboss with a heat tool.


Next, you'll need the Summer Frame. Apply a coat of Emboss It Ink to the frame. Sprinkle Burnt Copper Leaves Embossing Powder over the entire surface of the frame. Tap off the excess powder and emboss with a heat tool. 


You'll need two Tribal Feathers and one Skeleton Leaf. Apply a coat of Emboss It Ink to the skeleton leaf and both tribal feathers. Sprinkle Baked Texture - Taos Sunset Embossing Powder over top of the leaf and feathers. Tap off the excess powder and emboss with a heat tool.


The last pieces you'll need are two pumpkin leaves and one Mini Wood Maple Leaf. Apply two coats of Peeled Paint Distress Paint to each pumpkin leaves and the mini wood maple leaf. Rub Peeled Paint Distress Crayon along the middle of the pumpkin leaves and the edges of the maple leaf.


Once your patterned paper is adhere to the base of your wall hanging, you'll adhere the frame.


In the bottom right side of the frame, adhere the skeleton leaf and the two pumpkin leaves. Adhere three cream roses, two white roses and four brown roses in amongst the leaves. Use adhesive and foam squares to adhere the Blessed word in the middle of the frame.


In the top left side of the frame, adhere the maple leaf and the two tribal feathers. Adhere three cream roses, four brown roses and one white rose in amongst the leaf and feathers.

To finish the wall hanging, create a hanger out of a piece of white twine at the top of the wall hanging.


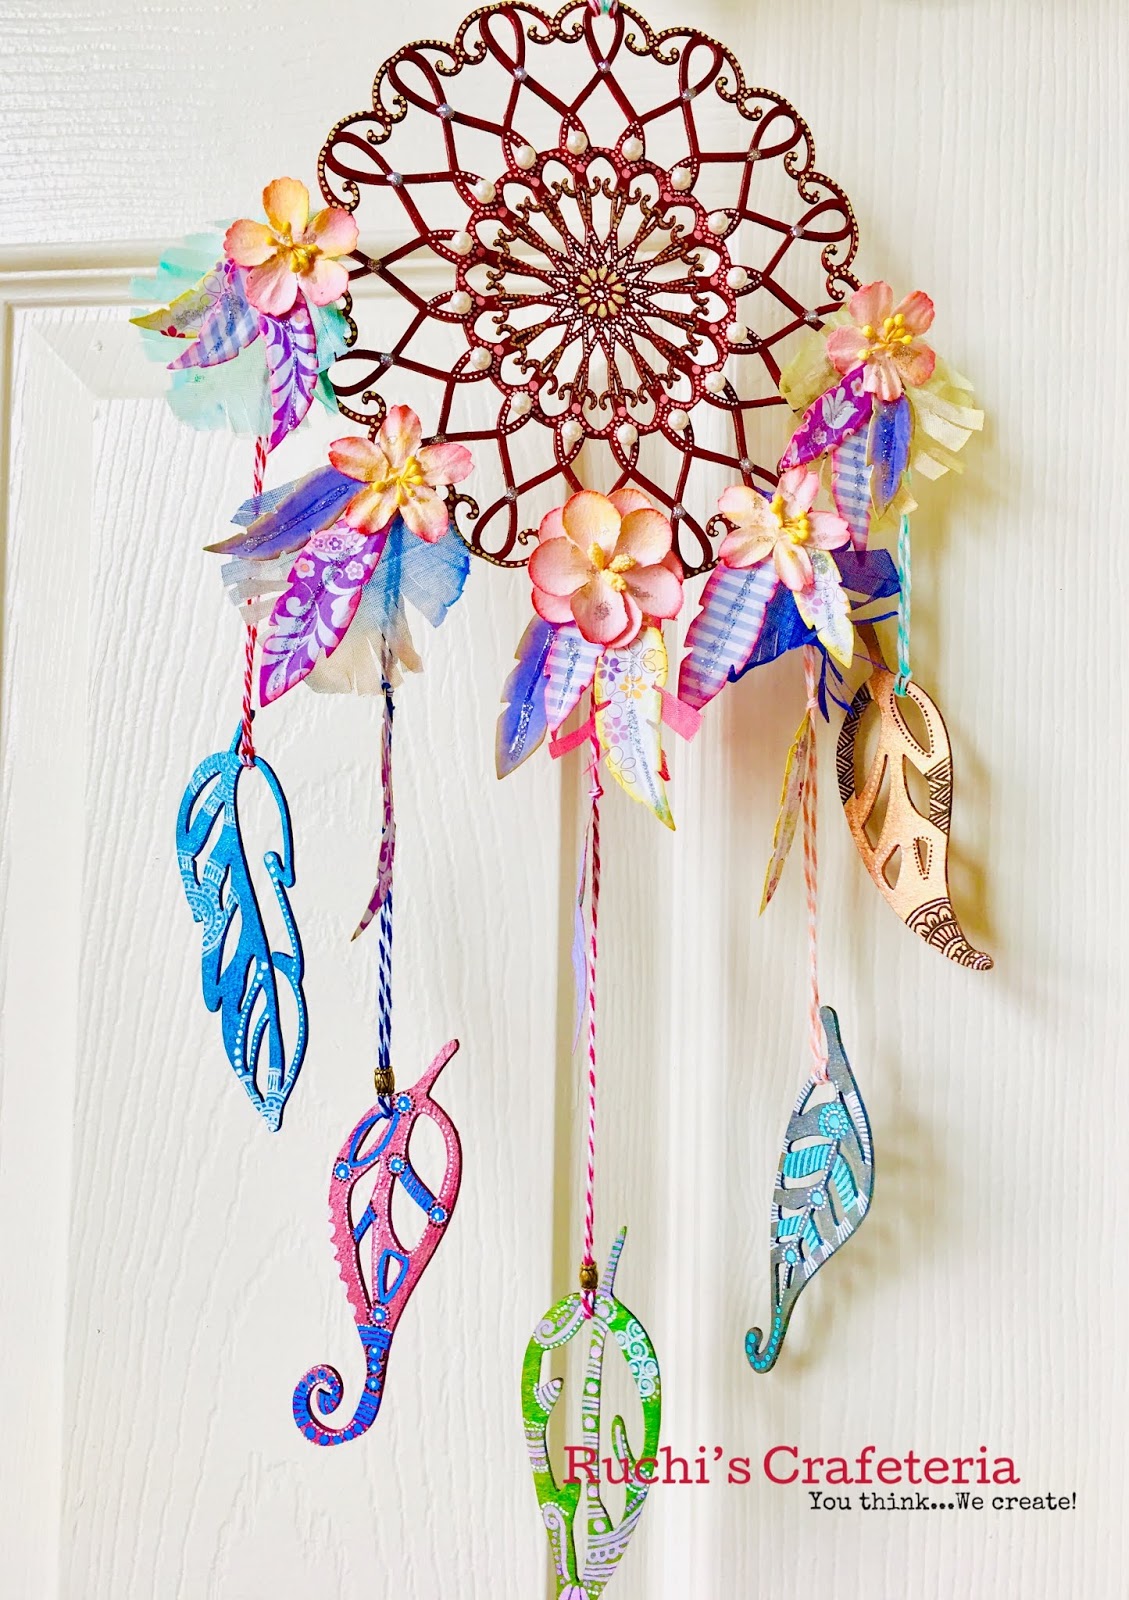
Here is the finished Blessed Wall Hanging.


Southern Ridge Trading Company Supplies Used:

- Skeleton Leaves
- Pumpkin Leaves
- Tribal Feathers

Other Supplies Used:

- Emerald Creek Craft Supplies: Baked Texture - Taos Sunset Embossing Powder, Burnt Copper Leaves Embossing Powder and Weathered Wood Embossing Powder
- Tim Holtz for Ranger Ink: Peeled Paint Distress Ink, Peeled Paint Distress Crayon, Gathered Twigs Distress Ink and a Blending Tool with Foam
- Ranger Ink: Emboss It Dabber
- Prima Marketing Inc: Autumn Sunset Collection
- Misc: White Twine and Bingo Card

Until Next Time!

- Katelyn


Friday, September 27, 2019

Amazing Card with Gloria Lee

Hello everyone!
Happy Friday!!!

Gloria here today and happy to share of my project.


To create this card, I made a 5.25" x 4" background paper using paper trimmer and blended the edges with pumice stone distress ink using a mini blending tool.
I blended with pumice stone distress ink and covered with Champagne mist metallix gel from decofoil using Bubble Wrap stencil .


And I choose Retro LightbulbsWord Mix #2 chipboard die cut and mini wood gears and coloured them with paint.


I choose a pattered paper from yearbook collection paper pad from Studio Calico for base paper and made it 5.5"x4.25" size using paper trimmer.


And adhere all elements as shown a top-folded card using double sided tape and a glue pen. 


 Southern Ridge Trading Company Supplies Used:


Thank you so much for stopping by and have a wonderful day!
Happy crafting!

- Gloria

Monday, September 23, 2019

Dream Catcher with Ruchi

Hello friends!! Ruchi here from Ruchi's Crafeteria and I'm back with my inspirational project.
Today I've created a Dream Catcher with minimum supplies like SRTC chipboards, some die cut feathers, flowers and petals.


Picked SRTC Heart o Graph Doily and Tribal Feather Mix chipboards and coloured them using various  Expressions Craft- Shimmer Metallic paints. When colours dried, doodled some henna designs on chipboards with Posca Markers.


Die cut some feathers from different pattern papers and coloured some petals using Spectrum Noir Sparkle liquid inks.


Arranged all the elements like Prima flowers, pearls, die cut paper feathers, coloured petals together and used Baker Twines for hanging all the feather chipboards.


That’s it for today!! Hope you like my today's project. Don’t forget to check SRTC shop for these chipboards and some other awesome designs.

Southern Ridge Trading Company Supplies Used:


Other Supplies Used:

- Expressions Craft: Shimmer Metallic Paints
- Spectrum Noir: Sparkle Liquid inks
- Posca Markers
- Prima Flowers
- Paper Smooches: Feather die
- Pearls, Glitter, Glue, Bakers Twine and Petals are from my stash

See ya next time.
Till then happy crafting!!
Ruchi


Wednesday, September 18, 2019

Drifting Feathers Mixed Media Fall Canvas with Pam Bray


FALL...
officially is in a few days!
 Blowing leaves, cooler weather, sweaters, coats and  "drifting feather" as birds fly south for the winter!


Let's start the celebration with creating a mixed media canvas celebrating "drifting feathers"!
Begin by apply the 6 x 6 pattern paper to top of canvas. 


Lay stencil on top of prepared canvas; apply white crackle paste to top of stencil. Dry. 


Adhere Southern Ridge Trading Company Fish Net Pattern  to top of prepared canvas. 


Apply embossing powder to top of each feather; heat emboss. 


Adhere prepared feathers to top of canvas. 


Adhere bow to top of feathers. 


Adhere flowers around top of feathers. 


Adhere a corner from Southern Ridge Trading Company Demask Corners pack to canvas. 


Adhere finished canvas to top of 6 1/2" x 6 1/2" frame.

Southern Ridge Trading Company Supplies Used:


Other Supplies Used:

- Wild Whisper: Nature Bliss 6x6 Paper Pack
- Emerald Creek Craft Supplies: Rock Candy Embossing Powder - Java Plum, Peppermint, Marshmellow, Butterscotch and Spearmint
- Gold Ribbon and Tan Twine
- White Crackle Paste
- Embossing Ink
- Adhesive

Thanks for stopping by today and make sure to stop by the Southern Ridge Trading Company store to see all the new holiday products! Enjoy Pam 

Saturday, September 14, 2019

Meet Our Design Team for Fall 2019!

First off, Karen and I would like to thank the current design team for all of their beautiful projects over the last six months. 

We also want to thank all of those who applied to our design team call. It was unbelievable to see all of the talent in Canada and the United States. For those who applied and didn't make it, continue to apply when our call comes up again. We are always looking to add to our team, so don't feel discouraged. You are all very talented and we truly enjoyed seeing everyone's submission. 

We want to welcome back a few of our design team members from the previous team who will be inspiring you once a month on the blog! We want to give a big welcome back to Pam Bray, Karen Jiles, Karla Yungwirth and Ruchi Agarwal.

Pam Bray


Karen Jiles


Karla Yungwirth


Ruchi Agarwal


We also want to congratulate Nancy Nickel, who will be joining our design team and will be inspiring you twice a month on our blog! 

Nancy Nickel


Make sure to stop by each of the ladies blogs to congratulate them on making the team! Stay tuned to see their creations starting in October.

-Karen & Katelyn


Friday, September 13, 2019

Wild Scrapbook Layout with Gloria Lee

Hello everyone!
Happy Friday!!!

Gloria here today and happy to share of my project.
 I made a scrapbooking layout using Retro bike, Gears Corners chipboard die cut and mini wood gears from Southern Ridge Trading Company Shop.


I made a 12 x 12" layout with a my son's photo.
First, I choose chipboards and coloured them with paint using paint brush.


I choose Lake Life kit from wild whispers.
I blended the background paper and cut papers with distress inks using mini blending tools.
And I adhere the papers as shown with double-sided tape.


I adhere the coloured chipboards with wood glue.
I fussy cut some flowers from designer papers using my Cutter Bee scissors.   


I adhere all the elements using glue tape and adhere a flair.
  

Southern Ridge Trading Company Supplies Used:


Thank you so much for stopping by and have a wonderful day!
Happy crafting!

- Gloria

Monday, September 9, 2019

Mixed Media Canvas - Imagination with Ruchi

Hello friends!! Ruchi here from Ruchi's Crafeteria and I'm back with my inspirational project.


Today I've created a canvas art 'Imagination' using mixed media technique.


Took a canvas and applied Prima White Gesso all over it. Then added texture using stencil and Prima modeling paste.


Picked SRTC Mini Wood Gears and SRTC Oval Peacock Feather Frame chipboards, Prima Art Stones, metal charm, twine and some paper cuts and adhered on my canvas using Prima gel medium. Coloured it using some metallic paints from my stash.


When it dried, added embellishments, half pearls and highlighted some parts using white gesso.


That’s it for today!! Hope you like my today's project. Don’t forget to check SRTC shop for these chipboards and some other awesome designs.

Southern Ridge Trading Company Supplies Used:


Other Supplies Used:

- Prima Marketing:  White gesso, Gel Medium, Modeling Paste, Art Stones, Metal Charms
Peek a Boo Designs Demask stencil
- Tim Holtz Big Chat stickers 
- Metallic paints, tiny beads, twine, glass pebble, half pearls, number embellishments are from my stash.

See ya next time.
Till then happy crafting!!
Ruchi


Friday, September 6, 2019

Birthday Mixed Media Tag with Karen Jiles


Hi there, 

It’s Karen sharing a Birthday Mixed Media Tag that I created with the Birthday Greetings, Garden Sign Combo and Intricate Butterfly chipboard sets.  I loved how this tag and all of the elements that were used to create it. Take a peek at my tutorial below.


Step 1: Distress the edges of an inked manila tag using oxide ink (Evergreen Bough) and a foam tool.


Step 2: Adhere flowers, clear pebbles and beaded pins using adhesive.


Step 3: Form and round the wings on the butterfly with finger and adhere to the tag with adhesive.


Step 4: Adhere “Happy Birthday” worded chipboard and birds from the Garden Sign Combo chipboard set to the tag using E6000.


Step 5: Add dyed ribbon to the tag. Using a paintbrush, highlight the flowers and dyed ribbon with gesso. Tap on gesso using paintbrush.


Step 6: Continue embellishing as desired.

Southern Ridge Trading Company Supplies Used:


Other Supplies Used:

- Inked Manila Tag
- Tim Holtz for Ranger Ink: Distress Oxide Ink - Evergreen Bough
- Foam Tool
- Flowers
- Clear Pebbles
- Beaded Pins
- Dyed Ribbon
- Gesso (White)
- Paintbrush
- E6000
- Hot Glue

Thanks so much for stopping by today.
Karen