Monday, January 30, 2017

Valentine Canvas with Corina Finley


Hello & Welcome back!

Can you keep a Secret? Well I hope so.......because I am sharing my Flat back Canvas that I just created to give to my husband for Valentines Day!

The background was created using Paint, Modeling Paste and Stencils. I used the medium (6 x 6) Navajo Stencil and the Heart Stencil


My Husband and I have been together for 17 years and married coming up 14 years.  I thought the Title 'Journey' was perfectly fitting! I used glitter spray to colour it a warm brown with a shimmer effect. 


I used a light tan paint to apply colour to the Delicate Lace Doily. I trimmed off a section of the doily that was not visible. I tucked it in the layers to give more delicate detail and painted it a darker brown.

The Delicate Lace Bar is my favourite addition to the Canvas. I simply used a red glitter spray and it turned out great!

To finish the Canvas off, I added cloth, lace, a variety of flowers and a few gems for sparkle!


Southern Ridge Trading Company Product Used:

- Journey Fun Word

Delicate Lace Doily


Remember to play along in the monthly challenge on the Southern Ridge Trading Company blogEach month enter for your chance to win 4 designs from the online store - chipboard.ca -$20 (before tax) retail value of YOUR OWN CHOOSING! 

Thanks for joining me today!

Take care,

Live, Laugh & Create!

Friday, January 27, 2017

Winter Snowflakes Frame with Deb Riddell

Hello and thank you for stopping by.  Deb here today to share with you a Winter Snowflake Frame that I made for our current Winter challenge.  I used Southern Ridge Trading Company’s Snowflake Die Cut, Snowflakes 712 and Bare Branches chipboard pieces to create my project.


I started out by base coating the Snowflake Die Cut with Americana Cool White acrylic paint and then stenciled over the whole frame with Tim Holtz’s Flourish Layering stencil and Ceramcoat Wedgewood Blue acrylic paint.


One of the Bare Branches was then embossed with Emerald Creek Craft Supplies Weathered Wood embossing powder.


A Snowflakes 712 snowflake hung from the branch with a piece of button thread.  The snowflake was base coated with more Cool White acrylic paint and then embossed with Iridescent Shimmer embossing powder from Emerald Creek Craft Supplies.


The word ‘winter’ was hand stamped onto the Snowflake Die Cut with some individual alphabet stamps from my stash


More snowflakes were punched from cardstock that was coloured with Distress inks and embossed with Iridescent Shimmer embossing powder and scattered over the frame.

Southern Ridge Trading Company Supplies Used:


Hope you have enjoyed seeing my Winter Snowflake Frame and that you will join in our current Winter challenge, you have a chance to win 4 designs from the online shop - chipboard.ca - a $20.00 (before tax) retail value of YOUR OWN CHOOSING!  Can’t wait to see what you link up, happy creating!

Deb xo


Thursday, January 26, 2017

Winter Journal Book Creativation Debut with Karen Bearse

For a lot of us crafty types the annual CHA Show is a favourite time of year. All the new products that are unveiled, just too exciting. This year saw big changes in our event, a new name Creativation, a new level of excitement & a new company. For me as a designer I was very excited to get my hands on some new product to play with. Especially Ellen Hull’s new Sizzix die “The Journal”. The potential is endless and once again the perfect chippies to play with are Southern Ridge Trading Co.


I was honoured to have my book as a sample in the Southern Ridge Trading Co. booth for Creativation 2017. This is a winter cool project covered in lots of wet media. The thing that is most impressive is that the chippies took the wet beautifully. The book has a shimmery cool winter look to it.


Southern Ridge Trading Company Products Used:


You are going to really want to join in our challenge this month with the chance to win free chippies. Wait until you see all the awesome new designs that were unveiled at Creativation!!!

Karen will be teaching this class at Goldenhills Papercrafts in Clifton, VA on February.16th. To register go to: http://www.goldenshillpapercrafts.com.
Happy crafting!

- Karen


Monday, January 23, 2017

Adventure In The Back Country Scrapbook Layout with Charlene Byrd

Hello everyone, Charlene here!


Thanks for joining me today on the blog! There is not much snow in southern Alberta in the winter so when we moved to Ontario the first thing that my son Hunter saved his money for was a sled! Last year he and his friend drove up to Pembroke with their sleds and rode the trails all day, loving every minute of it!


To create the tree I first stained it with Forest Green Distress Stain. I then added several different mediums to the tips to create the snow; most unsuccessfully as they all took on a green tinge from the stain. My end product was a textured sand medium and white acrylic paint.


I used my foam blending tool with Pumice Stone ink on the sled and then added some black soot ink around the edges.


The chains were simply stained with Black Soot Distress Stain and the stars with Fired Red Distress stain.


The Adventure word was another work in progress! I started with Crackle medium but I didn’t like the look of it when I added some colour, I tried making it red but it turned out looking pink! So I went with the old standby of black acrylic paint. I do like how the bumpy texture shows on the chipboard and I love how forgiving chipboard is to use. If you’re not happy with the look, simply paint over it! Voila!

Southern Ridge Trading Company Chipboard Used:

Other Products Used:

- KaiserCraft Paper and stickers
- Tim Holtz for Ranger Ink: Distress Stain - Black Soot, Forest Moss and Fired Brick. Distress Ink - Pumice Stone
- Letter stickers
- Black and white acrylic paint
- Textured Sand medium

Remember to play along in the monthly challenge over on the Southern Ridge Trading Company blogEach month enter for your chance to win 4 designs from the online store - chipboard.ca -$20 (before tax) retail value of YOUR OWN CHOOSING! 

Thanks for joining me,
Happy Creating!

Charlene


Friday, January 20, 2017

Thank You Card with Katelyn Grosart

Hey Southern Ridge Trading Company fans, Katelyn here and I'm on the blog today sharing with you a  Thank you card using some of the new products that we've just pre-released in our store. You'll want to make sure to head over and check them all out, you can find them all here. Stay tuned this weekend as we will be showing off the new CHA releases on Facebook. Today's Thank You card  will be sure to inspire you to recreate it at home. Read below and learn how I transformed my chipboard pieces to create my Thank You card.


To start, you'll need the Victorian Circle Square Frame. Apply a coat of Ranger Ink: Emboss It Dabber to the entire piece. Once the ink has been applied, sprinkle Dusk Stone Violet embossing powder over the entire surface. Tap off the excess powder and emboss with a heat tool. Set the frame aside to allow the powder to cool. If there isn't enough embossing powder on the frame, reapply the Emboss It Ink to the frame and sprinkle Dusk Stone Violet embossing powder over the entire surface. Tap off the excess powder and emboss with a heat tool. Set the piece aside to cool.


Next you'll need the Berry Branch Set. Cut two berry branches to fit at the bottom right hand side of the frame and cut one berry branch to fit at the bottom of the frame. Once the pieces have been cut, apply two coats of Victorian Velvet Distress Paint to each piece. Set the berry branches aside to dry.


With the Victorian Velvet Distress Paint still out, paint three floral banners. You'll want to apply another coat of paint, once the first coat has dried. Set the banners aside to dry.


With the banners painted, take the Wild Flower Bouquet and trim to fit as desired in the bottom right hand corner. Once the bouquet has been trimmed, apply one coat of Dusty Concord Distress Paint to the bouquet. With the first coat of Dusty Concord paint applied, lightly paint a coat of white gesso over top. While the white gesso is still wet, apply a coat of Dusty Concord Distress Paint to the bouquet. Once the paint has dried, ink the edges of the bouquet with Dusty Concord Distress Ink.


Cut the Thank You Flourish to fit in the middle of the frame. Once it's cut apply Abandoned Coral Distress Ink to the "Thank You" sentiment. 


With the chipboard pieces being covered, now it's time to move onto cutting your patterned paper. Cut a piece of patterned paper that measures 5 3/4" x 5 3/4".  Make sure to distress the edges of the papers and then ink the edges using Dusty Concord Distress Ink.


The last piece of patterned paper that you need to cut, will measure 5 7/8" x 5 7/8". Make sure to distress the edges of the papers and then ink the edges using Dusty Concord Distress Ink.


Adhere the floral patterned paper to the wood patterned paper.


Adhere the frame to the middle of the floral paper.


Adhere the "Thank You" sentiment to the middle of the frame.


Adhere two shorter berry branches on the right hand side of the frame. Once the berry branches have been adhered, adhere the wild flower bouquet slightly overtop of the berry branches.


String the three banners onto a piece of white ribbon. Once the banners have been strung, adhere the banners to the top left hand side of the frame.


Next, you'll want to wrap a piece of white ribbon along the bottom of the card, making sure to tie a bow on the right hand side, covering the bottoms of the berry branches and bouquet.


You'll want to add a variety of pink, and purple roses in the bottom right hand corner by the bow. Add as many or as little flowers as you want.


Add two pink roses and one purple rose to the banner.


The last finishing touch to add to the card is adding the longer of the three berry branches at the bottom of the frame. Once the branch has been added, adhere the card front to the card a 6" x 6" cardbase.


Here are some close up shots of my card.


Southern Ridge Trading Company Supplies Used:

- Floral Banners 
-  10mm pink and purple roses
- 15mm pink and purple roses

Other Supplies Used:

- Emerald Creek Craft Supplies: Dusk Stone Violet Embossing Powder 
- Tim Holtz for Ranger Ink: Distress Ink - Abandoned Coral and Dusty Concord, Distress Paint - Victorian Velvet and Dusty Concord 
- Ranger Ink: Emboss It Ink - Clear (dabber)
- Prima Marketing: Heavy White Gesso
- 49 and Market: Heirloom Botanicals - Conservatory and Sanctuary
- Bo Bunny Vintage Double Dot: Coffee
- Ribbon:  White
- Misc: Heat Tool 

Remember to play along in the monthly challenge over on the Southern Ridge Trading Company blogEach month enter for your chance to win 4 designs from the online store - chipboard.ca -$20 (before tax) retail value of YOUR OWN CHOOSING! 

Until Next Time!

-Katelyn 


Thursday, January 19, 2017

Corina's Keys


Hello

Thank you for joining me today! I am so very excited to share with you today a very special project. I created this necklace for my class which is happening in Phoenix, Arizona at Creativation on Monday.

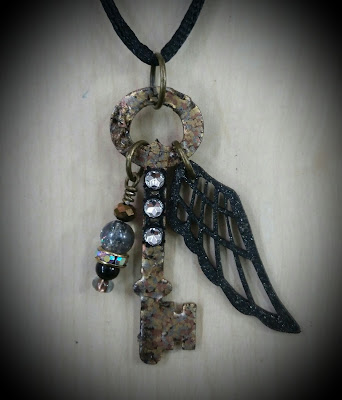
Karen, owner extraordinaire, has worked her magic and they are now included in the New Release! I have drawn 5 different vintage keys for 'Corina's Keys'! You can also get the Wing which I drew also!

For the Key, I embossed using Frantage embossing powder in Seasonings and over heat to change the blending of the metallic colours. I applied black Gesso to the Wing and then sprayed with homemade shimmer spray. I added a lovely dangle of beads to the opposite side. Added bling and jump rings to complete.

Southern Ridge Trading Company Products Used:

- Corina's Keys (coming soon)

- Wing (coming soon)


Remember to play along in the monthly challenge on the Southern Ridge Trading Company blogEach month enter for your chance to win 4 designs from the online store - chipboard.ca -$20 (before tax) retail value of YOUR OWN CHOOSING! 

Thanks for joining me today! 

Take care,

Live, Laugh & Create!

Wednesday, January 18, 2017

Heart Necklaces with Ava Gavloski

Hello, Ava here to share with you a quick and easy project that you can make for gift giving.  Wait a minute!  It looks quick and easy…..smile…
Really 1 hour and you have 2 gifts to give with a big WOW factor.  

First up, is the love linked skeleton hearts.  You can find these Mini Connected hearts in  the shop under the  Heart's, Love and Weddings Section of the store.  Get an order in for both of these chipboard hearts because they are perfect for many projects.  
(Hot Trend---Think planner clips)

goldhearts with red.jpg

Take out your favourite embossing powder (gold here for me), apply some VersaMark Ink, dip it into the powder and heat set. I think I applied 3 coats to get the coverage I wanted.

gold full edit.jpg

Add a couple of jump rings and choice of necklace and you have one gift ready.

My second necklace take a bit more time so be sure you have your hour of play time set aside on your schedule.

red full edit.jpg

Start out the same as the connected hearts, heat emboss the outside (gold) flourishes of the heart.

red glam paint.jpg

Paint your heart with the medium of your choice.  I would apply 2 coats of paint.  
Next up get out your Ultra Thick. Apply a generous amount of VersaMark Ink, spring on some Ultra Thick and heat emboss.  

red versamark.jpg

This application will make the heart very glossy, which you can dip back into the ultra thick and repeat the heating process.  About 4 to 5 times give a thick clear enamel look to the heart.

red utee sprinkle.jpg

On the last dry of the Utee, spray some glimmer mist onto the enamel like finish and heat set the mist.  You will get some aged vintage texture on the heart.

red glimmer mist heart.jpg

Once heat set, place heart in the freezer for a couple of hours.  Bring out and lightly bend and crack the surface of the heart.  Once the desired crackle look is achieved, rub on some ink to fill the crack’s. Wipe the heart clean and your have an aged glass look to your heart.

red heart crackle.jpg

Add a couple of jump rings and a necklace chain of your choice and this is ready for gift giving.

red close edit.jpg

Southern Ridge Trading Company Supplies Used:


Other Supplies Used:

- Tattered Angels: Glimmer Glaze - Sangria and Tutti Frutti Mist
- Embossing powder
- Jump Rings
- Necklace

Thanks for visiting us here at Southern Ridge Trading Company.  Become apart of our community by visiting our blog/monthly challenges.