Showing posts with label Mini Connected Hearts. Show all posts

Monday, February 3, 2020

Heart Wall Hanging with Karla Yungwirth

Hello friends! It’s Karla back today with a beautiful heart wallhanging, perfect for Valentines Day! When I think of Valentines, I think of vintage roses, soft pinks and cool reds and of course lots of hearts! I’ve grabbed a few awesome supplies from the Southern Ridge Trading Company Store - Plain Heart Mix Mini Connected HeartsMedium Arrow Stencil and the Love sentiment from Words of Christmas . I even put together a video so you can see exactly how this came together.


I used the large heart from the Plain Heart Mix, which comes with 7 chipboard hearts, as my base. It was perfect to cover with the pretty papers from the Vintage Valentine Simple Stories collection. Some Kraftin’ Kimmie Inks add colour to various pieces and I even grabbed some silver Inka Gold paste to add a bit of shimmer! A subtle arrow decorates the 3x4 cut apart card with a bit of grey ink and some Moonstone Glimmer Paste, and the Love sentiment looks ‘lovely’ inked with an ombre effect.


I used my Cricut Maker to cut the Heart Rosette from Cricut Design Space and added a 2x2 card glued to one of the smaller heart chipboard pieces for the top. These pretty connected mini hearts look lovely covered in red ink with a touch of silver paste.


You can check out exactly how I put this together and see all the supplies closeup in my VIDEO HERE.

Southern Ridge Trading Company Supplies Used:


Other Supplies Used:

- Simple Stories: Vintage Valentine Collection Pack
- Inka Gold: Silver Paint
- Kraftin’ Kimmie Stamps: Krafty Kolours Inks
- Art Institute Glitter Glue 
- Glue Gun
- Cricut Maker with Heart Rosette Cut File #M44A3A (Ribbons & Rosettes Cartridge)

Thanks so much for stopping by! I hope you’ll try making some seasonal home décor using goodies from the Southern Ridge Trading Company. Have a wonderful week friends!

Hugs,
Karla


Friday, July 12, 2019

I Said Yes to the Dress Layout with Gloria Lee

Hello crafty friends!
Happy Friday!!!

Gloria here today and happy to share of my project.
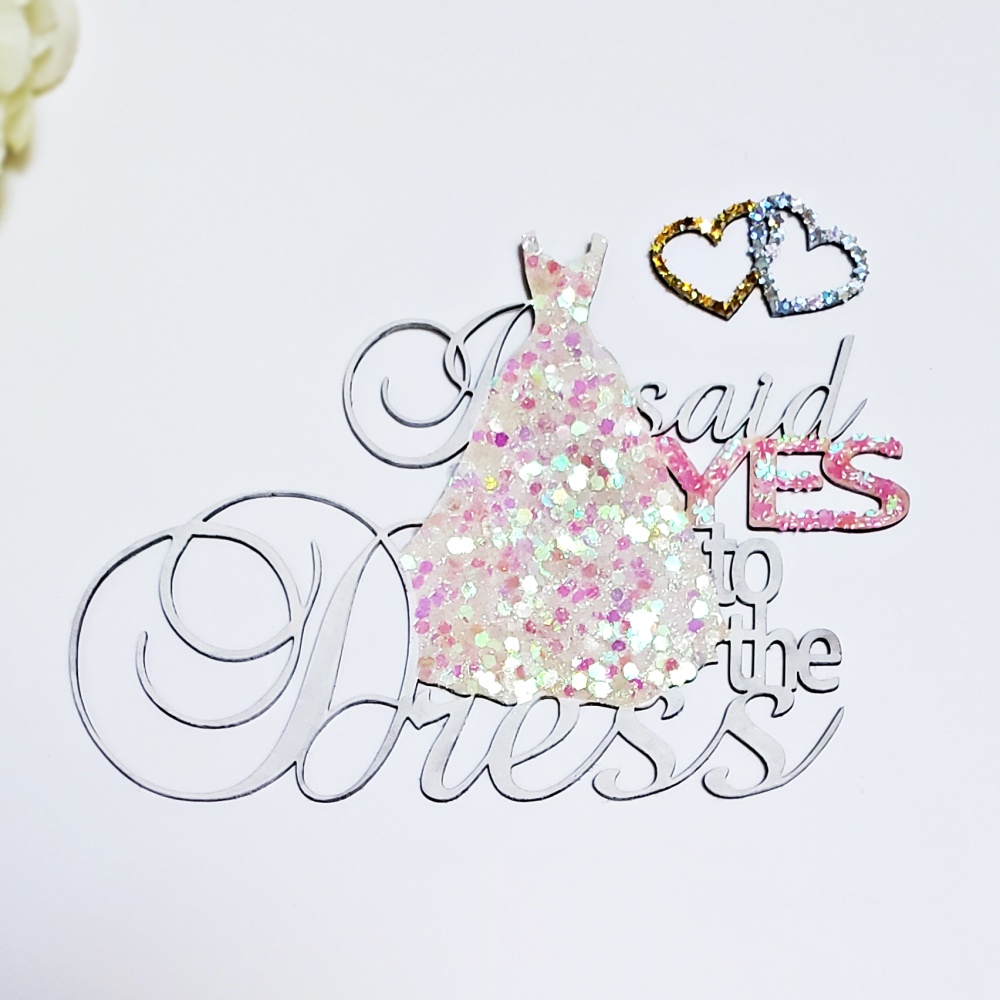
 I made a wedding scrapbooking layout using Say Yes to the Dress and Mini Connected Hearts chipboard die cut from Southern Ridge Trading Company Shop.

I made a 12' x 12' layout with my wedding photo.


When I saw the Say Yes to the Dress Chipboard, I decided to make a wedding page.
First, I coloured the Say yes to the Dress and Mini connected Hearts chipboard with white paint and I covered the dress, yes and hearts with Glossy accents and added glitters.


I painted a part of 12'x12' white card stock with watercolours and added some ink splatters all over the panel.


I cut some papers and adhere on the base card stock.


I stamped some flowers on a tracing paper with embossing ink, white heat embossed them and fussy cut them with my Cutter Bee scissors.  


I adhere my 15 years ago photo , the beautiful chipboards and the flowers .
The chip boards are so beautiful. 
The mini connected hearts is so adorable and perfect for wedding cards.


The hearts make cards so beautiful.
I made this card for our church member's wedding.


Southern Ridge Trading Company Supplies Used:


Thank you so much for stopping by and have a wonderful day!
Happy crafting!

Wednesday, December 26, 2018

Memories & Blessed Stand Up Canvas with Laura Gilhuly

Good Morning!
I hope you all had a very Merry Christmas and all your holiday wishes came true!

This year I made many gifts for friends...this is one for a very dear and sweet friend who has become like family


I started with the medium wood stand up canvas and covered it with gesso, I then used the small heart stencil with texture paste and allowed to dry naturally.  I layered different colours of grey and turquoise mists.


I embossed the title, mini connected hearts, and border pieces 


I followed the same process for the other side


To add some more visual interest I added some lights!

Southern Ridge Trading Company Supplies Used:

- Memories Swirl Word
- Blessed Fun Word
- Mini Connected Hearts
Medium Wood Stand Up Canvas
Heart Stencil - Small 
- Heart Flourish 


- Laura


Friday, October 20, 2017

Enjoy the Simple Things Card with Katelyn Grosart

Hey Southern Ridge Trading Company fans, Katelyn here. Today, I've created for you a pretty Enjoy the Simple Things Card, that's perfect to hang to give to that special someone in your life or you could change it and make it a baby card. You'll want to read below as I share with you how I created my Enjoy the Simple Things card.


To start, pull out the small frame from the Abstract Circle Frame package. Apply two coats of Titanium White Acrylic paint to the frame. Once the frame has dried, apply Raw Umber Antiquing Cream to the frame. After the antiquing cream has dried, rub off the excess paint. To finish off the frame, ink the edges of the frame with Vintage Photo Distress Ink and a blending tool with foam. 


Take a small bow out of the Ribbon Bows package. Apply two coats of Stormy Sky Distress Paint to the bow. Once the paint has dried, apply Picket Fence Distress Crayon to the bow. Rub the crayon in with your finger. 


Pull out three Mini Wood Stars from the package. Apply two coats of Tarnished Brass Distress Stain to each star. After the stain has dried, apply Gathered Twigs Distress Crayon to the edges of the stars. Rub the crayon in with your finger. 


Take two of the Sm. Primitive Stars out of the package. Ink the edges of the stars using Vintage Photo Distress Ink and a blending tool with foam.


Pull out two Mini Connected Hearts from the package. Cut one of the connected hearts apart. Using Art Alchemy Metallique Wax in White Gold, rub the wax over each heart.


The last chipboard piece you'll need is the Delicate Lace Element. With the element in front of you, cut one of the pieces off. Apply two coats of Walnut Stain Distress Paint to the element.


From the Images from the Past Paper, use the 2 1/2" fitted circle die to cut out the bunny and teddy bear. Die cut the 3" fitted circle out of Pion Blue Vl. Distress the edges of each circle. Ink the edges of the circles using Vintage Photo Distress Ink and a blending tool with foam.


Cut the following patterned paper pieces from the Pion Design paper:
- Pion Orca l: 4 1/4" x 5 1/2"
- Hide and Seek: 4 1/8" x 5 3/8" & 3 7/8" x 5 1/8"
- Bunny Hugs: 3 3/4" x 4 7/8"
Distress the edges of each patterned paper piece. Using a blending tool with Foam, ink the edges of each patterned paper piece using Vintage Photo Distress Ink.


Cut out the "Enjoy the Simple Things" sentiment out of the Images from the Past paper. Ink the edges of the sentiment using Vintage Photo Distress Ink and a blending tool with foam.


Adhere the bunny paper to the green clover paper. Adhere the green clover paper to the cream/green patterned paper. Adhere the cream/green paper to the gold paper. 


Adhere the Bunny/Teddy Bear image to the blue circle. Foam square the blue circle to the middle of the card front. Adhere the circle frame overtop of the Bunny/Teddy Bear image.


Adhere one of the Sm. Primitive stars in the top left hand side of the circle and adhere the other star on the bottom right hand side of the circle. Adhere the lace element bar to the top of the circle. Adhere the bow overtop of the lace element bar.


On the top left hand side of the circle, adhere the connected hearts and one of the mini wood stars. 


On the bottom right hand side of the circle, adhere the two unconnected hearts and the other two  mini wood stars. On the bottom left hand side of the bow, adhere the "Enjoy the Simple Things" sentiment. 


On the top left hand side of the circle, adhere one dark brown rose, one light blue rose, two cream roses and two brown roses. On the bottom right hand side of the circle, adhere two dark brown roses, four cream roses, one light blue rose and two brown roses. Once the roses have been adhered, adhere your card front to your card base.


Here are a few close up shots of each corner on my card.


Here's the finished card.


Southern Ridge Trading Company Supplies Used:

- 10mm Roses: Light Blue, Dark Brown and Cream
- 15mm Roses: Light Brown


Other Supplies Used:

- Tim Holtz for Ranger Ink: Distress Stain - Tarnished Brass, Distress Paint - Walnut Stain and Stormy Sky, Distress Ink - Vintage Photo, Distress Crayon - Picket Fence and Gathered Twigs and Blending Tool with Foam
- DecoArt: Fluid Acrylics - Titanium White and Antiquing Cream - Raw Umber
- Prima Marketing: Art Alchemy Metallique Wax - White Gold
- Pion Design: Theodore and Bella - Images From the Past, Hide and Seek & Bunny Hugs, Pion Design Palette - Pion Orca l & Pion Blue Vl
- Elizabeth Craft Designs: Fitted Circles
- Creative Scrapbooker Magazine/Cathie Allan: Super Stock Cardstock
- Scrapbook Adhesives by 3L: 3D Foam Squares and EZ Runner
- Tombow: Aqua Mono Liquid Glue

Until Next Time!

-Katelyn 


Friday, February 3, 2017

Love Wall Hanging with Katelyn Grosart

Hey there Southern Ridge Trading Company fans, Katelyn here. Valentine's Day is right around the corner, so today I've created a Love Wall Hanging perfect to add to your Valentine's Day decor. Read below and learn how I transformed my chipboard pieces to create my Love Wall Hanging.


To start, apply two coats of Cadimium Red Hue 1/4" around the top and sides of a 5" x 7" canvas. Once the canvas has dried, take your blending tool and Black Soot and ink the edges of the canvas. Set the canvas aside.


Next, you'll want to take out two Mini Connected Hearts from the package. Apply two coats of Candied Apple Distress Paint to each mini connected heart. Once the paint has dried, with your blending tool, ink the edges of the hearts using Black Soot Distress Ink. Set the hearts aside.


Take one Filigree Hearts out of the package. Apply two coats of Candied Apple Distress Paint to the heart. Once the paint has dried, with your blending tool, ink the edges of the heart using Black Soot Distress Ink. Set the heart aside.


Cut two small portions out of the Honeycomb Pattern. Apply two coats of Hickory Smoke Distress Paint to the honeycomb pieces. Once the paint has dried, apply a coat of Crackle Paint to each honeycomb piece. Set the pieces aside to dry.


Apply a layer of Emboss It Ink to both Wild Heart. With the emboss it ink on the wild heart, sprinkle Sweet Valentine Embossing Powder over top of both pieces. Tap off the excess powder and emboss with your heat tool. Set heart aside.


Die cut an arrow out of white cardstock. Once the arrow is cut out, apply a coat of Spun Sugar Distress Paint to it. After the paint has dried, with your blending tool, ink the edges of the arrow using Black Soot Distress Ink. Set the arrow aside.


The last piece of chipboard that needs to be covered is the Love Word. Apply two coats of Spun Sugar to the love word. Once the paint has dried, apply a layer of Emboss It ink to the love word. Sprinkle Fine Clear Gloss Embossing Powder to the love word. Tap off the excess powder and emboss it with your heat tool. To finish off the love word, with your blending tool, ink the edges of the love word using Black Soot Distress Ink. Set the word aside.


Next, you'll want to cut two pieces of patterned paper. One piece of patterned paper will measure 4 3/4" x 6 3/4". The second piece of patterned paper will measure 4 1/2" x 6 1/2". On the 4 1/2" x 6 1/2" paper, rip part of the top and bottom of the paper. To finish off the patterned papers, edge distress the edges and then ink them using Black Soot Distress Ink. You'll also want to pull one medium sized doily out.

Now it's time to assemble your wall hanging. Adhere the 4 3/4" x 6 3/4" patterned paper piece to the canvas. Once the patterned paper is adhered, adhere one of the honeycomb pieces to the top left portion of the patterned paper. Adhere the second piece of honeycomb to the bottom right portion of the patterned paper.


Next, adhere the other patterned paper piece over top of the first patterned paper piece, leaving a 1/4" border all the way around. Adhere the doily to the middle of the 4 1/2" x 6 1/2" piece of patterned paper.


Adhere the solid heart to the middle of the doily. Once the solid heart is adhered, foam square the swirly portion of the heart over top of the solid heart. 


Adhere the arrow to the middle of the solid heart. Once the arrow is adhered, foam square the filigree heart to the middle of the solid heart. The filigree heart will sit slightly on the arrow.


To finish off the center heart, adhere the love word to the middle of the filigree heart.


On the bottom right hand side of the wild heart, adhere two large pink flowers, six red roses, six pink roses and three cream roses as desired.


On the top left hand side of the wild heart, adhere three large pink flowers, six red roses, five pink roses and four cream roses as desired.


To finish off the wall hanging, add in some pyrite stones in amongst the flowers on both the bottom and top sides of the heart. Once the stones are adhered, add a ribbon loop at the top of the canvas so you can hang it wherever in your home.


Here are a few close ups of the finished wall hanging.


And here is the finished Love Wall Hanging.


Southern Ridge Trading Company Supplies Used:

- 10mm Roses: Red, Pink and White
-  Pink Flowers

Other Supplies Used:

- Emerald Creek Craft Supplies: Sweet Valentine Embossing Powder, Fine Clear Gloss Embossing Powder and Pyrite Stones
- Tim Holtz for Ranger Ink: Distress Ink - Black Soot, Distress Paint - Hickory Smoke, Candied Apple and Spun Sugar
- Ranger Ink: Emboss It Ink - Clear (dabber) and Glossy Accents
- Deco Art Media: Crackle Paint and Fluid Acrylics: Cadimium Red Hue
- Tombow: Aqua Mono Liquid Glue
- Bo Bunny: Doilies
- Elizabeth Craft Designs: White Soft Finish Cardstock
- Joset Designs: Arrow Die
- Echo Park: Blowing Kisses - 3x4 Journaling Cards and 4x6 Journaling Cards
- Hug a Bug Seam Binding Ribbon: White
- Misc: Heat Tool and 5x7 Canvas


Until Next Time!

-Katelyn