Showing posts with label Words of Christmas. Show all posts

Monday, February 3, 2020

Heart Wall Hanging with Karla Yungwirth

Hello friends! It’s Karla back today with a beautiful heart wallhanging, perfect for Valentines Day! When I think of Valentines, I think of vintage roses, soft pinks and cool reds and of course lots of hearts! I’ve grabbed a few awesome supplies from the Southern Ridge Trading Company Store - Plain Heart Mix Mini Connected HeartsMedium Arrow Stencil and the Love sentiment from Words of Christmas . I even put together a video so you can see exactly how this came together.


I used the large heart from the Plain Heart Mix, which comes with 7 chipboard hearts, as my base. It was perfect to cover with the pretty papers from the Vintage Valentine Simple Stories collection. Some Kraftin’ Kimmie Inks add colour to various pieces and I even grabbed some silver Inka Gold paste to add a bit of shimmer! A subtle arrow decorates the 3x4 cut apart card with a bit of grey ink and some Moonstone Glimmer Paste, and the Love sentiment looks ‘lovely’ inked with an ombre effect.


I used my Cricut Maker to cut the Heart Rosette from Cricut Design Space and added a 2x2 card glued to one of the smaller heart chipboard pieces for the top. These pretty connected mini hearts look lovely covered in red ink with a touch of silver paste.


You can check out exactly how I put this together and see all the supplies closeup in my VIDEO HERE.

Southern Ridge Trading Company Supplies Used:


Other Supplies Used:

- Simple Stories: Vintage Valentine Collection Pack
- Inka Gold: Silver Paint
- Kraftin’ Kimmie Stamps: Krafty Kolours Inks
- Art Institute Glitter Glue 
- Glue Gun
- Cricut Maker with Heart Rosette Cut File #M44A3A (Ribbons & Rosettes Cartridge)

Thanks so much for stopping by! I hope you’ll try making some seasonal home décor using goodies from the Southern Ridge Trading Company. Have a wonderful week friends!

Hugs,
Karla


Wednesday, December 18, 2019

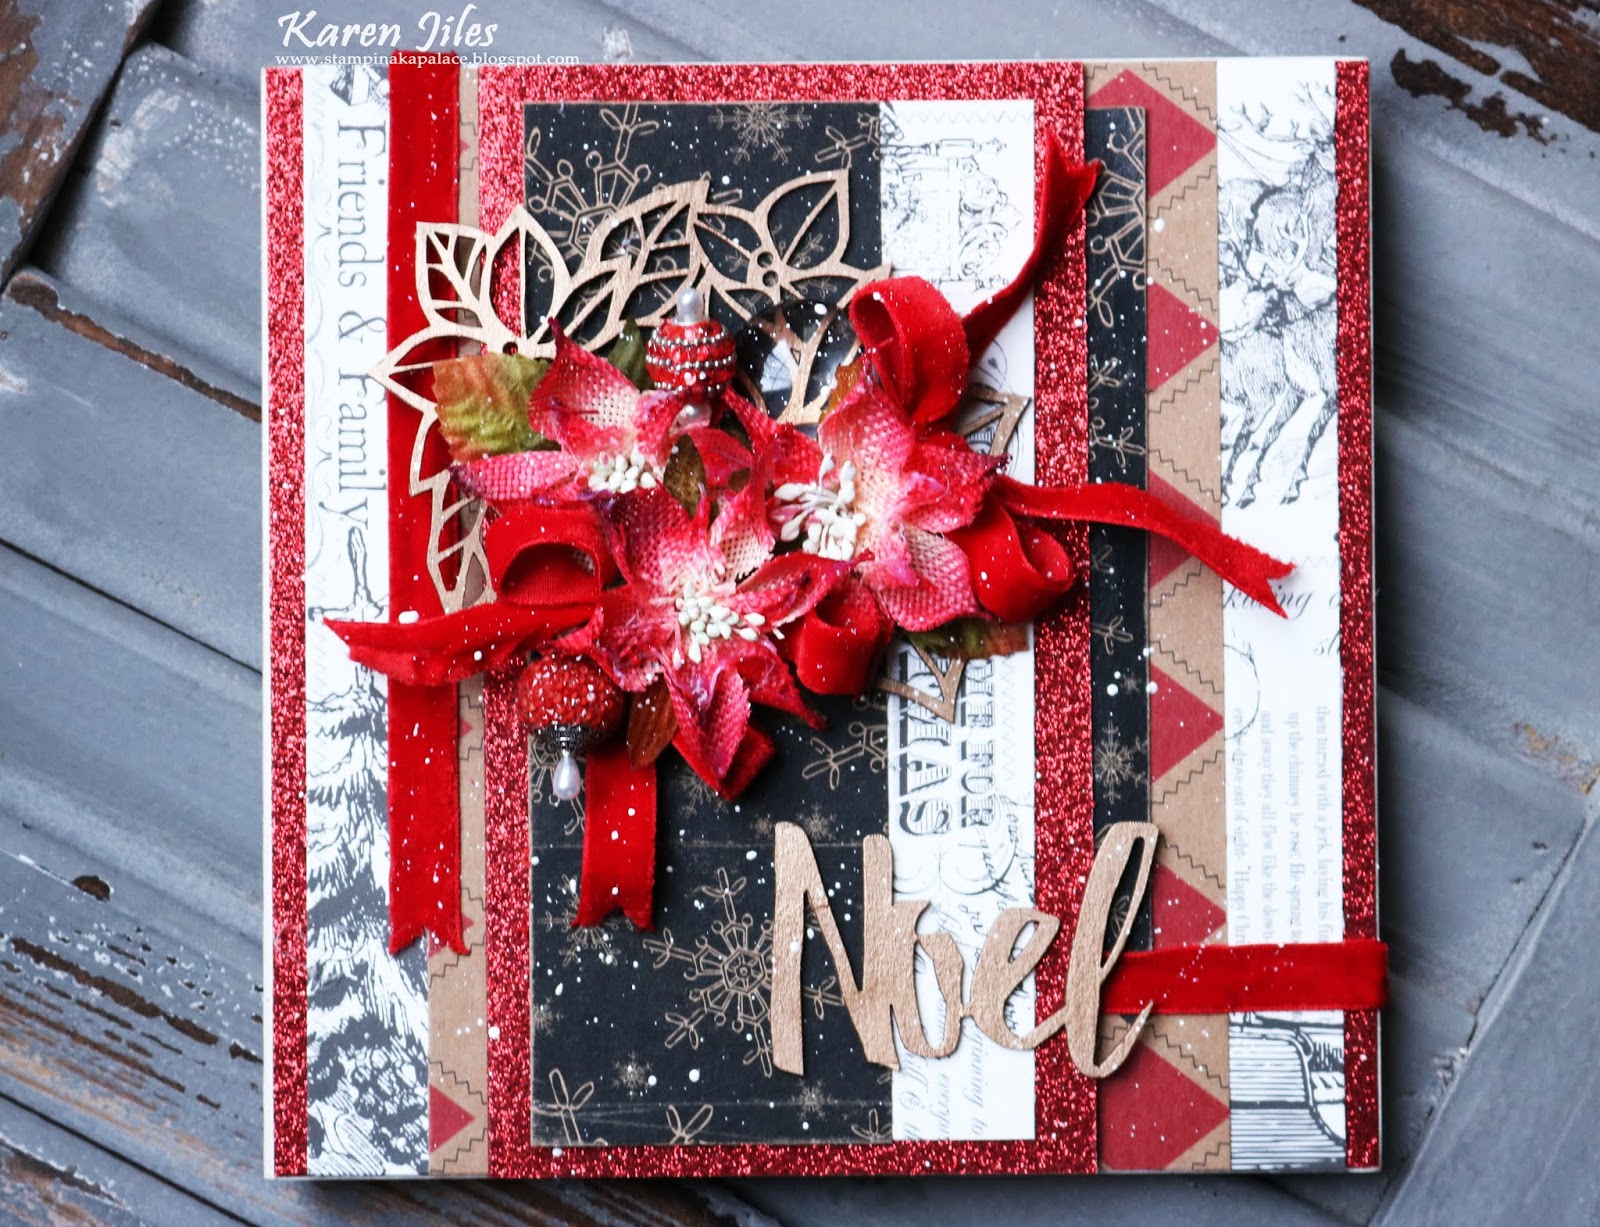
Christmas Keepsake with Karen Jiles


Hi there, 

It’s Karen sharing a Christmas Keepsake that I created with the Skeleton Poinsettia and Words of Christmas Chipboard sets.  The chipboard sets were absolutely perfect for this Keepsake. I coupled them with some embellishment mousse and Christmas themed patterned papers. I loved the end result. Take a peek at my tutorial below.


Step 1: Adhere coordinating layers of patterned paper together using adhesive. 


Step 2: Add additional patterned paper layers and adhere to wooden frame using E6000. Set aside.


Step 3: Apply Cosmic Brown Embellishment Mousse to the Skeleton Poinsettia and 
Words of Christmas chipboard using a foam tool. Heat set the chipboard to dry. Note: To give the poinsettia some dimension, I reformed the chipboard with my finger.


Step 4: Adhere the mousse covered chipboard to the layered papers using E6000. Add a clear pebble, flowers and velvet ribbon.


Step 5: Add beaded pins and tap on gesso using a paintbrush.


Step 6: Continue embellishing as desired.

Southern Ridge Trading Company Supplies Used:


Other Supplies Used:

- Wooden Frame
- Patterned Paper
- Embellishment Mousse (Cosmic Brown)
- Foam Tool
- Scissors
- Beaded Pins
- Clear Pebble
- Velvet Ribbon
- Gesso (White)
- Paintbrush
- E6000
- Hot Glue
- Heat Gun

Thanks so much for stopping by today.
Karen


Wednesday, December 11, 2019

Merry Christmas Tags with Ornaments with Pam Bray

  
Happy Holidays and Merry Christmas!!! Pam here today sharing a few fun tags with removable ornaments using Southern Ridge Trading Company holiday chipboard pieces! 


Begin by covering chipboard tags with pretty pattern papers and border strips!


Adhere Southern Ridge Snowflake Wreath Small  to bottom of prepared tags! (HINT: Make sure to lightly adhere the  Snowflake Wreath Small  to tag since they are to be removed for the ornament gift!)


Adhere pattern paper to center of two of the Southern Ridge Wood Christmas Ornaments! Add bows to top of each ornament. 


Paint and emboss bell and deer from Southern Ridge Deer Christmas Mix using embossing powder and embossing ink. Adhere to top of prepared ornaments. 


Adhere prepared embossed chipboard pieces to top of Snowflake Wreath Small .


Paint and emboss Joy and Noel from Southern Ridge Words of Christmas using embossing powder and embossing ink.


Adhere prepared words to pattern paper mats; adhere prepared mats to top of tags. 


Adhere number disc to bottom of tags. 


Die cut black card stock doilies; adhere under tag back!


Apply Marshmallow Rock Candy to snowflakes and doily;  heat set. Adhere to top of tag! 


Southern Ridge Trading Company Supplies Used:


Other Supplies Used:

- Wild Whisper Designs:  Fall and Winter Paper Collection and Pine Dreams Embossing Powder
- Emerald Creek Craft Supplies: Marshmallow Rock Candy Embossing Powder and Charred Gold Embossing Powder
- Doily Die Cuts
- May Arts: Natural and Red Twine, Red Ribbon
- Xyron Adhesive
- Snowflakes
- Embossing Ink
- White Paint
- Black Card Stock

I hope you have enjoyed the tutorial on how to create beautiful tags for your packages but REMEMBER to tell the recipient that the ornament comes off the tag for their tree!!! ALSO... the tags are perfect all year long...just change the Christmas theme to another. Add a magnet on the back of the ornament piece to create fun addition to your home. Enjoy Pam

Wednesday, December 4, 2019

Noel Stocking with Karla Yungwirth

Hello friends! Karla back today with a pretty wall hanging Christmas Stocking created with lots of fun goodies from the Southern Ridge Trading Company Shop – the Christmas Stocking, Snowflakes (comparable to THESE), Words Of Christmas and Holly Berry Branch. This was such a fun way to kick off December, and would be lovely to do as a family project too – having everyone customize their own stocking and add their names!


Here are the steps I used to decorate my stocking:

  1. I added sticky backed Cricut Vinyl with a pretty red pattern to the main part of the stocking and cut around the edge with a craft knife. Then, I did the same thing with white felt, tracing around it and cutting it out before adhering with a strong glue.


  1. I used a Distress Paint Dabber to paint the stocking loop green and glued on some fun green pom-pom trim. I think pom-poms make everything more fun!


  1. I glued on a toe and heel from white felt again and added faux stitching lines with Nuvo Crystal Drops.


  1. I painted the Holly Berry Branch with my shiny metallic paints – I’ve had these for 15 years! They worked great to cover the chipboard with a lovely sheen of colour!


  1. I coated the snowflakes with a wash of the white paint before adding them to the stocking.


  1. I painted the Noel from the Words of Christmas set with black paint and then brushed it lightly with white acrylic paint before adding some Liquid Applique. As soon as you heat the Liquid Applique it puffs up like real snow!


  1. I tucked some Mini Ephemera from the Tim Holtz idea-ology pack into the top of the stocking and added some Studio Katia sequins and Ranger Stickles – because you gotta glitter it at Christmas! A few drops of Glossy Accents to the berries and ephemera adds even more texture and dimension.


That finishes off this pretty Christmas stocking wall hanging! You could even use it as a beautiful tag to add to a special gift on the big day!


I hope you are enjoying the start of December, and get to take some crafty time for yourself!


Southern Ridge Trading Company Supplies Used:

- Snowflakes (comparable to THESE)

Other Supplies Used:

- Cricut Vinyl
- White Felt
- Pom-Pom Trim
- Tonic Studios: Nuvo - Silver Crystal Drops
- ArtQuest Stargazers Watercolor Palette
- Liquid Applique
- White Acrylic Paint
- Ranger Ink: Stickles, Glossy Accents and Tim Holtz Distress Paint
- Studio Katia: Sequins
- Tim Holtz Idea-ology: Mini Christmas Ephemera

Thanks so much for stopping by. Wishing you a very Merry Christmas!

Hugs,
Karla


Saturday, November 30, 2019

Peace Christmas Card with Nancy Nickel

Hello! It's Nancy here with a fun new project!
Today I have used the fabulous chipboard
from Southern Ridge Trading Company
 to create a very elegant Christmas Card!


Here's what I used:


I began with a white cardstock card base.
I cut a white Glitter Cardstock panel to cover the front of the card.
Then I die-cut a blue Glitter Cardstock oval, 
and centered it over the white panel.


I inked the Angel chipboard piece up with embossing ink,
sprinkled it with the glittery white embossing powder, 
and set it with my heat gun.
I then adhered the angel to the center of the blue oval.


I repeated that process with the glittery blue embossing powder,
on the "Peace" chipboard.
Then I adhered it in place across the bottom of the card.


Finally, I added a sheer white ribbon to the top of the card.


Southern Ridge Trading Company Products Used:


Other Supplies Used:

- White Cardstock, 
- DCWV: White and Blue Glitter Cardstock
- Tim Holtz for Ranger Ink: Distress Embossing Ink
  - Glitters Galore Cosmic Embossing Powders: Winter White and Ice Rink
- Celebrate It Ribbon.
* * * * *
Thanks so much for stopping in today!
I'll have another project share for you soon!

* * * * *