Monday, July 29, 2019

Mixed Media Card- Totes Adorbs! with Ruchi

Hello friends!! Ruchi here from Ruchi's Crafeteria and I'm back with my inspirational project.


Today I've created a simple mixed media card with minimum supplies.


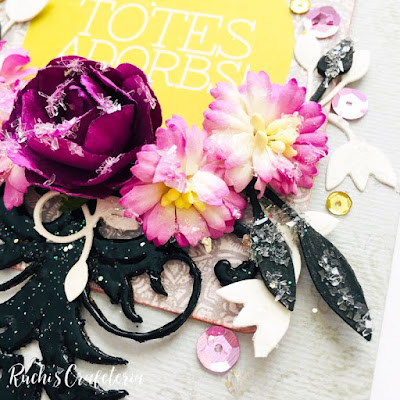
I picked a grey card stock and stamped some demask design using Altenew Warm Gray inks. Then glued Prima ATC tag Totes Adorbs which means Totally Adorable!! 


Picked SRTC Damask Corners chipboard and heat embossed it with Ranger Black embossing powder. I just applied Prima Heavy Gesso Black on SRTC Foliage Leaf Branch chipboard.


Arranged all the elements like SRTC chipboards, paper flowers, die cut leaves and glued them on my card base. Sprinkled some Diamond Dust and Finnabair Glass Glitters on them.


That’s it for today!! Hope you like my today's project. Don’t forget to check SRTC shop for these chipboards and some other awesome designs.

Southern Ridge Trading Company Supplies Used:


Other Supplies Used:

- Prima Marketing:  ATC Tags and Heavy Gesso Black
- Ranger Ink: Black Embossing Powder
- Versamark embossing ink
- Finnabair: Glass Glitters
- Altenew: Warm Gray Mini Cube Set
- KaiserKraft Flowers
- Demask stamp, sequins, grey cardstock, diamond dust, glue, die cut leaves are from my stash


See ya next time.
Till then happy crafting!!
Ruchi


Friday, July 26, 2019

Innocent Scrapbook Layout with Gloria Lee

Hello crafty friends!
Happy Friday!!!

Gloria here today and happy to share of my project.
 I made a scrapbooking layout using Word Mix #2 and Leafy branches chipboard die cut from Southern Ridge Trading Company Shop.

I made a 12 x 12" layout with my son's photos.


I choose Word Mix #2 , Leafy branches chipboard die cut and two baby photos , yellow card stock.
Here are a few step outs showing how I got my pieces together before adhere them.


I painted the edges of designer paper pieces with Hero arts inks.


I painted the chipboard cuts with green and dark blue colours.


I adhere the papers, coloured chipboards and photos on the yellow base card stock.


And added 'prayer' die cut and some flowers.
Here’s a closer look at the Leafy branches.


Southern Ridge Trading Company Supplies Used:


Thank you so much for stopping by and have a wonderful day!
Happy crafting!

Gloria


Monday, July 22, 2019

“Just Be” Vintage Altered Plate with Karen Jiles


Hi there, 

It’s Karen sharing a “Just Be” Vintage Altered Plate that I created with the Exhale Word Mix and Penny Farthing Bike chipboard.  I coupled the products with a vintage plate, some expanding mousse, flowers, pins and clear gems. The products were perfect together.  Take a peek at how this project came together in the tutorial below.


Step 1: Trim patterned papers down to layering sizes and run through Xyron machine to apply adhesive to the papers. Adhere papers together and then adhere layered papers to chipboard layer.


Step 2: Sand patterned paper and chipboard edges using a sanding bar.


Step 3: Adhere “Just Be” and Bike chipboard, corrugated board and corkboard embellishments to the patterned paper layers. Note: These embellishments added some great texture and awesome details.


Step 4: Adhere quote, flowers, clear pebbles and heart pins. Set aside.


Step 5: Apply Worn Linen Expanding Mousse to the edges and random areas of the plate. Heat the expanding mouse to create bubbled texture. Using a paintbrush, tap on some gesso. Note: This plate made the perfect base for this project. The colour was perfect and extremely lightweight material.

Just Be Altered Plate-SRT-6-Karen Jiles

Step 6: Using E6000, adhere the patterned paper layer to the plate and tap on some more gesso to enhance the overall design.


Step 7: Continue embellishing as desired.


Southern Ridge Trading Company Supplies Used:


Other Supplies Used:

- Plate (Lightweight)
- Patterned Papers & Coordinating Paper Elements
- Expanding Mousse (Worn Linen)
- Foam Tool
- Flowers
- Heart Pins
- Clear Pebbles
- Chipboard
- Corrugated Board
- Sanding Bar
- Corkboard Embellishments
- Gesso (White)
- Paintbrush
- E6000
- Xyron Machine
- Heat Tool
- Trimmer

This project was so much fun! It enabled me to combine some great embellishments with an everyday use product to create a cool displayable piece of art. 
Thanks so much for stopping by today.
Karen

Wednesday, July 17, 2019

Love Card with Pam Bray


Hello to all our Southern Ridge Trading Company Fans!!!
Pam here today sharing the "Love" of chipboard today with a super easy embossed card using fabulous chipboard from Southern Ridge Trading Company. 


Begin by adhering pattern paper to card base. Emboss white card stock using collage stamp, embossing ink and embossing powder. Adhere to front of card.


Apply embossing ink to spot on top of card front; add Cotton Candy Rock Candy Embossing Powder to top. Emboss. Fussy cut small pattern paper butterfly; add to top of embossing powder.


Apply embossing ink to top of Southern Ridge Trading Company Mina Butterfly Trellis chipboard; apply Caramel and Limeade Rock Candy Embossing Powder to top of ink. Heat emboss.


Apply embossing ink to top of "Love" word from the Southern Ridge Trading Company Words of Christmas; apply Limeade Rock Candy Embossing Powder to top of ink. Heat emboss.


Southern Ridge Trading Company Supplies Used:


Other Supplies Used:

- Graphic 45:  Botanical Tea Papers
- Blank Page Muse: Daisy Collage Stamp Set
- Emerald Creek Craft Supplies: Rock Candy Embossing Powder: Limeade, Caramel and Cotton Candy (Coming Soon...Contact Emerald Creek Craft Supply)
- Emerald Creek Craft Supplies: Glacier White Embossing Powder
- Xyron Adhesive
- Ranger Ink: Embossing Ink
- White Card Stock
- 5" x 6 1/2" Card Base

Thank you so much for stopping by and have a wonderful weekend!
Happy crafting!
Pam


Monday, July 15, 2019

Take Me To The Sea Mixed Media Tag with Ruchi

Hello friends!! Ruchi here from Ruchi's Crafeteria and I'm back with my inspirational project.

It's hot, bright sun outside and all are planning their vacation at beach side. So I've created a tag on this seashore theme as I love beaches too :)


I chose some sea colours and seashore elements for my tag. Picked SRTC Mini Ocean Set, Fish Net and Foliage Pieces chipboards and applied different metallic paints on them. Then heat embossed with gold, orange and clear embossing powders.


Chose mixed media technique to create my tag. Textured my tag base and did some stamping to create background. Layered some Prima papers, and all the SRTC chipboards together and then embellished them with some Prima Art Stones, sequins, stamped leaves, glitter gold and shells which I collected from my various beach trips :)


That’s it for today!! Hope you like my today's project. Don’t forget to check SRTC shop for these chipboards and some other awesome designs.

Southern Ridge Trading Company Supplies Used:


Other Supplies Used:

- Prima Marketing: ATC Tags, Art Stones and Modelling Paste
- Ranger Ink: Gold and Orange embossing powder
- WOW clear embossing powder
- Versamark Ink
- Posca Markers
- Expressions Craft: Metallic Paints and Alaska Gold glitters
- Stamps are from My Favorite Things, Mudra Craft Stamps, Lesia Zgharda Stamps
Altenew Artist Markers
- Sequins, papers, stencil, diamond dust, glue, shells are from my stash.

See ya next time.
Till then happy crafting!!
Ruchi


Friday, July 12, 2019

I Said Yes to the Dress Layout with Gloria Lee

Hello crafty friends!
Happy Friday!!!

Gloria here today and happy to share of my project.
 I made a wedding scrapbooking layout using Say Yes to the Dress and Mini Connected Hearts chipboard die cut from Southern Ridge Trading Company Shop.

I made a 12' x 12' layout with my wedding photo.


When I saw the Say Yes to the Dress Chipboard, I decided to make a wedding page.
First, I coloured the Say yes to the Dress and Mini connected Hearts chipboard with white paint and I covered the dress, yes and hearts with Glossy accents and added glitters.


I painted a part of 12'x12' white card stock with watercolours and added some ink splatters all over the panel.


I cut some papers and adhere on the base card stock.


I stamped some flowers on a tracing paper with embossing ink, white heat embossed them and fussy cut them with my Cutter Bee scissors.  


I adhere my 15 years ago photo , the beautiful chipboards and the flowers .
The chip boards are so beautiful. 
The mini connected hearts is so adorable and perfect for wedding cards.


The hearts make cards so beautiful.
I made this card for our church member's wedding.


Southern Ridge Trading Company Supplies Used:


Thank you so much for stopping by and have a wonderful day!
Happy crafting!

Monday, July 8, 2019

Explore Card with Katelyn Grosart

Hey Southern Ridge Trading Company fans, Katelyn here. Travelling has become such a big part of our lives these days, that going away for a long trip, isn't as common as it used to be. In light of those special people in your lives that are going away on a long trip, why not create a card and give one to them to celebrate the fact. To inspire you, I've created this fun Explore card. You'll want to read below as I share with you how to embellish the chipboard pieces for my Explore Card at home.


From the Create, Explore, Relax set, cut out the Explore word. Using a blending tool with foam, blend Walnut Stain Distress Oxide Ink over the entire surface of the word.


Next, you'll need the Sm. World Globe.


From the Plain Banners, you'll need three banners. I traced the banners around two pieces of patterned paper. Cut the three banners out. Adhere the paper banners to the chipboard banners and punch holes through the top of the banners. Ink the edges of the banners using Walnut Stain Distress Oxide Ink and a blending tool with foam.


The last chipboard piece you'll need the large frame from the Abstract Frame Set. Using a blending tool with foam, blend Antique Linen Distress Oxide Ink over the entire surface of the frame. Apply Emboss It Ink to the frame and sprinkle Tidal Lotus embossing powder over the entire surface of the frame. Tap off the excess powder and emboss with a heat tool.


Cut three patterned paper pieces that measure 4 1/4" x 5 1/4", 4 1/2" x 5 1/2" and 4 3/4" x 5 3/4" to mount in behind of the frame. Once the frame is mounted over top of the image, adhere the banner through the top left hand hand corner of the frame. Adhere a large white rose and two coral roses above the banner.


Adhere the Explore word to the bottom portion of the frame. Adhere a coral and a mint rose to the left side of the E in the explore word. In the bottom right hand corner of the frame, adhere one large white rose, two coral roses, two mint roses and two small white roses.


Adhere the globe above the flowers. Add embellishments from the paper collection as desired. Adhere two coral roses and one mint rose above the globe.


Here are a few closeup photos of the finished card.


Here is the finished Explore Card.


Southern Ridge Trading Company Supplies Used:

- Sm. World Globe
- 10mm roses: Coral, Mint and White
- 20mm roses: White

Other Supplies Used:

- Emerald Creek Craft Supplies: Tidal Lotus Embossing Powder
- Mintay: Wanderlust Collection
- Tim Holtz for Ranger Ink: Distress Oxide Ink - Walnut Stain & Antique Linen and Blending Tool with Foam
- Ranger Ink: Emboss It Dabber
- Creative Scrapbooker Magazine: Superstock Cardstock
- Misc: Twine

Until Next Time!

- Katelyn