Friday, November 30, 2018

Christmas Wall Plaque with Monica Edwards

Hi everyone! It's almost Christmas time woo hoo... so I am sharing a wall plaque. 


I made by using one of the pages from the Dingbat mini album and covering it with Graphic 45 patterned paper.


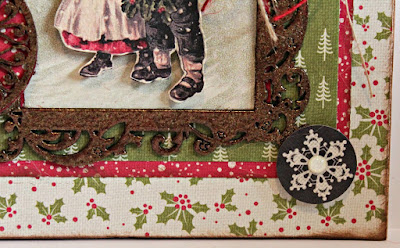
I then took the Chain Frames covered it with gold embossing powder to match the colours in the paper and used to my frame my photo.


 I added some flowers and burlap ribbon to hang it up with.  Makes a perfect gift idea or a fun home decor piece for the holidays.


Southern Ridge Trading Company Supplies Used:

Other Supplies Used:

- Graphic 45 Paper
- Ranger Ink: Super Fine Gold Embossing Powder
- Glitter Foamiran
- Bead Spray
- Teresa Collins Clear Adhesvive

- Monica

Monday, November 26, 2018

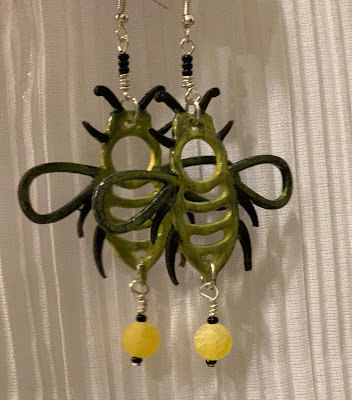
Bumble Bee Earrings with Deonna Riegler

Hello all my crafty friends,

Hopefully this post will bring a little sunshine into a rather dreary time of the year.  These cute little Bumble Bee earrings were make with the bumble bee set from Southern ridge trading company.


I first painted the earrings with black and yellow.  Let them dry well and embossed each area with yellow and black embossing powder and let cool.


I dug out my trusty jewelry making supplies and got started. I added complimentary beads and silver finding to complete the sunny look.


Southern Ridge Trading Company Supplies Used:

- Bees

I hope you enjoy!
Deonna


Friday, November 23, 2018

Believe Canvas with Pam Bray


Hi Southern Ridge Trading Company Fans!!! Pam here today sharing my Believe Canvas using some amazing Southern Ridge Trading Company Chipboard!!! It is never to early to start creating home décor pieces for the holidays!  


Begin by inking pattern paper using Nutmeg ink; adhere to top of 8" x 10" Canvas. 


Add mat pattern paper to top of canvas along with a scallop border and border strip. 


Emboss Southern Ridge Trading Company Scroll FrameBelieve and Rope Ornament using the Ancient Amber Baked Texture Embossing Powder. 


Adhere prepared Believe to top of canvas. 


Adhere embossed Scroll Frame to top of pattern paper; adhere to top of frame. Fussy cut second image from pattern paper. 


Add second image to top of frame with pop dots. Punch 2" circle from pattern paper; adhere to base of  Rope Ornament Adhere embossed top of Rope Ornament to base. Add to front of canvas with pop dots. 


Add sticker to canvas along with enamel dots. 


Add twine bow to Rope Ornament and tie to the "B" on the Believe.


Add stickers to top of canvas; add a few with pop dots to create added dimension. Add glitter white enamel dot to center of Rope Ornament.


Southern Ridge Trading Company Supplies Used:


Other Supplies Used:

- Emerald Creek Craft Supplies: Baked Texture - Ancient Amber Embossing Powder
- Authentique: Nostalgia Paper Collection
- Colorbox: Nutmeg Blend
- 8" x 10" Canvas
- Tan and Red Twine
- Red and Glitter White Enamel Dots
- Glue Gun and Glue Sticks
- Xyron: Creative Station with Permanent Adhesive
- Pop Dots

I hope you have enjoyed my easy tutorial on how to make your very own Believe Canvas for your home or for a gift idea this holiday season!  Hugs Pam


Wednesday, November 21, 2018

Because every Picture tells a Story Scrapbook Layout with Laura Gilhully

Good morning!

As a mom of two boys and married to great manly man type of guy – I get excited when I find masculine elements I can use on my pages! 


For this layout I used the Gear corners from Southern Ridge Trading Company 


I covered the corners with different colours of embossing powder to get the look I wanted, then added some metal gears.

I cut apart the one gear corner and added a few pieces here for dimension


Here is the piece I cut apart – love that I can do that without the chipboard fraying or falling apart!


Here you can see the mixed media work I did in the background by using texture paste through the circle stencil from Southern Ridge, then different colours of embossing powder.

Southern Ridge Trading Company Supplies Used:

Gears Corners

Thank so much for stopping by 

Laura

Tuesday, November 20, 2018

Beautiful Chipboard Album with Monica Edwards

Hi everyone Monica here with my first crafty post for Southern Ridge Trading Company.  I am sharing the Dingbat Chipboard mini album using Fabrika Decoru patterned paper.


Adhere the patterned paper to your mini and using a kraft knife cut the paper to the shape of the mini album.  Once done to embellish the front of the mini I created some simple foamiran flowers.  I took a flower die and diecut a total of 9 flowers.  You will layer 3 flowers per bloom.  To colour my foamiran I used soft oil pastels which in my opinion makes a difference.  The softer pastels colour the foamiran very smooth and the normal ones you tend to have to press harder to get the colour to stick.


 Once done simply glue them together using some flroal adhesive and give them a slight twist to give your flower some shape.  Depending on the thickness of the foamiran you wont want to twist to hard or you can rip the foamiran.


Next I took some Brillance ink in Graphite and coloured my chippie Leaf Sprigs to coordinate with my colour scheme. 


 A perfect gift idea for friend, loved one or hmmm... just keep it for yourself!!


I hope everyone enjoyed my post and be sure to join our Facebook Group we would love to see your creations:

SOUTHERN RIDGE TRADING COMPANY

Southern Ridge Trading Company Supplies Used:


Other Supplies Used:

- Inks: Brillance Graphite Ink
- Adhesive: Lawn Fawn - Floral Adhesive
- Embellishment: Foamiran
- Other: Gallery Soft Pastels and Seam Binding Ribbon - Black

Thanks for joining me today!
- Monica

Monday, November 19, 2018

Merry Christmas Card with Karla Yungwirth

Hi friends, Karla back today with a masculine Christmas card using the awesome Multi Gear Stencil and Mini Wood Gears. I decided to try the Alcohol Lift technique and love how it turned out!


I started by adding Ranger Alcohol Ink to a piece of Yupo paper cut to fit my card. I grabbed a couple greens, a blue and a mushroom colour. As I dried the inks with my heat gun it pushed them around a bit. Then, I layered the Multi Gear Stencil on the background and put a bit of Alcohol Lift Reinker on a sponge. I lightly sponged all over the background and when I removed the Stencil I layered a baby wipe on top of the background- being careful not to rub, I just pressed it down and it pulled up the Ink colour. I then let it dry a bit and lightly buffed with a soft tissue to remove a little more ink. I stamped Merry Christmas with the Wild Whisper Christmas Comfort 4x4 stamp set directly on the background. 


I created a metallic effect on the Mini Wood Gears by embossing them with Emerald Creek Hammered Metal and Charred Gold Embossing Powders. I love this Jeep from the Wild Whisper Christmas Comfort 2x3 stamp set! I stamped it on kraft cardstock and coloured it in with Jane Davenport Magic Wand Coloured Pencils and added some Emerald Creek Pyrite Gemstones under the wheels. 


Southern Ridge Trading Company Supplies Used:


Other Supplies Used:

- Emerald Creek Craft Supplies: Hammered Metal Embossing Powder, Charred Gold Embossing Powder and Pyrite Gemstones
- Ranger Ink: Alcohol Ink, Yupo Paper and Alcohol Lift Reinker
- Wild Whisper: Christmas Comfort 2x3 & 4x4 Stamp Sets 
- Jane Davenport: Magic Wand Coloured Pencils

This was a quick and easy card to do, but one that will make people think you spent a long time making it! Grab your Southern Ridge Stencils and try it out!! 

- Karla


Thursday, November 15, 2018

I Said Yes to the Dress Scrapbook Layout with Deonna Riegler

Hello all my artistic friends,
This is my first project for November that I made for the Southern Ridge Trading Company Design team.

I made this layout of my new daughter in law’s wedding dress.  It was such a beautiful day and she is such a beautiful woman on her happy day.  I just had to make this page of her!

First I took the “Love” word and misted it with black distress ink then I heat set it and applied a layer of shimmering paint on top.  I then took the “say yes to the dress” chipboard and misted it with red ink then I heat set it and applied a layer of shimmering paint on top.  Then put them both aside to dry.


I took my papers and picture to decide how I wanted to lay out the page.  I matted the picture with several papers. Inked the edges and applied the photo.  Placed a large red feather behind the picture, cut some tags of various shapes out of papers and matted some saying with paper to bring the focal to the train of her dress, made sure to add the date and attached everything with pop dots.  


I then decided how I wanted my chipboard pieces to best pop and then attached them with tape runner and liquid glue.


Southern Ridge Trading Company Supplies Used:


Hope you enjoy this page as much as I enjoyed the wedding!
Happy crafting,
Deonna


Wednesday, November 14, 2018

Adventure Scrapbook Layout with Katelyn Grosart

Hey Southern Ridge Trading Company fans, Katelyn here. It's hard to believe that November is here and it's time for me to start thinking about creating my Christmas Cards. For today's post though, I've created this Adventure Scrapbook Layout which features a variety of our popular chipboard pieces. You'll want to read below as I share with you how I embellished the chipboard elements for my layout.


To start, you'll need both of the Swirl Corners #2. Apply Emboss It Ink to the entire surface of each corner. Sprinkle Weathered Wood embossing powder over top of each corner. Tap off the excess powder and emboss with a heat tool. 


Next, you'll need the large frame from the Abstract Frame Set. Apply Emboss It Ink to the entire surface of each corner. Sprinkle Midnight Black embossing powder over top of each corner. Tap off the excess powder and emboss with a heat tool. 


Take the Adventure Word out of the package. Apply Emboss It Ink to the entire surface of each corner. Sprinkle Gun Metal embossing powder over top of each corner. Tap off the excess powder and emboss with a heat tool. 


Next you'll need the small cedar tree from the Cedar Trees package. Apply two coats of Walnut Stain Distress Paint to the bottom of the cedar tree. Apply two coats of Pine Needles Distress Paint to the top half of the cedar tree. 


The last chipboard element you'll need is a chipboard tag. Trace the tag around a piece of coordinating patterned paper.  


Adhere the patterned paper tag to the chipboard tag. Ink the edges of the chipboard tag using Black Soot Distress Ink.


Once the patterned papers have been layered together, adhere one swirl corner to the left of the banner element. Adhere the patterned papered chipboard tag to the right of the banner element.


The other swirl corner is adhered in the top left side of the banner element and then the other patterned papers are layered over top of the corners.


The abstract frame gets adhered over the photo. The cedar tree gets adhered to the bottom left of the abstract frame.


Once the border strips were adhered, adhere the adventure word to the right of the frame using adhesive and foam squares.


Here's the finished Adventure Scrapbook Layout.


Southern Ridge Trading Company Supplies Used:

- Chipboard Tags

Other Supplies Used:

- Emerald Creek Craft Supplies: Weathered Wood Embossing Powder, Gun Metal Embossing Powder and Midnight Black Embossing Powder
- Tim Holtz for Ranger Ink: Distress Oxide Ink - Black Soot, Distress Paint - Walnut Stain & Pine Needles and Blending Tool with Foam
- Ranger Ink: Emboss It Ink Dabber
- Kaisercraft: Mountain Air - Tree Trunks, Rugged, Strong and Adventure
- Tombow: Mono Multi Liquid Glue
- Misc: Heat Tool

Until Next Time!

- Katelyn