Monday, April 30, 2018

For You Tag with Katelyn Grosart

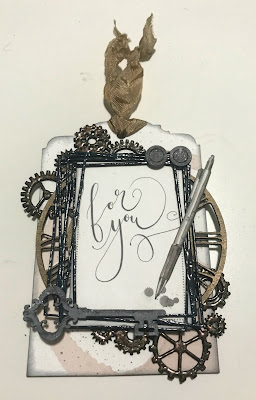
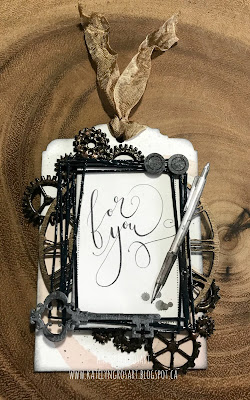
Hey Southern Ridge Trading Company fans, Katelyn here. For today's post, I've created this For You Tag that's perfect to add to a gift bag or to give to someone special in your life.  You'll want to read below as I share with you how to recreate my For You Tag at home.


To start, cut two pieces off of the Multi Gears Pattern. Apply Emboss It Ink to the two chipboard pieces. Sprinkle Burnt Copper Leaves Embossing Powder over each chipboard piece. Tap off the excess powder and emboss with your heat tool. Set the chipboard pieces aside to cool.


Take the small Abstract Frame Set out of the package. Apply Emboss It Ink to the frame. Sprinkle Baked Texture - Deep Sea Embossing Powder over the frame. Tap off the excess powder and emboss with your heat tool. Set the frame aside to cool.


From the Vintage Scroll Keys, take one out from the package. Apply two coats of Hickory Smoke Distress Paint to the key. Once the paint has dried, rub Black Soot, Brushed Pewter and Pumice Stone Distress Crayons overtop of the paint. 


Select two nuts from the Nuts & Bolts package. Apply two coats of Hickory Smoke Distress Paint to the nuts. Once the paint has dried, rub Black Soot, Brushed Pewter and Pumice Stone Distress Crayons overtop of the paint. 


Cut the Fine Clock Face in half. Rub Bronze Age Art Alchemy Metallique Wax overtop of each of the clock pieces. 


Take a Chipboard Tag out of the package. Place the chipboard tag onto the patterned paper piece and trace the tag. Cut the tag out. Ink the edges of the patterned paper tag using Black Soot Distress Ink and a blending tool with foam.


Ink the edges of the chipboard tag using Black Soot Distress Ink and a blending tool with foam.


From the Card Sheet Travel For You patterned paper piece, cut out the "For You" card and fussy cut the pen out of one of the other squares. Ink the edges of the "For You" card and the pen using Black Soot Distress Ink and a blending tool with foam.


Adhere the patterned paper tag to the chipboard tag. Punch a hole at the top of the tag.


In the top left hand corner of the tag, adhere one of the gear pattern pieces. In the bottom right hand corner, adhere the other gear pattern piece. Adhere the right hand side of the clock face in the middle  and slightly right so that it hangs off of the tag. Adhere the left hand side of the clock face in the middle and right up against the left hand side of the tag.


Adhere the For You card to the middle of the clock face. Adhere the abstract frame overtop of the For You card.


Adhere the key to the bottom left hand side of the frame. Adhere the pen to the middle right hand side of the frame. Adhere the two nuts to the top right hand corner of the frame. To finish your tag, tie some ribbon to the top of the tag.


Here are a few close up photos of the finished tag.


And here's the finished tag.


Southern Ridge Trading Company Supplies Used:


Other Supplies Used:

- Tim Holtz for Ranger Ink: Distress Ink - Black Soot, Distress Crayons - Black Soot, Pumice Stone & Brushed Pewter, Distress Paint - Hickory Smoke and Blending Tool with Foam
- Ranger Ink: Emboss It Ink Dabber
- Emerald Creek Craft Supplies: Burnt Copper Leaves Embossing Powder and Baked Texture - Deep Sea Embossing Powder
- Prima Marketing: Art Alchemy Metallique Wax - Bronze Age
- Alexandre Renke: Coffee Cup with Pattern and Card Sheet Travel For You
- Tombow: Mono Multi Liquid Glue
- Misc: Ribbon and Heat Tool

Until Next Time!

- Katelyn


Wednesday, April 25, 2018

Charming - Vintage Car Canvas with Erin Quiding-Sampson


Hi I’m back on the blog today to share a little canvas with you. This vintage car canvas would be a great gift for fathers day.
To start, I coated my Chipboard pieces and a flat 5 by 7 canvas with Gesso.
While those were drying, I got my acrylic paint ready to pour onto my canvas. I wanted to make a marbled background, so I used DecoArt Black, white, silver morning and spun gold Acrylic paints. I added a little bit of pouring medium to the black and white paints to help them flow better. I poured my paint onto the canvas in puddles, layering them on top of one another.
When I thought I had enough paint to cover, I grabbed something large enough to hold the canvas to catch all the paint drippings.
Angle the canvas back and forth until you get it all covered. This needs to dry for at least overnight. Mine is still not dry as I type this, but I live in a VERY WET climate.
Next, I painted my chipboard. I used my finger to rub black and silver paint across the top of the vintage car. I wanted to highlight all the grooves of the grill and head lights and I find this works very well. I painted the Chipboard word using Silver and the decorative pieces black. After these were dried, I used Matte gel medium to adhere the chipboard down onto the canvas. Once I get it completely dried I will place it into a small picture frame for hanging.
Thank so much for stopping by, please check out all the vintage chipboard pieces on www.chipbaord.ca to create your own canvas.

Southern Ridge Trading Company Products Used:

Other Supplies Used:
- Deco Art Acrylic Paint
- DeSerres Acrylic Pouring Medium
- Liquitex Matte Gel Medium
- Gesso
- 5"x 7" flat Canvas

Thanks so much for stopping in.  
~ Erin


Tuesday, April 24, 2018

Silver Box with Tracy Sagriff

If you knew me you would know that I love all things vintage and frilly. That often is reflected in the art that I create. This project falls under that category.


I fell in love with the Strawberry Leaf Oval Frame from Southern Ridge Trading Company and knew that it was going to be the foundation of this design. When I first took it out and began creating I had intended to use it as the backdrop for a very summery picnic themed altered cigar box. I imagined making big red strawberries to emphasize the incredible detail in this cut. Somewhere along the line my vintage vibe took over and before I knew it I had created a very vintage inspired faux hammered silver box. That just shows how one piece can have so many possibilities.

  1. Start by applying a thin coat of the black gesso to the entire box. This makes it so much easier than trying to get every nook and cranny later.
  2. Use the chipboard frame to trace the shape on the napkin or rice paper. Be sure to think about what part of the image you want to be featured on the box. Set the cut image aside.
  3. Adhere the chipboard frame to the box top using gel medium. Allow plenty of time for it to dry thoroughly.
  4. Once dry adhere your resin roses to the box. Again let that gel medium really dry before moving one.
  5. Coat the entire box top, frame and roses with a thin coat of black gesso. Once dry you can paint the box. I used an undercoat of light green then a layer of crackle medium and then finally a layer of black paint. When the cracking was done I gently rubbed the entire box top with silver texture luxe.
  6. Apply a thin layer of gel medium to the inside of the frame and glue down your image.
  7. Once dry you can use your foil and texture luxe to bring out the areas you want to be silver.  I find you have the best control if you work with your fingers.
  8. Coat the key piece in silver texture luxe and adhere it along with any embellishments or bling to the box top.
  9. There you go a beautiful faux silver box which would make a PERFECT GIFT for Mother’s Day.


Southern Ridge Trading Company Supplies Used:

Other Supplies Used:
- Cigar box or Wooden Box
- Acrylic Paint : Black & Green
- Black Gesso
- Resin Flowers
- Resin Buttons or Bobbles
- Gel Medium
- Rice Paper or a pretty napkin in a pinch
- Silver Foil
- Silver Texture Luxe

- Tracy


Monday, April 23, 2018

Explore Your World Scrapbook Layout with Charlene Byrd

Hello Bloggers!
Charlene here! Thank you so much for joining me today!


Look at these 2 handsome fellas! My son Hunter and his best friend Adam on the day of their high school prom.  These 2 are about to set off on the great big adventure called life. I am so happy that they have each other to lean on, good friends are rare and hard to find. Life is about making an impact, go off and explore the world and make your mark on it! I am so proud of these men!


I didn’t want the swirl on the bottom of the Explore word so I simply used my Tim Holtz scissors to cut it off (I find they are the best scissors for the job!). Then I rubbed Black Soot Distress ink across it.


I stained the circle frame with Black Soot Distress Stain and then cut it into 2 pieces. I also stained the stars with black Soot.


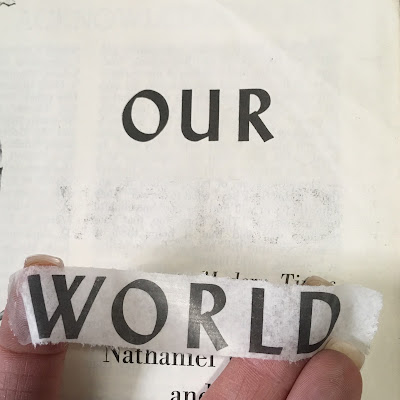
I was going to add some old book paper to the photo collage but when I pulled out an old book it had the word WORLD in the title. I really liked it! So I took a piece of scotch tape and burnished it over the word and pulled up the tape and voila – I have the word World!


Southern Ridge Products Used:

Other Products Used:
- Kaisercraft paper
- Basic Grey paper
- Tim Holtz Graphite paper
- Corrugated Paper
- Tim Holtz for Ranger Ink: Black Soot Distress Stain and Ink
- Cheesecloth
- Alpha stickers

Until next time!
Happy Scrappin!
Charlene


Friday, April 20, 2018

Shine On with Sandy McTier


I’ve always loved the mystical, magical and whimsy of fairies!  
When I saw the SRTC Fairy chipboard pieces, I just knew I had to create with them!!


Prepping the Pieces:
  • I painted the Mason jar surface with DecoArt’s All Purpose Sealer and let completely dry.
  • Once dried, I gave it a light sanding and then painted a smooth layer of DecoArt Media Gesso and let completely dry again. Once dried, I gave it another light sanding to remove any dust.

Fairy:
  • I painted the fairy with Lamp Black and let dry.
  • I wanted her to be just a silhouette but also wanted her wings to shine just a bit. So, I painted DecoArt Interference in Violet and Turquoise on her wings.

Mason Jar:
  • I painted over the jar with some Glazing Medium and then, using an Angle brush, floated White in the center, Desert Turquoise on the outer edges of the white and then finished with Dioxazine Purple along the edges. I softly blended between the colors with a mop brush so that the colors would transition into one another. I let the purple run right up into the lid too.
  • Next, I stenciled some of the colors used in the jar over a piece of Punchinella and finished by stenciling some White here and there. I also wanted some smaller dots, so I stenciled over a piece of dry wall tape with circles on it.
  • Using a liner brush and thinned down White, I added some sparkles here and there in the jar.
  • I dry brushed some Dioxazine Purple swirls up from her hand and, once dried, I dry brushed some White over that… going for a misty look. I added some dots and sparkles with the liner brush and thinned down White.


Mason Jar (cont.):
  • I painted the lid with a mixture of Lamp Black and White and then floated in a line to separate the sections.
  • Once dried, I dry brushed some Dioxazine Purple and Desert Turquoise on the sections. Then, I dry brushed some White on the left side and on each of the sections, as shown in the picture.  

Finishing Touches:
  • I used a small letter stamp set and stamped the words “Shine On” using a black Staz-On ink pad. Even though I lined it up with a piece of painters tape, those letters aren’t always straight on the block, so I wasn’t too fussed if they lined up exactly or not.
  • Once dried, I painted a layer of DecoArt Media Soft-Touch Varnish over the entire piece.
  • Next, I used the On Point Glue by Imagine to glue the fairy onto the jar and then shaded underneath her arm, skirt and lower wing with Dioxazine Purple.
  • Finally, I looped some armature wire through the holes and, using needle nose pliers, wrapped it around the back wire and then into a little twirl.  

Optional:  Glamour Dust the swirls, if desired.

Southern Ridge Trading Company Supplies Used:


Other Supplies Used:

- Surface: Mason Jar from www.cdwood.com Item#31-L352
- Dynasty Brushes: Black Gold 1/2" Angle, 3/8" Angle, IPC Large Oval Foam, Medium Tracy Morea Stencil Brush, Small Mezzaluna, and a liner brush of choice.
(All available from TheBrushGuys.com – use promo code: sandymc for an additional discount)
- DecoArt Americana Acrylics: Desert Turquoise, Snow Titanium White, Lamp Black and Dioxazine Purple
- DecoArt Media Interference: Turquoise and Violet
- DecoArt Media Gesso: White
- DecoArt Media Varnish: Soft-Touch
- DecoArt Glazing Medium
- Imagine On Point Glue
- Misc. Supplies: Punchinella, Circle Dry Wall Tape, Needle Nose Pliers, Staz-on Ink Pad, Small Sanding Block, Wire and an Alphabet Stamp Set.


©2018 Shine On, Sandy McTier Designs ~ all rights reserved

Y’all have a GREAT day and Happy Creating!!  Sandy