Showing posts with label DecoArt Americana Acrylics. Show all posts

Friday, April 20, 2018

Shine On with Sandy McTier


I’ve always loved the mystical, magical and whimsy of fairies!  
When I saw the SRTC Fairy chipboard pieces, I just knew I had to create with them!!


Prepping the Pieces:
  • I painted the Mason jar surface with DecoArt’s All Purpose Sealer and let completely dry.
  • Once dried, I gave it a light sanding and then painted a smooth layer of DecoArt Media Gesso and let completely dry again. Once dried, I gave it another light sanding to remove any dust.

Fairy:
  • I painted the fairy with Lamp Black and let dry.
  • I wanted her to be just a silhouette but also wanted her wings to shine just a bit. So, I painted DecoArt Interference in Violet and Turquoise on her wings.

Mason Jar:
  • I painted over the jar with some Glazing Medium and then, using an Angle brush, floated White in the center, Desert Turquoise on the outer edges of the white and then finished with Dioxazine Purple along the edges. I softly blended between the colors with a mop brush so that the colors would transition into one another. I let the purple run right up into the lid too.
  • Next, I stenciled some of the colors used in the jar over a piece of Punchinella and finished by stenciling some White here and there. I also wanted some smaller dots, so I stenciled over a piece of dry wall tape with circles on it.
  • Using a liner brush and thinned down White, I added some sparkles here and there in the jar.
  • I dry brushed some Dioxazine Purple swirls up from her hand and, once dried, I dry brushed some White over that… going for a misty look. I added some dots and sparkles with the liner brush and thinned down White.


Mason Jar (cont.):
  • I painted the lid with a mixture of Lamp Black and White and then floated in a line to separate the sections.
  • Once dried, I dry brushed some Dioxazine Purple and Desert Turquoise on the sections. Then, I dry brushed some White on the left side and on each of the sections, as shown in the picture.  

Finishing Touches:
  • I used a small letter stamp set and stamped the words “Shine On” using a black Staz-On ink pad. Even though I lined it up with a piece of painters tape, those letters aren’t always straight on the block, so I wasn’t too fussed if they lined up exactly or not.
  • Once dried, I painted a layer of DecoArt Media Soft-Touch Varnish over the entire piece.
  • Next, I used the On Point Glue by Imagine to glue the fairy onto the jar and then shaded underneath her arm, skirt and lower wing with Dioxazine Purple.
  • Finally, I looped some armature wire through the holes and, using needle nose pliers, wrapped it around the back wire and then into a little twirl.  

Optional:  Glamour Dust the swirls, if desired.

Southern Ridge Trading Company Supplies Used:


Other Supplies Used:

- Surface: Mason Jar from www.cdwood.com Item#31-L352
- Dynasty Brushes: Black Gold 1/2" Angle, 3/8" Angle, IPC Large Oval Foam, Medium Tracy Morea Stencil Brush, Small Mezzaluna, and a liner brush of choice.
(All available from TheBrushGuys.com – use promo code: sandymc for an additional discount)
- DecoArt Americana Acrylics: Desert Turquoise, Snow Titanium White, Lamp Black and Dioxazine Purple
- DecoArt Media Interference: Turquoise and Violet
- DecoArt Media Gesso: White
- DecoArt Media Varnish: Soft-Touch
- DecoArt Glazing Medium
- Imagine On Point Glue
- Misc. Supplies: Punchinella, Circle Dry Wall Tape, Needle Nose Pliers, Staz-on Ink Pad, Small Sanding Block, Wire and an Alphabet Stamp Set.


©2018 Shine On, Sandy McTier Designs ~ all rights reserved

Y’all have a GREAT day and Happy Creating!!  Sandy


Wednesday, February 14, 2018

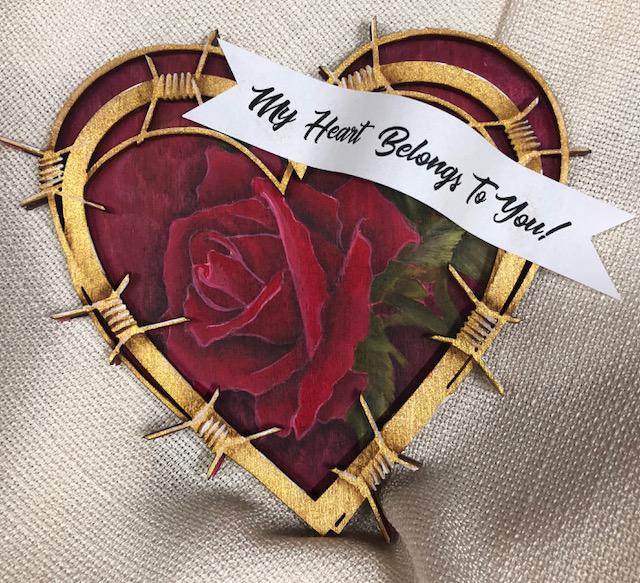
My Heart Belongs To You with Tracy Moreau

Valentines Day inspires many of us to proclaim our love for that someone special! Try making a statement with this Fun valentines  or anytime ornament. A little edgy and all Romance , this barbered wire heart is  a quick and easy project for a  proclamation of Love!

I started with a washed base coat of thinned  Tuscan Red over the panel and then stencilled that with warm white and my favourite Baroque background Stencil. While that dried I used a cosmetic sponge, to apply Extreme Sheen 24 Ky Gold to the Barbed Wire frame.
Once dry I applied a wash of Razzle Berry over the whole surface , to set the stencilled design back just a little. ( I only wanted a little light pattern in the background)


Once I traced and transferred the design to the surface , I based the floral with Tuscan Red and the leaves with Antique Green, then shaded around the floral with thinned Soft Black. I began shading and Highlighting the Floral and the leaves to bring the design forward. As I worked I balanced the design by Applying a wash of Heavily thinned Soft Black over the background to create more contrast.  While that dried I began adding some shading and some highlighting to the barbed wire to create depth and structure to the wire frame.


I glued the frame to the panel and then added a piece of bakers Twine to the top centre in the V of the heart. I borrowed a detail from a friend and added a small banner to the frame with my Own Declaration, but you could choose any message you like. I cut this from card Stock and chose a Lovely font to print my Declaration.


For this project you will need:

Southern Ridge Trading Company Supplies Used:


Other Supplies Used:

- DecoArt Americana Acrylics: Tuscan Red, Soft Black , Asphaltum, Warm White, Antique Green , Margarita, Plantation Pine, Razzle Berry and Extreme Sheen 24Kt Gold
- Dynasty Brushes: Tracy Moreau Stencil Brush, Black Gold 1/4 Angle, Black Gold 10/0 Liner, Black Gold #6 Round and Black Gold  3/4 flat wash.
- Misc: E6000 Glue, and permanent (2) Glue Dots. ( for the paper Banner), bakers twine for the hanger.

Designed By Tracy Moreau


Friday, August 11, 2017

Orchids and Dragon Flies with Tracy Moreau

Dragonflies are my Totem, By Spirit guide so to speak. I have an odd affinity for them and they to me. They frequently land on me when I'am out of doors. I love to watch them fly and am enthralled by them when at rest. The delicacy of their wings and the vibrancy of the colour are inspiring. They are...uniquely elegant.
I have used the laser cut dragonflies in a previous post, but NOT the stencil! And I loved this Tavern Sign piece so, I combined them to create this.

I started with the chipboard Vintage Sign Kit, using the middle piece for the surface (I have other plans for the rest of the pieces!) One chipboard Zen Dragonfly and Dragonfly Stencil. 
I love the Southern Ridge stencils...tons of details!!
I started with base coating the surface with Carbon Lamp Black. Then stencilled the dragonfly with DecoArts Bronze Dazzling Metallic. I just applied the image randomly over the surface taking care to allow portions of the image in a few places.


The stencils are easy to clean up with a little hand sanitizer!

I traced and transfer the floral to the panel and then based coated the Americana Acrylics. The petals are based with Warm White and the centre portion with Light Orchid. I based the leaves with Avocado Dip.


I shaded around the floral using a float of Lamp Black and began shading the floral with floats of Light Orchid, then deepened them with a float of Brilliant Purple. The leaves are shaded with floats of Plantation Pine and highlighted with floats of Margarita/Warm White. I then toned both the floral and the leaves and stems with floats of thinned Asphaltum.


I outlined the edge of the panel with a 18kt Gold Paint Pen. While this was drying I painted the dragonfly with a sponge dabbing first Bronze, then Gold, then Green Metallic and then Peacock Pearl Metallic. I glued a small wooden block to the back of the dragonfly. To give it elevation over the floral.


Here's what you need to complete this project:

Southern Ridge Trading Company Supplied Used:

Other Supplies Used:
- DecoArt Americana AcrylicsLight Orchid, Brilliant Purple, Titanium White, Warm White, Lamp Black, Avocado Dip, Plantation Pine, Sunny Day, Persimmon, Margarita, Asphaltum. Dazzling Metallics: Crystal Green, Peacock Pearl, Bronze and Bright Gold
DynastyBlack Gold Brushes1/2 angle shader, 10/0 Liner and #4 Filbert
Tracy Moreau Stencil Brush1/2 stencil brush

Questions?? Contact me at tracy.moreau@tracymoreau.net

Designed by Tracy Moreau


Thursday, April 6, 2017

Vintage Clock with Deb Antonick


This month I wanted to do something cheerful and colourful to help rid myself of the winter blues. Winter will just never end. I decided to go with a Shabby Chic look and one of my very favourite things ... coffee! 


was thrilled to receive this large vintage clock face to create a project on, so to create the distressed shabby chic look I used DecoArt Chalky Finish paints.


I base coated the entire piece first with the brown (Russet) and let it dry. 
Then I painted over the brown with the lighter green (Refreshing) and let it dry to the touch.


Use a damp cloth to gently rub over the green to expose bits of the brown from underneath.

Then I stencilled the center with a coffee stencil from Studio 12 and the Dark Grey (Relic) Chalky Finish paint.


I then drew on my coffee cup and the heart. (Link to pattern is provided below).
I shaded around my design for a little antiquing with DecoArt Acrylics Asphaltum (dark brown)
I painted the cup with DecoArt Acrylics in soft pinks, and the heart with off white as follows:
Cup:
Basecoat – Cotton Candy
Shade – Boysenberry
Highlight – Pink Chiffon
Deepen Shading - Razzleberry


Heart:
Basecoat – Light Buttermilk
Shade – Fawn
Highlight – Warm White
Deepen shading – Asphaltum

I then stencilled tiny polkadots on the cup with Warm White (White)

I added a chipboard branch and painted the stem with the Asphaltum and the leaves with Foliage Green (green).


I wanted more colour so I added a little butterfly from my ephemera box that coordinated with the colour palette.

I  stencilled the wood Coffee and a cup from the stencil onto the heart.


I finished by adding some steam swirls with my Emboss It pen and some vintage Stampendous Embossing powder.

Southern Ridge Trading Company Products Used:

- Wood Vintage Clock Face (coming soon)

Other Supplies Used:

- DecoArt Americana Décor Chalky Finish Paints:  Rustic, Refreshing and Relic
- DecoArt Americana Acrylics: Asphaltum, Light Buttermilk, Warm White, Fawn, Cotton Candy, Boysenberry, Razzleberry, Pink Chiffon, Foliage Green and Lamp Black (for outlining)
- DecoArt Media Matte Medium, or any adhesive
- Ranger Ink: Emboss It Pen
- Stampendous: Vintage Glitter
- Polka Dot stencil
- Poems for the Morning: Coffee Word Art Stencil 

Here's the link for the line drawing of the coffee cup and heart: https://www.dropbox.com/s/1koacqwjccuh2eu/Vintage%20Coffee%20pattern_DebAntonick.pdf?dl=0

Deb Antonick