Saturday, November 30, 2019

Peace Christmas Card with Nancy Nickel

Hello! It's Nancy here with a fun new project!
Today I have used the fabulous chipboard
from Southern Ridge Trading Company
 to create a very elegant Christmas Card!


Here's what I used:


I began with a white cardstock card base.
I cut a white Glitter Cardstock panel to cover the front of the card.
Then I die-cut a blue Glitter Cardstock oval, 
and centered it over the white panel.


I inked the Angel chipboard piece up with embossing ink,
sprinkled it with the glittery white embossing powder, 
and set it with my heat gun.
I then adhered the angel to the center of the blue oval.


I repeated that process with the glittery blue embossing powder,
on the "Peace" chipboard.
Then I adhered it in place across the bottom of the card.


Finally, I added a sheer white ribbon to the top of the card.


Southern Ridge Trading Company Products Used:


Other Supplies Used:

- White Cardstock, 
- DCWV: White and Blue Glitter Cardstock
- Tim Holtz for Ranger Ink: Distress Embossing Ink
  - Glitters Galore Cosmic Embossing Powders: Winter White and Ice Rink
- Celebrate It Ribbon.
* * * * *
Thanks so much for stopping in today!
I'll have another project share for you soon!

* * * * *

Wednesday, November 27, 2019

Merry Christmas Ornament with Katelyn Grosart

Hey Southern Ridge Trading Company fans, Katelyn here. I'm thrilled to be back on the blog today sharing my Merry Christmas Ornament perfect to give as a gift to someone for their Christmas tree or add it your own. To create my ornament, I've used a variety of our popular Christmas chipboard pieces. You'll want to read below as I share with you how to recreate my Merry Christmas Ornament at home.


To start, you'll need to choose a couple of Christmas papers that coordinate together. From one of the patterned papers, die cut a 3" stitched circle. From the other patterned paper, die cut a 2 1/2" stitched circle. Ink the edges of both circles using Walnut Stain Distress Ink and a blending tool with foam.

For the base of your ornament, you'll need a 3 1/2" circle.


Next, you'll need one of the Etched Merry Christmas Medallion


You'll need one of the Snowflake Wreath - small from the package. Apply a coat of Emboss It Ink to the wreath. Sprinkle Fractured Ice Embossing Powder overtop of the wreath. Tap off the excess powder and emboss with a heat tool. Once the wreath has cooled, repeat the process again with embossing powder, giving your wreath one more coat of powder. 


Choose one of the snowflakes from the Snowflake 714 package. Apply two coats of Brushed Pewter Distress Stain to the snowflake.


From the Itty Bitty Snowflakes, you'll need to take three out of the package.


Choose one of the deer from the Merry Deer Mix. Apply a coat of Emboss It Ink to the deer. Sprinkle Molten Dimensions - White Wonder Embossing Powder overtop of the wreath. Tap off the excess powder and emboss with a heat tool. Once the wreath has cooled, repeat the process again with embossing powder, giving your deer one more coat of powder. Once the powder has cooled, tie a red ribbon bow around the neck of the deer.


Adhere the 2 1/2" circle to the 3" circle. Foam square the 3" circle to the middle of the 3 1/2" ornament base.


Use foam squares to adhere the snowflake wreath to the 3" circle. Adhere the snowflake to the left hand side of the wreath.


Use thin foam squares to adhere the deer overtop of the silver snowflake. Use adhesive and foam squares to adhere the Merry Christmas sentiment to the right of the deer.


Adhere the three itty bitty snowflakes as desired on the wreath. To finish the ornament, add a piece of twine in a loop to the top of the ornament.


Here are a few closeup photos of the ornament.


Here is the finished Merry Christmas Ornament.


Southern Ridge Trading Company Supplies Used:


Other Supplies Used:

- Emerald Creek Craft Supplies: Fractured Ice Embossing Powder and Eileen Hull Molten Dimensions - White Wonder Embossing Powder 
- Tim Holtz for Ranger Ink: Walnut Stain Distress Ink, Distress Stain - Brushed Pewter and a Blending Tool with Foam
- Ranger Ink: Emboss It Dabber
- Misc: Christmas Patterned Paper, Twine, Red Ribbon and Tin Circle

Thanks so much for joining my today!

- Katelyn


Wednesday, November 20, 2019

Blessed Home Decor Mixed Media Canvas with Pam Bray

 
Hi Southern Ridge Trading Company Fans! Pam here sharing my Blessed  Home Décor Mixed Media Canvas using fabulous chipboard! I love creating home décor pieces. Creating with Southern Ridge Trading Company  chipboard and pretty pattern paper makes it easy! 


Begin by inking pattern paper to place on top of  a 6" x 6" canvas. Adhere to canvas. 


Draw around oval shape of Southern Ridge Trading Company Elegant Vintage Flourish Frame to pattern paper; trim to fit oval with scissors. Adhere to top of Elegant Vintage Flourish Frame; add pattern paper scallop borders and strip to center of prepared Elegant Vintage Flourish Frame.


Adhere prepared Elegant Vintage Flourish Frame  to center of prepared frame. 


Paint Southern Ridge Trading Company Blessed Fun Word and  Fall Leaves with white paint; dry. 


 Embossed prepared pieces with Rock Candy Embossing Powders. 


Adhere prepared leaves to top of canvas. 


Adhere prepared Blessed to top of prepared canvas. 


Adhere more of the prepared embossed fall leaves along with flowers and twine bow to prepared canvas. 


Finish canvas with small enamel dots.

Southern Ridge Trading Company Supplies Used:


Other Supplies Used:

- Authentique: November Pattern Paper
- Emerald Creek Craft Supplies: Rock Candy Embossing Powder - Spearmint, Peppermint and Butterscotch
- Tan Twine
- Embossing Ink
- Nutmeg ColorBox Blends Ink
- Prima Flowers
- 6" x 6" Canvas
- White Paint
- Small Brown Enamel Dot
- Xyron: Adhesive Tape Runner

I hope you are inspired to create home décor projects all year long for your home or as gifts this holiday season using Southern Ridge Trading Company Chipboard. Enjoy Pam

Monday, November 18, 2019

Autumn Birthday Keepsake with Karen Jiles


Hi there, 

It’s Karen sharing an Autumn Birthday Keepsake that I created with the Skeleton Leaf StencilBirthday Greetings, and Wheat Bushel chipboard sets.  The stencil and chipboard sets worked beautifully together. I coupled them with some embellishment mousse, glimmer paste and dyed ribbon. I loved the end result. Take a peek at my tutorial below.


Step 1: Apply Orange Blush and Chai Latte Embellishment Mousse to the back of the shadow box with a foam tool. Heat set to dry. 


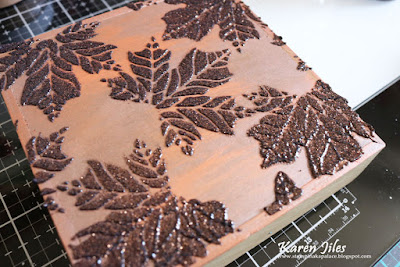
Step 2: Lay the Skeleton Leaf Stencil on top of the mousse covered shadow box. Using a craft spatula, apply glimmer paste to the stencil transferring the pattern to the shadow box. Set aside to dry.

Step 3: Apply Orange Blush Embellishment Mousse to the Happy Birthday chipboard sentiment. Note: I applied 2 coats. Heat set the chip board to dry and set aside. 


Step 4: Apply mica mist to the Wheat Bushel chipboard pieces and heat set to dry. Adhere the Wheat Bushel chipboard and Happy Birthday to the shadow box using E6000.  Add a dyed ribbon bow.

Step 5: Tap on gesso using a paintbrush to enhance the overall design.

Step 6: Continue embellishing as desired.
Southern Ridge Trading Company Supplies Used:

- Skeleton Leaf Stencil

Other Supplies Used:

- Shadow Box
- Embellishment Mousse: Orange Blush and Chai Latte
- Glimmer Paste: Rich Cocoa
- Mica Mist: Antique Gold
- Kraft Spatula
- Foam Tool
- Scissors
- Dyed Ribbon
- Gesso (White)
- Paintbrush
- E6000
- Hot Glue
- Heat Gun

Thanks so much for stopping by today.
Karen

Friday, November 15, 2019

Sparkle Christmas Card with Nancy Nickel

Hello, everyone! It's Nancy here with a new project share.
I've glittered up some fabulous chipboard pieces,
to create a very sparkly Christmas card.

Here's my card:


Here's what I used:


When I cut out the chipboard "Sparkle",
 I left a little stem under the "a".
I also left a stem at the top of the ornament piece.
I then connected the two stems, 
so it looks like the ornament is hanging off of the word.
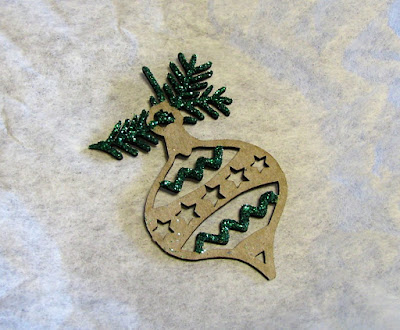
I began with adding some glue to the chipboard ornament,
in all the areas that I wanted to have green.
A skinny glue tip makes it so easy to add to the intricate areas.


I the shook green glitter very generously over the glued areas.


I then used tweezers to pick it up, turn it over, 
and shake off all the excess glitter. 


I then repeated the same process for the red glitter,
and then the white glitter.
I then set these pieces aside to dry.


I then cut an A2 size card base from white cardstock.
I cut the decorative paper 4" x 5 1/4".
I inked the edge of the paper, and adhered in place.


Once they were all dry,
I adhered the glittered pieces to the card front.


When I was all finished my project,
I used the Perfect Cleaning Cloth to wipe up all the glitter.
Here's one last look at the finished card:


Southern Ridge Trading Company Products:


Other Materials Used:

- Papers: Recollections - Cardstock, Authentique - Nostalgia
- ScraPerfect: Best Glue Ever, No-Clog Writing Cap,Perfect Cleaning Cloth
- Ink: Martha Stewart - Red Chrysanthemum
- Glitter: Glitters Galore - Fire Engine Red, 
Elegant Emerald, Diamond Dust.

* * * * *
Thanks so much for stopping by today!
I'll be back soon with more creative fun!

* * * * *