Showing posts with label Vintage Scroll Keys. Show all posts

Friday, January 24, 2020

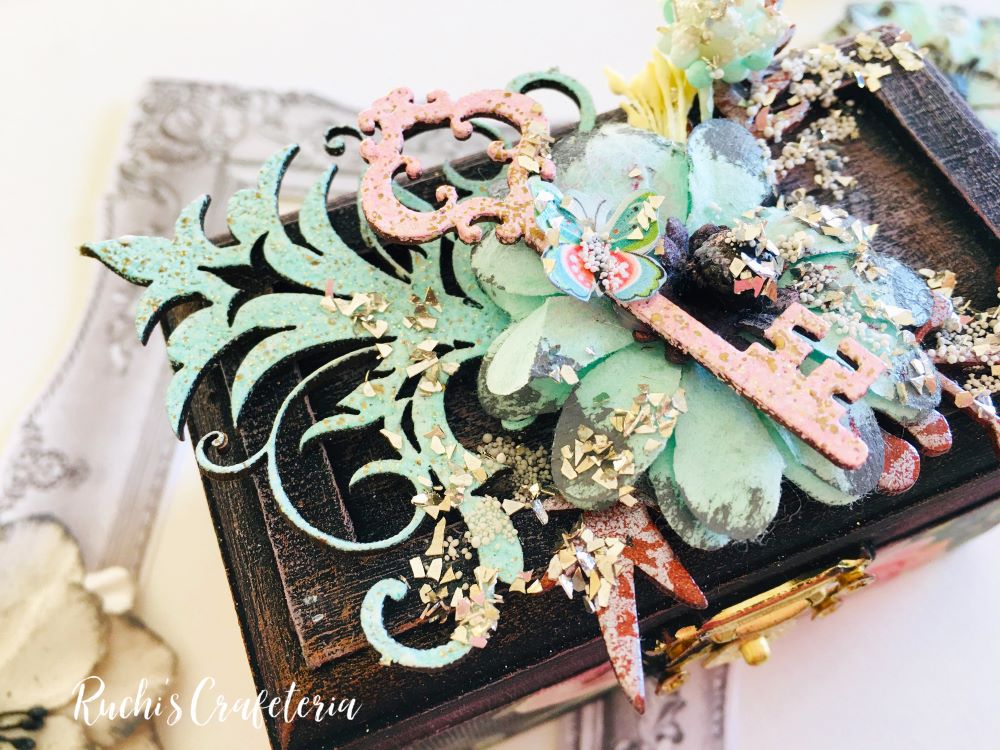
Wooden Treasure Box with Ruchi

Hello friends! Ruchi here from Ruchi's Crafeteria and I'm back with my inspirational project.

Today I've altered a wooden box into a beautiful Treasure Box with perfectly designed SRTC chipboards.


First I've applied Prima Black Gesso all over to the box and set it aside for drying.
When dried, I took a decoupage paper and applied it to my box. Left the lid but if you want you can cover the lid too with paper.


I chose SRTC chipboards- Vintage Scroll Keys, Demask Corners, and Foliage Pieces and heat embossed them using different embossing powders.
Arranged all the elements like SRTC chipboards, Prima flowers, pollens together on the box lid.
Lastly highlighted some parts of the box with metallic paints and sprinkled Finnabair Glass Glitters and Mini Art Stones.


Southern Ridge Trading Company Supplies Used:


Other Supplies Used:

- Bob n Betty: Decoupage Paper
- Prima Marketing Inc.: Black Gesso, Flowers
- Finnabair: Glass Glitter, Mini Art Stones
- Expressions Craft: Metallic Paints
- Imagine Crafts: Versamark Embossing Ink
- Ranger Ink: Embossing Powders
- WOW: Embossing Powder
- Wooden box, glue, pollens are from my stash

See ya next time.
Till then happy crafting!!
Ruchi


Monday, January 6, 2020

Exhale, Breathe, Meditate Wall Hanging with Katelyn Grosart

Hey Southern Ridge Trading Company fans, Katelyn here. Christmas is over and I'm definitely ready to start crafting something other than Christmas, so today, I'm excited to share with you my Exhale, Breathe, Meditate Wall Hanging. To create my wall hanging, I've used a variety of our chipboard pieces. You'll want to read below as I share with you how to recreate my Exhale, Breathe, Meditate Wall Hanging at home.


To start, die cut a 4 1/2" Stitched Fishtail out of Plain Collage Paper. Place the X's stencil overtop of the fishtail and sprinkle Lindy Stamp Gangs powder - Oom Pah Pah Pink and Cuckoo Clock Cardinal. Spritz the powder with water and remove the stencil. Set the fishtail aside to dry.


Once the fishtail has dried, place the splashes stencil on the fishtail and blend Black Soot Distress Oxide ink through the stencil as desired on the fishtail. Apply Candied Apple Distress Oxide Ink to the dot stamp and stamp randomly on the fishtail. Clean the stamp off. Apply Carved Pumpkin Distress Oxide Ink to the dot stamp and stamp randomly on the fishtail.


From the Exhale Word Mix, you'll need the Breathe, Meditate and Exhale words. Apply two coats of Brushed Pewter Distress Stain to each word. 


Next, you'll need the Tribal Feather Skinny Strand. Apply two coats of Black Marble Dylusions Paint to the strings of the feathers. Apply two coats of Cherry Pie Dylusions Paint to two of the feathers. Apply two coats of Squeezed Orange Dylusions Paint to two of the feathers. Once the paint has dried, add white dots with a gel pen over each feather. Cut the strand of feathers down to 5 1/2".


You'll need one of the Vintage Scroll Keys. Apply two coats of Brushed Pewter Distress Stain to the key.


Next, you'll need the large Abstract Circle Frame. Apply a coat of Emboss It Ink to the frame. Sprinkle Salted Raven Embossing Powder over the frame. Tap off the excess powder and emboss with a heat tool.


The last chipboard piece you'll need is the World Globe. Apply two coats of Black Marble Dylusion Paint to the globe. 


Die cut a 4 1/2" Stitched Fishtail out of Kraft Cardstock. Ink the edges of both stitched fishtails using Black Soot Distress Oxide Ink and a blending tool with foam.


Adhere the 4 1/2" stenciled fishtail to the 4 1/2" kraft fishtail.


Adhere the world globe to the middle of the 4 1/2" stitched fishtail. Adhere the abstract circle frame to the world globe. 


Adhere the vintage scroll key to the middle of the abstract circle frame. Adhere the tribal feather skinny strand to the middle of the vintage scroll key.


Adhere the Exhale, Breathe and Meditate words to the right side of the feathers and circle frame. To finish the wall hanging, punch two holes at the top of the fishtail and tie jute twine through the holes to create the wall hanging.


Here are a few closeup photos of the finished wall hanging.


Here are the finished Exhale, Breathe, Meditate Wall Hanging.


Southern Ridge Trading Company Supplies Used:


Other Supplies Used:

- Emerald Creek Craft Supplies: Salted Raven Embossing Powder
- Tim Holtz for Ranger Ink: Distress Stain - Brushed Pewter, Distress Oxide Ink - Black Soot, Candied Apple & Carved Pumpkin and Blending Tool with Foam
- Dyan Reavley for Ranger Ink: Dylusions Paint - Squeezed Orange, Black Marble and Cherry Pie
- Dina Wakley for Ranger Ink: X's stencil
- Ranger Ink: Emboss It Dabber
- Lindy's Stamp Gang: Magical Shaker - Oom Pah Pah Pink and Cuckoo Clock Cardinal
- Alexandre Renke: Splashes Stencil
- Prima Marketing: Clear Stamp - Offset Dots
- Tim Holtz/Ideaology: Collage Paper - Plain
- Elizabeth Craft Designs: Stitched Fishtail
- Misc: Kraft Cardstock, White Gel Pen and Jute Twine

Thanks so much for joining my today!

- Katelyn


Monday, August 12, 2019

Mixed Media Tag - Grow with Ruchi

Hello friends!! Ruchi here from Ruchi's Crafeteria and I'm back with my inspirational project.


Today I've created a simple mixed media tag.


I picked a piece of cardboard  and applied cotton gauge using Prima Clear Gesso. Sprayed immix Fuchsia Pink sprinkle mist from Expressions Craft.


Picked SRTC Heart Scroll Cage and SRTC Vintage Scroll Key chipboards, and applied Prima White gesso all over them. Once it dried, applied Colorbox- White Chalk ink and heat embossed it with WOW clear embossing powder.


Arranged all the elements like SRTC chipboards, Prima flowers, stamped and coloured leaves, butterfly and washi tape. Glued them on my tag base. For completing the look, added half pearls and glitter here n there on elements.


That’s it for today!! Hope you like my today's project. Don’t forget to check SRTC shop for these chipboards and some other awesome designs.


Southern Ridge Trading Company Supplies Used:


Other Supplies Used:

- Prima Marketing:  Heavy Gesso White, Gesso- Clear and flowers
- Wow: Clear Embossing Powder
- Colorbox: White Chalk Ink
- Honey Bee stamp: Hello Gorgeous stamp set
- Concord & 9th: Hello Lovely stamp set
- Expressions Craft: Immix Fuchsia Pink Sprinkle Mist 
- Tim Holtz Idea-ology: Big Chat Stickers  

Cardboard, half pearls, butterfly, twine, glue, cotton gauge are from my stash.

See ya next time.
Till then happy crafting!!
Ruchi


Tuesday, July 24, 2018

Moments In Time Mixed Media Clock with Tracy Sagriff

Can you imagine summer is almost half over. Sometimes I feel like I need a device to stop the clock and just savour the moment. This project reminded me to take those moments to enjoy the beauty around us.


Trace and cut a piece of foam board the size of the diameter of the clock face and another for the center circle.

Use gel medium to glue the wood and foam together.

Cover entire project with gecko

Adhere and the diecuts and flowers


Add an additional coat of gesso over new items

Use Faber Castel gelatos in a variety of shades of purple and blue to add colour directly to the project. Use a paintbrush and water to  move the pigment around.

Dilute white paint and glimmer glaze and use it to create spatters

Ink the edges with Distress Oxide Inks


Southern Ridge Trading Company Supplies Used:

- Moments in Time

Other Supplies Used:

- Flowers
- Lavender Acrylic Paint
- Lush Lilac Glimmer Glaze
- Gesso
- Tim Holtz for Ranger Ink: Distress Oxide Ink - Shaded Lilac and Faded Blue Jeans 
- White paint
- Gel medium
- Foam board

- Tracy


Monday, July 23, 2018

Remember This Scrapbook Layout with Charlene Byrd

Hello bloggers!
Charlene here! Thanks for joining me today!

Today I’m sharing a gorgeous layout with a precious picture of my sweet great niece. I love vintage style so this picture was so fun to work with.


The chipboard pieces were all coloured with Walnut Distress Stain.


I cut the key into 2 pieces so I could tuck them at the top and the bottom of the page.


I also cut the decorative border in half and then into 2 pieces (again so I could tuck it)

Southern Ridge Trading Company Products Used:

Other Products Used:
- Kaisercraft paper and diecuts
- Paper bag
- Lace
- Cheesecloth
- Flowers
- Pearls
- Buttons
- Paper doilies

Thanks for joining me today!
Until Next time
Charlene


Friday, June 15, 2018

Fly Away with Me Tag with Katelyn Grosart

Hey Southern Ridge Trading Company fans, Katelyn here. For today's post, I'm excited to share with you my Fly Away with Me Tag that's perfect to give to that special someone in your life.  My Fly Away with Me Tag features a variety of our chipboard pieces. You'll want to read below as I share with you how to embellish the chipboard pieces for my Fly Away with Me Tag at home.


To start, take one of the Fine Clock Face's out of the package. Apply a coat of Emboss It Ink to the clock face. Sprinkle Burnt Copper Leaves Embossing Powder over the entire surface of the clock. Tap off the excess powder and emboss with a heat tool. If the embossing powder didn't completely cover the clock, repeat the previous steps in the areas that need more embossing powder.


Next, you'll need a Barbed Wire Circle Frame - Small. Apply a coat of Emboss It Ink to the frame. Sprinkle Rocky Road Baked Texture Embossing Powder over the entire surface of the frame. Tap off the excess powder and emboss with a heat tool. If the embossing powder didn't completely cover the frame, repeat the previous steps in the areas that need more embossing powder.


From the Med. Gears, choose one of the gears. Apply a coat of Emboss It Ink to the gear. Sprinkle Hammered Metal Embossing Powder over the entire surface of the gear. Tap off the excess powder and emboss with a heat tool. 


Choose three small gears and two medium sized gears from the Mini Wood Gears. Apply a coat of Emboss It Ink to each of the gears. Sprinkle Rocky Road Baked Texture Embossing Powder over the entire surface of the gears. Tap off the excess powder and emboss with a heat tool. 


Cut apart one of the Scroll Borders. Blend Ground Espresso Distress Ink with a blending tool and foam onto the entire surface of both of the scroll pieces. 


The last chipboard piece you need is one Vintage Scroll Key. Apply two coats of Hickory Smoke Distress Paint to the key. Once the paint has dried, rub Black Soot Distress Crayon along the edges of the key.


Once all the patterned papers have been layered all together, I then added the two scroll border pieces diagonally on the tag. Adhere the clock face and gear together. Once they've been adhered, add your sentiment to the middle of the gear. Adhere the barbed wire circle frame overtop of the saying.


To finish around the frame, adhere two stamps, a hot air balloon and the vintage scroll key. Adhere three small gears in the top left of the tag and two small gears in the bottom right of the tag.


To finish off the tag, add a burgundy bow at the top of the tag.


Southern Ridge Trading Company Supplies Used:


Other Supplies Used:

- Emerald Creek Craft Supplies: Burnt Copper Leaves Embossing Powder, Hammered Metal Embossing Powder and Baked Texture by Seth Apter - Rocky Road Embossing Powder
- Tim Holtz for Ranger Ink: Distress Ink - Ground Espresso, Distress Crayons - Black Soot, Distress Paint - Hickory Smoke and Blending Tool with Foam
- Ranger Ink: Emboss It Ink Dabber
- Elizabeth Craft Designs: Fitted Circles
- Pion Design: The World Awaits - Tags, Vacation Memories, Destination Unknown and Adventure Awaits & Design Palette - Blue IX and Maroon II
- Tombow: Mono Multi Liquid Glue
- Misc: Burgundy Ribbon and Heat Tool

Until Next Time!

- Katelyn