Showing posts with label Small Primitive Stars. Show all posts

Wednesday, July 25, 2018

Winter In July Card with Jessica Kaiser

Hello crafty friends!

It’s Jess here today with another fabulous chipboard themed card!  I tried to keep with my "Christmas in July" theme - but the card ended up being more of a "winter in July" theme - HOCKEY!  How much more Canadian can you get than a hockey card?


Let me share how I made it!  These are the Southern Ridge products I used on this card:


I started by heat embossing my Hockey Players!  I used a dark navy blue for the focal "Hockey" guy, and a nice red for the other!  I typically use 2-3 layers of embossing powder on my chipboard pieces. I simply cover each piece with Versamark Ink, then sprinkle on my powder of choice and heat setting!  I repeat for each layer until I like the coverage.  I used a gold detail powder on my Small Primitive Stars (and one pretty Navy Blue one for contrast!).


I had a few "hockey" themed patterned papers kicking around, so I used them to create my background. I also adhered a small piece of red cardstock to the back of the "Hockey" word to make it stand out. 


I used some Nuvo Crystal Drops to accent the edges of the hockey stick and skate blades. It also accented the corners of the card! Here are a few more pictures of my card:


I did pop up the blue hockey player using Foam Squares to give it more of a focal point. SUCH a fun card!!!

Southern Ridge Trading Company Supplies Used:
Hockey

Other Supplies Used:
- White Cardstock
- SNS Dimensional Glue
- Echo Park: Hockey Paperpack & Stickers 
- 3D Foam Squares
- Red Cardstock

I hope you had some fun here on the blog today! I really enjoyed making this card - it's always nice to have some "boy" cards on hand!

See you again real soon!!


Jess


Friday, October 27, 2017

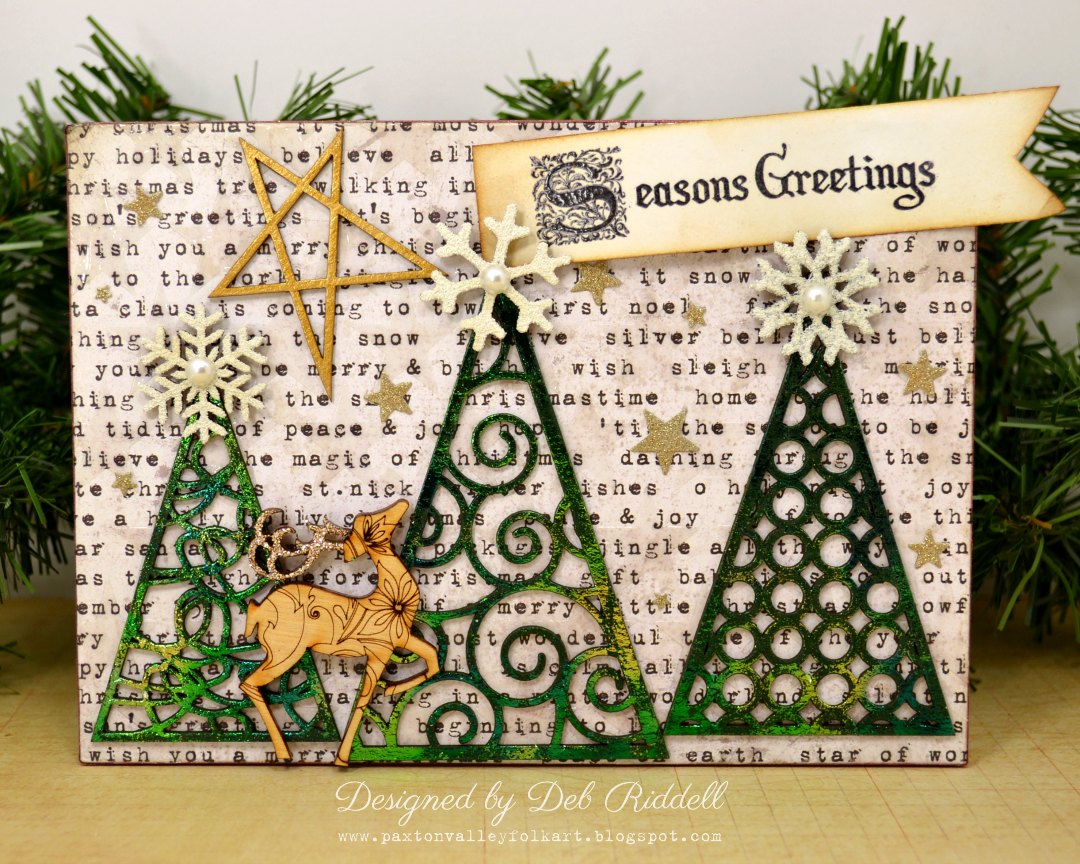
Season's Greetings Christmas Tree Trio Decoration with Deb Riddell

Hello everyone, Deb Riddell here with you today to share a Christmas decoration that I made with lots of Southern Ridge Trading Company’s wonderful Christmas chipboard and wood veneers.


I used Southern Ridge’s Scribble Triangle Tree Set, Wood Small Marked Deer (love that wee guy!), Small Primitive Stars, Snowflakes 712 and Star stencil in the making of my Season’s Greetings Christmas Tree Trio decoration.  I have a few step out photos on how I made it, hope you will enjoy seeing them.

I started out with a piece of ¼” MDF cut to about 5” x 7” (it was in my stash and I haven’t a clue where it came from but it was the perfect size so I decided to use it.  You could also use a flat artist’s canvas or even just cover a piece of chipboard with scrapbook paper to make yours).  I covered the MDF front and back with paper from Tim Holtz’s Tidings Paper Stash and wrapped the edges with some red glitter tape from his Tidings Design Tape set.


I then stenciled Ranger Clear Gloss Texture Paste through Southern Ridge’s Star stencil, repeating the pattern as necessary to cover the entire front side of the panel, and set it aside to dry.

The three Christmas trees from the Scribble Triangle Tree Set were painted with Hauser Dark Green Americana acrylic paint and once the paint had dried, Deco Foil Adhesive was applied over all of the trees with the Deco Foil Adhesive pen.  Once the adhesive had dried clear and tacky, Emerald Watercolour Deco Foil was burnished over top.  I love the variegation of colour you achieve with the watercolour Deco Foils!


The Wood Small Marked Deer is so beautiful all on it’s own that you don’t have to much to enhance it. I just gave him a coat of DecoArt Gloss Varnish and once it had dried, added more Gloss Varnish to his antlers and sprinkled them with Distress Vintage Platinum Glitter Dust, perfection!

One of the Small Primitive Stars was painted with DecoArt Emperor’s Gold Dazzling Metallics paint and once dry, the Deco Foil Adhesive pen was used to apply adhesive before applying Rebekah Meier Design Mixed Media Transfer Foil in Old Gold over top.


Three of the snowflakes from the Snowflakes 712 set were painted with Americana Titanium White acrylic paint and once it had dried, Emerald Creek Craft Supplies Soft Fallen Snow embossing powder was applied to all of them.

A flat back pearl was adhered onto the centers of all of the embossed snowflakes.  Some of Tim Holtz’s gold Deco Sheet was adhered onto white cardstock and tiny stars were die cut with Simon Says Stamp’s Large Holiday Shapes and Holiday Shapes Hearts Stars Craft dies.


The Season’s Greetings sentiment was stamped onto white cardstock with a Crafty Secrets Vintage Christmas stamp with Black Soot Distress Archival ink, clear embossed and then cut into a banner shape.  The whole banner was lightly inked with Old Paper Distress Ink and the edges inked with Vintage Photo Distress Ink.


Here are a few close ups, the foiled Scribble Triangle Trees were added along the bottom edge of the prepared MDF plaque and one of the embossed snowflakes was added to the top of each tree.  That wonderful deer was adhered overtop of the trees on the left hand side of the panel.


The gold Deco Sheet stars were added here and there to the panel and you can see the shine from the Gloss Texture Paste stenciled stars in the background, another layer of shine to glow in the light of the Christmas candles!


I hope that you’ve enjoyed seeing how my Season’s Greetings Christmas Tree Trio decoration came together and that you’ve been inspired to make one of your own!


Southern Ridge Trading Company Supplies Used:


Other Supplies Used:

- Therm O Web: Deco Foil, Deco Foil Adhesive Pen and Rebekah Meier Designs Mixed Media Transfer Foil
- DecoArt: Americana Acrylic Paint, Dazzling Metallics Paint and Gloss Varnish
- Emerald Creek Craft Supplies: Soft Fallen Snow Embossing Powder
- Tim Holtz / Advantus: Tidings Paper Stash, Tidings Design Tape and Deco Sheets
- Tim Holtz / Ranger Ink: Clear Gloss Texture Paste, Distress Vintage Platinum Glitter Dust, Distress Ink and Distress Archival Ink
- Simon Says Stamp: Large Holiday Shapes Craft Dies and Holiday Shapes Hearts Stars Craft Dies
- Miscellaneous: MDF 5” x7” panel, white cardstock, clear embossing powder, flat back pearls, scissors, adhesive and Christmas sentiment stamp

Thanks again for stopping by today and as always, happy creating!


Monday, January 23, 2017

Adventure In The Back Country Scrapbook Layout with Charlene Byrd

Hello everyone, Charlene here!


Thanks for joining me today on the blog! There is not much snow in southern Alberta in the winter so when we moved to Ontario the first thing that my son Hunter saved his money for was a sled! Last year he and his friend drove up to Pembroke with their sleds and rode the trails all day, loving every minute of it!


To create the tree I first stained it with Forest Green Distress Stain. I then added several different mediums to the tips to create the snow; most unsuccessfully as they all took on a green tinge from the stain. My end product was a textured sand medium and white acrylic paint.


I used my foam blending tool with Pumice Stone ink on the sled and then added some black soot ink around the edges.


The chains were simply stained with Black Soot Distress Stain and the stars with Fired Red Distress stain.


The Adventure word was another work in progress! I started with Crackle medium but I didn’t like the look of it when I added some colour, I tried making it red but it turned out looking pink! So I went with the old standby of black acrylic paint. I do like how the bumpy texture shows on the chipboard and I love how forgiving chipboard is to use. If you’re not happy with the look, simply paint over it! Voila!

Southern Ridge Trading Company Chipboard Used:

Other Products Used:

- KaiserCraft Paper and stickers
- Tim Holtz for Ranger Ink: Distress Stain - Black Soot, Forest Moss and Fired Brick. Distress Ink - Pumice Stone
- Letter stickers
- Black and white acrylic paint
- Textured Sand medium

Remember to play along in the monthly challenge over on the Southern Ridge Trading Company blogEach month enter for your chance to win 4 designs from the online store - chipboard.ca -$20 (before tax) retail value of YOUR OWN CHOOSING! 

Thanks for joining me,
Happy Creating!

Charlene


Friday, November 18, 2016

Jingle All The Way Christmas Decoration with Deb Riddell

Hello and welcome! It’s Deb here today with a tutorial to share with you on how I made my Jingle All The Way Christmas wall hanging decoration.


I used Southern Ridge’s Jingle All The Way chipboard sentiment, Small Primitive Stars and Holly Berry Assembly. This would make a wonderful Christmas gift for someone special in your life, so read on for the how to.

I started out by painting the medium sized Jingle All The Way chipboard sentiment (it comes in three different sizes) with DecoArt Americana Acrylic paints and embossed parts of the sentiment with embossing powders.  I sprinkled the embossing powders over the acrylic paint while it was still wet, working on one section at a time, and then heated the embossing powder after the acrylic paint was nearly dry.

I used Titanium White paint with Fresh Fallen Snow embossing powder on the snowflakes; Gold Metallic paint with Christmas Gold embossing powder on the bells; Hauser Medium Green for the holly leaves on the bells with Sterling Pine embossing powder; Santa Red paint with Candy Red embossing powder on the holly berries on the bells and Dark Chocolate Brown paint on the sled with Silver embossing powder on the runners.  The lettering itself was painted with Hauser Dark green, shaded with Black Green and then highlighted with Hauser Light Green.  The lettering was then sealed with gloss acrylic varnish once the paint had dried.


Three Small Primitive Stars in varying sizes were embossed with Christmas Gold embossing powder and the Holly Berry Assembly leaves were embossed with Sterling Pine embossing powder and the berries with Candy Red embossing powder.  I didn’t paint these chipboard pieces, just coated them with clear embossing ink to get the powders to adhere to them.

A piece of sheet music paper (8” x 8”) from Tim Holtz’s Tidings Paper Stash was finger painted here and there with diluted white gesso.  Once the gesso was dry, snowflakes were stenciled randomly with Ranger Transparent Gloss texture paste through the Tim Holtz Snowflakes layering stencil.


After the texture paste had dried, the sheet music paper was trimmed down to about 7 ½” square and the edges were distressed and inked with Frayed Burlap Distress ink.

A spattering of diluted white acrylic paint and a fine spritz of Brushed Pewter Distress Mica spray finished off the sheet music background paper.


A piece of 110lb white cardstock was cut to 8 ¼” square and stamped repeatedly with Tim Holtz’s Birch background stamp and Tree Branch Archival ink.  The cardstock was then dragged through some Antique Linen and Hickory Smoke Distress stains and sprays on my craft sheet and dried with a heat gun, repeating as necessary until the colour I was looking for was achieved.  The edges of this piece of cardstock were then distressed and inked with Frayed Burlap Distress ink as well.

A piece of chipboard packaging was cut to 8 ½” square and covered front and back with damask scrapbook paper from the My Mind’s Eye Holiday Cheer paper pad, green damask on the front and red damask on the back.


The edges were distressed and inked with Frayed Burlap Distress ink and the Birch background paper and sheet music background paper were layered on top and adhered into place.

Three silver jingle bells from my stash were coloured with Gold Mixative alcohol ink and pieces of jute twine were tied onto each bell.


I used my Ranger Clear Embossing Pen to add some Fresh Fallen Snow embossing powder to the top of each jingle bell.

And then it was time to assemble the wall hanging.  I punched ⅛” holes into the top of the chipboard plaque and tied on two lengths of jute twine.  The three gold jingle bells were tied into place at the top of the plaque with the jute twine hangers.


Clear embossing ink and the clear embossing pen were used to add more Fresh Fallen Snow Embossing powder to the top of the plaque and also to the ‘Jingle All The Way’ sentiment.


The ‘Jingle All The Way’ sentiment was mounted onto pieces of black fun foam and positioned in the center of the plaque.  You can see the dimension and also catch a glimpse of the glossy texture paste snowflakes in the photo below.


The Holly Berry Assembly was added to the left upper corner.


And the Small Primitive Stars were added to the three remaining corners.


And that was it, I hope that you have enjoyed seeing how I constructed my Jingle All The Way Christmas decoration and that you have been inspired to make one of your own!


Southern Ridge Trading Company Supplies Used:


Other Supplies Used:

- Tim Holtz/Ranger Ink: Distress ink, Distress stain, Distress spray stain, Alcohol ink and Distress Mica spray
- Ranger Ink: Transparent Gloss Texture paste, Archival ink and Clear Embossing pen
- Tim Holtz/Stampers Anonymous: Pine background stamp and Snowflakes layering stencil
- Tim Holtz/Advantus: Tidings Paper Stash
- My Mind’s Eye: Holiday Cheer paper pad
- DecoArt: Americana acrylic paint and Gloss varnish
- Emerald Creek Craft Supplies: Soft Fallen Snow and Candy Red embossing powder
- Miscellaneous: Sterling Pine, Christmas Gold, Silver embossing powders, 110lb cardstock, jute twine and string, silver jingle bells, chipboard packaging, black fun foam, white gesso, liquid adhesive, double sided tape, scissors, paper trimmer and paint brush

I hope that you will join in our current challenge, Christmas, by linking up a project you’ve been working on for the holidays.  You have a chance to win 4 designs from the online store - chipboard.ca - a $20.00 (before tax) retail value of YOUR OWN CHOOSING!  Can’t wait to see what you link up and as always, happy creating!

Deb xo