Showing posts with label Star Stencil. Show all posts

Monday, March 2, 2020

Foiled Tag Wall Hanging with Karla Yungwirth

Hello friends, it’s Karla back today with a fun project using a Chipboard Tag,  6”x6” Star Stencil and the Primitive Stars Chipboard. I’ve been having a great time with the new icraft /Thermoweb DecoFoil Transfer Gel Duo and Foils, so I thought I’d combine them with these fun SRTC products and a Simple Stories inspirational quote to make a foiled tag wall hanging.


I started by cutting down the 6x8 piece of Simple Stories paper to fit the chipboard tag. Then I used the DecoFoil pen to colour in the areas of the letters and applied Ranger Foil and DecoFoil by allowing it to dry for a couple minutes and then pressing the foils on. The Ranger foil will work with the pressure of your hand, but the DecoFoil needs to be put through a diecut machine - so I used my Cuttlebug. I achieved a variegated colour by pressing parts of different colours of the Ranger foil to each letter and then running it through the Cuttlebug with Iridescent DecoFoil over top.  I then used the star stencil and the transfer gel to apply a thin layer of gel to various areas of the background. By using washi tape I was able to do only 2 stars at a time. After that dried, about an hour, I used the Cuttlebug again to press the DecoFoil on. I used 2 extra pieces of cardstock as shims and ran it through as if I was using a steel die.


In a similar way, I used the deco foil pen to coat the chipboard stars (which come in a set of 18!) and then applied Lapis Watercolor DecoFoil to the top, running it through my diecut machine to adhere. The chipboard is thin enough that it ran through the machine using only the plates I would normally use with steel dies.


I glued the tag paper to the chipboard, trimmed any excess and inked the edges with Kraftin’ Kimmie Krafty Kolours Ink.


I added some white rope from the dollar store to the top of the tag, and glued on the stars , using foam tape to pop some up.


A few Wild Whisper sequins finished off this inspirational tag, which I can hang on my wall or give as a gift!


Southern Ridge Trading Company Supplies Used:

- Chipboard Tag

Other Supplies Used:

- Simple Stories Patterned Paper
- Thermoweb/iCraft DecoFoil: Transfer Gel Duo, Pen and Foils
- Ranger Ink: Foils
- Wild Whisper Designs: Sequins
- Kraftin’ Kimmie: Krafty Kolours Ink
- Cuttlebug Machine
- White Rope – Dollarama
Thanks so much for stopping by! I hope you have an amazing week ahead!
Hugs,
Karla

Saturday, June 29, 2019

Celebrate Mixed Media Tag with Karen Jiles

Hi there,


It’s Karen sharing a Celebrate Mixed Media Tag that I created with the Star Stencil and Corrugated Stars. I loved these products together. The Star stencil is a versatile stencil to use for various occasions and the corrugated stars added great texture. Take a look at how this tag came together in the tutorial below.


Step 1: Lay Star Stencil on top of manila tag. Transfer Star Stencil pattern onto tag using a foam tool and distress Ink.


Step 2: Using E6000, adhere ribbon to the back of each side of the manila tag.


Step 3: Adhere large star charm to tag and adhere corrugated star on top of the star charm.
Step 4: Adhere flowers, leaves, additional star charms and corrugated stars.
Step 5: Add sentiment, hemp, bow, crystal gems and pin.
Step 6: Tap on gesso using paint brush to enhance the overall design.
Step 7: Continue embellishing as desired.
Southern Ridge Trading Company Supplies Used:


Other Supplies Used:

- Manila Tag
- Foam Tool
- Tim Holtz for Ranger Ink: Distress Ink - Chipped Sapphire and Festive Berries
- Hemp
- Flowers
- Crystal Gems & Pin
- Metal Charms
- Ribbon
- Celebrate Sentiment Die Cut
- Gesso (White)
- Scissors
- Paintbrush
- E6000
- Heat Tool
- Trimmer

This tag was so much fun. It gave me an opportunity to use so many fun mixed media elements. The corrugated stars provided just the right amount of texture and the star stencil tied the Celebratory theme together well. 
Thanks so much for stopping by today.
Karen

Friday, October 27, 2017

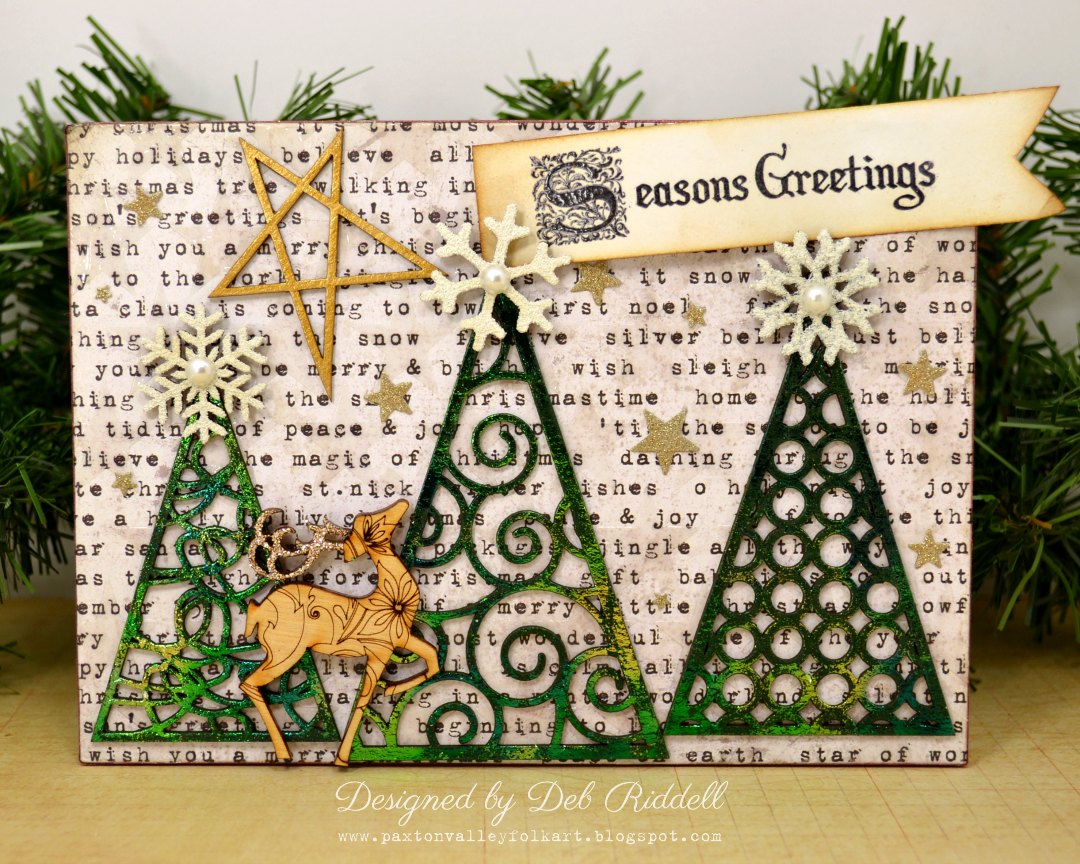
Season's Greetings Christmas Tree Trio Decoration with Deb Riddell

Hello everyone, Deb Riddell here with you today to share a Christmas decoration that I made with lots of Southern Ridge Trading Company’s wonderful Christmas chipboard and wood veneers.


I used Southern Ridge’s Scribble Triangle Tree Set, Wood Small Marked Deer (love that wee guy!), Small Primitive Stars, Snowflakes 712 and Star stencil in the making of my Season’s Greetings Christmas Tree Trio decoration.  I have a few step out photos on how I made it, hope you will enjoy seeing them.

I started out with a piece of ¼” MDF cut to about 5” x 7” (it was in my stash and I haven’t a clue where it came from but it was the perfect size so I decided to use it.  You could also use a flat artist’s canvas or even just cover a piece of chipboard with scrapbook paper to make yours).  I covered the MDF front and back with paper from Tim Holtz’s Tidings Paper Stash and wrapped the edges with some red glitter tape from his Tidings Design Tape set.


I then stenciled Ranger Clear Gloss Texture Paste through Southern Ridge’s Star stencil, repeating the pattern as necessary to cover the entire front side of the panel, and set it aside to dry.

The three Christmas trees from the Scribble Triangle Tree Set were painted with Hauser Dark Green Americana acrylic paint and once the paint had dried, Deco Foil Adhesive was applied over all of the trees with the Deco Foil Adhesive pen.  Once the adhesive had dried clear and tacky, Emerald Watercolour Deco Foil was burnished over top.  I love the variegation of colour you achieve with the watercolour Deco Foils!


The Wood Small Marked Deer is so beautiful all on it’s own that you don’t have to much to enhance it. I just gave him a coat of DecoArt Gloss Varnish and once it had dried, added more Gloss Varnish to his antlers and sprinkled them with Distress Vintage Platinum Glitter Dust, perfection!

One of the Small Primitive Stars was painted with DecoArt Emperor’s Gold Dazzling Metallics paint and once dry, the Deco Foil Adhesive pen was used to apply adhesive before applying Rebekah Meier Design Mixed Media Transfer Foil in Old Gold over top.


Three of the snowflakes from the Snowflakes 712 set were painted with Americana Titanium White acrylic paint and once it had dried, Emerald Creek Craft Supplies Soft Fallen Snow embossing powder was applied to all of them.

A flat back pearl was adhered onto the centers of all of the embossed snowflakes.  Some of Tim Holtz’s gold Deco Sheet was adhered onto white cardstock and tiny stars were die cut with Simon Says Stamp’s Large Holiday Shapes and Holiday Shapes Hearts Stars Craft dies.


The Season’s Greetings sentiment was stamped onto white cardstock with a Crafty Secrets Vintage Christmas stamp with Black Soot Distress Archival ink, clear embossed and then cut into a banner shape.  The whole banner was lightly inked with Old Paper Distress Ink and the edges inked with Vintage Photo Distress Ink.


Here are a few close ups, the foiled Scribble Triangle Trees were added along the bottom edge of the prepared MDF plaque and one of the embossed snowflakes was added to the top of each tree.  That wonderful deer was adhered overtop of the trees on the left hand side of the panel.


The gold Deco Sheet stars were added here and there to the panel and you can see the shine from the Gloss Texture Paste stenciled stars in the background, another layer of shine to glow in the light of the Christmas candles!


I hope that you’ve enjoyed seeing how my Season’s Greetings Christmas Tree Trio decoration came together and that you’ve been inspired to make one of your own!


Southern Ridge Trading Company Supplies Used:


Other Supplies Used:

- Therm O Web: Deco Foil, Deco Foil Adhesive Pen and Rebekah Meier Designs Mixed Media Transfer Foil
- DecoArt: Americana Acrylic Paint, Dazzling Metallics Paint and Gloss Varnish
- Emerald Creek Craft Supplies: Soft Fallen Snow Embossing Powder
- Tim Holtz / Advantus: Tidings Paper Stash, Tidings Design Tape and Deco Sheets
- Tim Holtz / Ranger Ink: Clear Gloss Texture Paste, Distress Vintage Platinum Glitter Dust, Distress Ink and Distress Archival Ink
- Simon Says Stamp: Large Holiday Shapes Craft Dies and Holiday Shapes Hearts Stars Craft Dies
- Miscellaneous: MDF 5” x7” panel, white cardstock, clear embossing powder, flat back pearls, scissors, adhesive and Christmas sentiment stamp

Thanks again for stopping by today and as always, happy creating!


Friday, November 4, 2016

Merry Christmas Prancing Deer Card with Deb Riddell

Hello everyone, Deb here today to share a Christmas card with you that I made with Southern Ridge Trading Company’s Small Marked Reindeer, Small Primitive Stars, Star Stencil and the Merry Christmas Greeting Pack.


I started out with a piece of 110 lb white cardstock cut to 4” x 5 ¼” and stenciled it with clear embossing ink through the Star Stencil and then embossed it with Iridescent Shimmer embossing powder.


The embossed cardstock was then coloured with multiple shades of blue Distress inks and set aside to dry.

Another piece of white cardstock was coloured with multiple shades of green Distress spray stains.


The green cardstock was then die cut with the Tim Holtz/Sizzix Tree Line die.

The Tree Line die cut was adhered to the blue embossed star background and the trees and bottom of the card were embossed with Fresh Fallen Snow embossing powder.


One of the Merry Christmas greetings was cut from the Merry Christmas Greetings Pack and painted with white acrylic paint as was one of the Small Primitive Stars.  Both chipboard pieces were then given a thin coating of Vintage Distress Collage medium and, once that had dried, both were embossed with clear embossing powder.

Three sizes of stars were die cut from white cardstock multiple times with a star die, stacked together for a bit of dimension (I made a stack of three die cuts for each star) and then painted with white acrylic paint.  The stars were also given a light coating of Vintage Distress Collage medium and while the medium was still wet, they were each sprinkled with Clear Rock Candy Distress Glitter.


The Small Marked Deer was given a coat of gloss varnish and, while the varnish was still wet, I carefully sprinkled just the antlers with Vintage Platinum Distress Glitter Dust.  Wish I could get a decent picture to show you this glitter, it is truly spectacular but the camera does not like taking pictures of it!

And then the card was assembled.  I made an A2 size card blank (4 ¼” x 5 ½”) from kraft cardstock and adhered the embossed star background to it with double sided tape before adhering all of the chipboard embellishments into place.  As a finishing touch, I added a bit of Stardust Stickles Glitter glue around the edge.  Here are a few closeups.


Thanks so much for stopping by today and I hope that you have enjoyed seeing my Christmas card!


Southern Ridge Trading Company Supplies Used:


Other Supplies Used:

- Tim Holtz/Ranger Ink: Distress Ink, Distress Spray Stain, Vintage Platinum Distress Glitter Dust, Clear Rock Candy Distress Glitter & Vintage Distress Collage Medium
- Ranger Ink: Stickles - Stardust Glitter Glue
- Tim Holtz/Sizzix: Tree Line On The Edge die
- Emerald Creek Craft Supplies: Iridescent Shimmer embossing powder & Soft Fallen Snow Embossing Powder
- Simon Says Stamp: Large Holiday Shapes dies
- DecoArt: Gloss Varnish
- DecoArt Americana: Cool White acrylic paint
- Scotch: Tacky Glue
- White and kraft cardstock
- Double sided tape
- Clear embossing powder
- Clear embossing ink

I hope that you will be inspired to enter our current challenge Christmas!  As hard as it is to believe, that wonderful holiday will be here before we know it so get out your crafting supplies and link up your creations.  You have a chance to win 4 designs from the online store - chipboard.ca - a $20.00 (before tax) retail value of YOUR OWN CHOOSING!  Can’t wait to see what you make, happy creating!

Deb xo