Showing posts with label Memories Fun Word. Show all posts

Friday, June 29, 2018

Memories Wall Hanging with Katelyn Grosart

Hey Southern Ridge Trading Company fans, Katelyn here. For today's post, I'm excited to share with you my Memories Wall Hanging that's perfect to add to your home decor.  My Memories Wall Hanging features a variety of our chipboard pieces. You'll want to read below as I share with you how to recreate my Memories Wall Hanging at home.


To start, you'll need a 5"x7" canvas. Apply two coats of Walnut Stain Distress Paint Ink around the edges of the canvas. Rub Ground Espresso Distress Crayon around the edges of the canvas.


Apply two coats of Black Paint to the Memories Fun Word. After the paint has dried, rub Aged Brass and Brushed Iron Art Alchemy Metallique Wax over top of the word.


Take one Drifting Feathers out of the package. Apply two coats of Walnut Stain Distress Paint on the feather. Once the paint has dried, rub Ground Espresso Distress Crayon along the edges of the feather.


Take two Fern Leaf Foliage pieces out of the package. Apply two coats of Peeled Paint Distress Paint to the fern pieces. After the paint has dried, rub Peeled Paint Distress Crayon along the edges of both fern pieces. 


Next you'll need is the Doily Frame. Apply Emboss It Ink to the frame and sprinkle Oil Rubbed Bronze Embossing Powder overtop of the piece. Tap off the excess powder and emboss with a heat tool.


The last chipboard piece you'll need is the Delicate Lace Doily. Cut the piece in half and then in quarters. Apply two coats of Walnut Stain Distress Paint to two of the doily quarters.


Choose a Found Relative. Die cut the found relative using the 3" Stitched Circle Die. Ink the edges of the circle using Ground Espresso Distress Ink and a blending tool with foam.


Choose one of the Anthology papers and die cut the 3 1/2" stitched circle out of it. Ink the edges of the circle using Ground Espresso Distress Ink and a blending tool with foam. 


From a second Anthology paper, cut a piece that measures 4 1/4" x 6 1/4". Ink the edges of the circle using Ground Espresso Distress Ink and a blending tool with foam. At the top right of the piece of paper, tear a bit down and do the same at the bottom left of the paper.


From a third Anthology paper, cut a piece that measures 4 1/2" x 6 1/2". Ink the edges of the circle using Ground Espresso Distress Ink and a blending tool with foam. At the top right of the piece of paper, tear a bit down and do the same at the bottom left of the paper.


From the same piece of Anthology paper that you cut the circle out of, cut a piece that measures 4 3/4" x 6 3/4". Ink the edges of the circle using Ground Espresso Distress Ink and a blending tool with foam. 


Adhere the 4 3/4" piece of patterned paper to the canvas. Adhere one piece of the doily chipboard to the top right side of the canvas. Adhere the other piece of doily chipboard to the bottom left side of the canvas.


Adhere the 4 1/2" piece of patterned paper overtop of the 4 3/4" patterned paper piece. Adhere the 4 1/4" patterned paper piece overtop of the the 4 1/2" patterned paper piece.


If desired, adhere the lace to the middle of the patterned paper. Adhere the found relatives to the 3 1/2" circle. Foam square the 3 1/2" circle to the middle of the canvas.


Adhere the doily frame overtop of the circles. Adhere one of the fern leaf foliage piece to the top left portion of the frame. Adhere the other fern leaf foliage piece and feather in the bottom right side of the frame.


Adhere the Memories word underneath the photo.


In the top left side of the frame, adhere one large cream rose, two brown roses, four black roses and two cream roses.


In the bottom right hand side of the frame, adhere one large cream rose, two cream roses, two brown roses and two black roses.


To finish off the memories wall hanging, add a black ribbon hanger.


Here are a few close up photos of the wall hanging.


Southern Ridge Trading Company Supplies Used:

- Doily Frame
- 10mm Roses: Brown and Black
- 15mm Roses: Cream
- 20mm Roses: Cream

Other Supplies Used:

- Emerald Creek Craft Supplies: Oil Rubbed Bronze Embossing Powder
- Tim Holtz for Ranger Ink: Distress Ink - Ground Espresso, Distress Crayons - Peeled Paint and Ground Espresso, Distress Paint - Ground Espresso and Peeled Paint and Blending Tool with Foam
- Ranger Ink: Emboss It Ink Dabber
- Elizabeth Craft Designs: Stitched Circles
- PaperArtsy: Little Black Dress Paint
- Prima Marketing: Art Alchemy Metallique Wax - Brushed Iron and Aged Brass
- Kaisercraft: Anthology - Apothecary, Herbs and Botanist
- Tim Holtz Ideaology: Found Relatives
- Tombow: Mono Multi Liquid Glue
- Misc: Lace, 5"x7" Canvas, Black Ribbon and Heat Tool

Until Next Time!

- Katelyn


Thursday, May 18, 2017

Memories Wall Hanging with Katelyn Grosart

Hey there Southern Ridge Trading Company fans, Katelyn here. This month, the design team decided that one of our projects would feature the new Zen Dragonfly chipboard piece. So for my project I used the Zen Dragonfly along with a few other chipboard pieces to create my beautiful Memories Wall Hanging. Grab a cup of your favourite beverage and read below as I share with you how I created my Memories Wall Hanging.


To start, place the Soda Fizz Stencil on the Square Lace Frame. Once the stencil is placed on the frame, apply a thin coat of Transparent Matte Texture Paste through the stencil. Lift the stencil off the frame. After the paste has been applied, let dry for 15 minutes. With the texture paste now dry, apply two coats of Black Gesso. Let the gesso dry for 15 minutes.


With the gesso now dry on the square lace frame, apply Vintage Silk Opal Magic Wax to the entire frame. Once the wax has been applied, rub the Black Soot Distress Crayon along the edges of the frame. With the Distress Crayon on the frame, rub the wax from the crayon into the frame. 


Paint a coat of black gesso on the Zen Dragonfly. Once the gesso is applied on the zen dragonfly, apply both the Green Brocade and Blue Velvet Opal Magic Wax onto the dragonfly.  


Apply Ranger Ink Emboss It Ink to the entire zen dragonfly. Once the ink has been applied, sprinkle Iridescent Shimmer Embossing Powder over the entire dragonfly. Tap off the excess powder and emboss with your heat tool.


Cut two pieces of Honeycomb pattern. Apply two coats of Black Gesso to the honeycomb pattern. Once the gesso has dried, apply Black Soot Distress Crayon to the edges of the pieces. Rub the wax from the distress crayon into the edges of the honeycomb. 


Apply a coat of White Gold Opal Magic wax to the Memories Fun Word. Once the White Gold wax has been applied, lightly apply the Green Brocade Opal Magic wax to the Memories Fun Word.  


To finish off the edges of the Memories Fun Word, apply Black Soot Distress Crayon to the edges of the Memories Fun Word. Once the distress crayon has been applied, rub the wax from the distress crayon in with your finger.


Cut two pieces of black patterned paper from the Nature Sketchbook 12x12 Patterns & Solids. One piece will measure 3 1/2" x 3 1/2" and the second piece will measure 
4 1/2" x 4 1/2". 


Adhere one the honeycomb pattern pieces to the bottom right hand corner of the 
3 1/2" x 3 1/2" piece of black patterned paper. Adhere the other honeycomb pattern piece to the top left hand corner of the 3 1/2" x 3 1/2" piece of black patterned paper. 


Adhere the square lace frame to the 3 1/2" x 3 1/2" piece of black patterned paper. 


Adhere the 4 1/2" x 4 1/2" piece of black patterned paper to the back of the square lace frame making sure the black patterned paper side faces up. 


Foam square the zen dragonfly to the middle of the square lace frame. 


Adhere the Memories Fun Word to the bottom portion of the square lace frame. 


To finish the Memories Wall Hanging, add a piece of black ribbon to the top of the frame. 


Here are a some close ups of the finished Memories Wall Hanging.


Here's the finished Memories Wall Hanging.


Southern Ridge Trading Company Supplies Used:


Other Supplies Used:

- Emerald Creek Craft Supplies: Iridescent Shimmer Embossing Powder
- Tim Holtz for Ranger Ink:  Distress Crayon - Black Soot
- Ranger Ink: Emboss It Ink - Clear (dabber) and Texture Paste Transparent Matte
- Prima Marketing: Art Alchemy Opal Magic Wax - Vintage Silk, White Gold, Green Brocade and Blue Velvet
- Graphic 45: Nature Sketchbook - 12x12 Patterns & Solids
- DecoArt Media: Black Gesso
- Tombow: Aqua Mono Liquid Glue
- Hug N' Snug Seam Binding Ribbon: Black
- Misc: Heat Tool 


Until Next Time!

-Katelyn 


Monday, May 1, 2017

Memories Scrapbook Layout with Charlene Byrd

Hello Bloggers!


Charlene Here! Thank you for joining me today! Life has been so crazy busy for me lately that I felt like the creative bug had escaped me. So I started flipping through a pile of pictures that was sitting on my desk trying to decide what I would design for this post.  I came across this photo of my boys that was taken 12 years ago playing with their good friends. 12 years! I honestly can’t believe how fast time goes. This is the biggest reason why I love to scrapbook…preserving and remembering memories.


I took my Black Soot Distress ink and swiped it across all 3 chipboard pieces until I got the desired colour I wanted.


Then I sanded the top and the sides of the filmstrip. I wanted to filmstrip to look a bit more weathered and worn.

Southern Ridge Chipboard:


Other Products Used:

- Basic Grey paper and stickers
- Cardstock
- Hemp
- Misc: Flowers and Butterflies

Thanks for joining me today. Scrapbooking this picture reminded me that even though life may be hectic and crazy, I need to take the time to enjoy the little moments, for they pass by so very quickly.
- Charlene


Monday, March 27, 2017

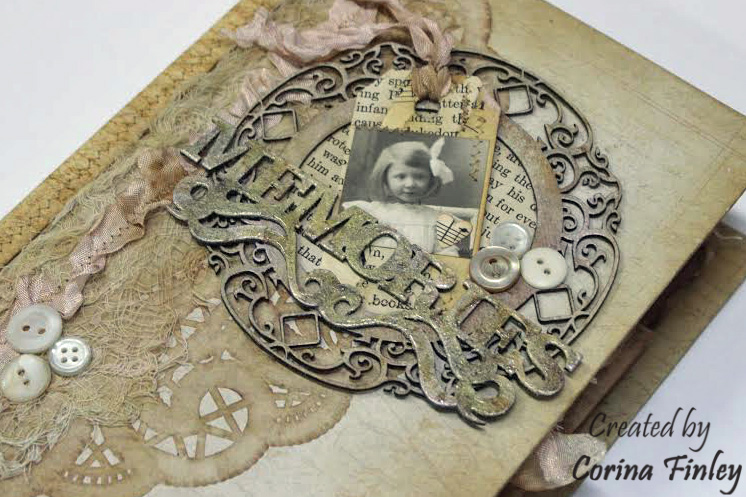
Vintage Junk Journal with Corina Finley


Happy Spring!

Thank you for joining me today. I have created my very first Vintage Junk Journal showcasing the Memories Fun Word & Victorian Circle Frame on the cover. 


I really enjoyed creating this journal starting from coffee dying all the assorted paper, doilies and embellishments. It is not a fast process but worth it at the end!


For my cover, I used a coffee stained lined paper base and wrapped the front and back panels. I cut a large doily in half and adhered a piece to each of the panels.


I randomly stamped the Journal spine with a vintage script stamp using brown dye ink and added stitched embellishing to the edges. Coffee stained cheese cloth & seam binding was layered under the Victorian Circle Frame and the Memories Fun Word. I then slipped in a vintage tag I created and added a few buttons.


Southern Ridge Trading Company Products Used:

Memories Fun Word


Remember to take a look at the Southern Ridge Trading Company website -Chipboard.ca for great Chipboard designs for your next card or project!

Thanks for joining me today!

Take care,

Live, Laugh & Create!