Showing posts with label Abstract Heart Frames. Show all posts

Thursday, January 30, 2020

Loveable Scrapbook Layout with Nancy Nickel

Hello, everyone!
It's Nancy here, with a fun new post for Southern Ridge Trading Company!
Today I'm sharing a simple and sweet Valentine project!

  I always have several 8 X 8 Albums going. 
Some are seasonal, like the Winter one I shared last month. 
Some are filled with assorted pages that I've been inspired to make.
This is one of those pages.

It was the beautiful Abstract Heart Frames,
from Southern Ridge Trading Company,
that inspired this page.


I started by gathering all my supplies.


I dabbed the heart chipboard frames with embossing ink,
sprinkled them with the embossing enamel, and heat set. 
I repeated the process using the pink embossing powder,
on the "Loveable" and the three little hearts. 


I laid the smaller heart frame onto an old photo of my daughters.
This was taken back in the day...when they were still "Loveable"! ;o)
 Using my blade, I cut the photo to fit the frame. 
If you don't like using a blade, just draw around the frame, 
and cut out with scissors. 


Here's a close-up of the intricate frame, and the sparkly enamel. 
The "Loveable" is so shiny and pink!


 I adhered the 6" decorative paper to the center of the 8" cardstock base.
I adhered the large frame in place first, and then added the word in place.
Next, I added foam tape to the back of the framed photo,
and adhered it in place.
Finally, I added the three little hearts to the page.


I know that the word and little hearts would have shown up
much more clearly on the first paper I had chosen.
However, I really wanted something more whimsical and pretty.
So that's why I decided to go with this paper!


Southern Ridge Trading Company Products:


Other Supplies Used:

  - Recollections: Cardstock
- Bo Bunny: Crazy Love
- Stampendous: Embossing Ink and Shabby Pink Embossing Enamel
- Glitters Galore: Shabby Pink Embossing Powder
- ScraPerfect: Best Glue Ever and No Clog Writing Cap.

* * * * *
Thanks so much for stopping in today!
I'll have another project share for you in very soon!

* * * * *

Friday, January 18, 2019

True Love Mixed Media Keepsake with Karen Jiles


Karen here, sharing a “True Love” Keepsake using Southern Ridge Trading’s Words of Christmas and Abstract Hearts chipboard sets. I loved creating this Keepsake with the versatile chipboard that I chose. They were perfect with the love themed papers I selected. I complimented the papers and chipboard with some vintage embellishments that really gave this piece a classic look. This Keepsake measures 5 x 5 and the size is super fun and easy to create with. Take a peek at my tutorial below:


Step 1: Using a foam tool, apply Lilac Lavender Embellishment Mousse to edges of wooden box, chipboard abstract heart and “Love” chipboard from the Words of Christmas Chipboard Set. Heat set and set aside.


Step 2: Trim patterned paper down to layering sizes and sand edges with sanding bar.

C:\Users\Karen\AppData\Local\Microsoft\Windows\INetCache\Content.Word\True Love Keepsake-Karen Jiles-3A.JPG


Step 3: Begin layering patterned papers together using adhesive.


Step 4: Create a card effect using coordinating patterned paper and adhere to Keepsake. Note: This effect adds an opportunity to add journaling and a sweet photo.

C:\Users\Karen\AppData\Local\Microsoft\Windows\INetCache\Content.Word\True Love Keepsake-Karen Jiles-5A.JPG


Step 5: Adhere velvet ribbon, focal layer, abstract heart and Love chipboard to the Keepsake.

C:\Users\Karen\AppData\Local\Microsoft\Windows\INetCache\Content.Word\True Love Keepsake-Karen Jiles-6.jpg

Step 6: Add velvet bow and paper straws to the Keepsake.

C:\Users\Karen\AppData\Local\Microsoft\Windows\INetCache\Content.Word\True Love Keepsake-Karen Jiles-7.jpg

Step 7: Punch hearts from patterned paper and adhere to the Keepsake. Add sentiment and pins.

C:\Users\Karen\AppData\Local\Microsoft\Windows\INetCache\Content.Word\True Love Keepsake-Karen Jiles-8A.JPG


Step 8: Add charm and tap on gesso to enhance the overall design. Note: I punched a 1 inch circle from coordinating patterned paper and cut it half. Each half was positioned at the top and bottom of the keepsake creating a tab effect.

C:\Users\Karen\AppData\Local\Microsoft\Windows\INetCache\Content.Word\True Love Keepsake-Karen Jiles-STC 1.jpg

Step 9: Continue embellishing as desired.


Southern Ridge Trading Company Supplies:


Other Supplies Used:

- Valentines themed patterned paper
- Wooden Box
- Sanding Bar and Scissors
- Gesso (White)
- Lilac Lavender Embellishment Mousse
- Foam Tool
- Beaded & Decorative Pins
- Paper Straws
- Charm
- Small Heart Punch and Small Circle Punch
- Trimmer
- Heat Tool
- Paintbrush
- E6000
- Hot Glue

Thanks so much for stopping by today.
Karen

Wednesday, August 29, 2018

Congrats Wedding Card with Katelyn Grosart

Hey Southern Ridge Trading Company fans, Katelyn here. For today's post, I'm thrilled to share with you this Congrats Wedding Card that was given away last weekend to the happy couple.  To embellish my Congrats Wedding Card, I featured a variety of our popular frames and border chipboard pieces. You'll want to read below as I share with you how I embellished the chipboard pieces for my card.


To start, you'll need to cut out the two hearts from the Classy frame. Apply a layer of Emboss It Ink to the two chipboard hearts. Sprinkle Glacier White Embossing Powder overtop of the hearts and tap off the excess powder. Emboss with a heat tool. Apply a layer of Emboss It Ink to the now embossed hearts. Sprinkle White Satin Pearl Embossing Powder overtop of the hearts and tap off the excess powder. Emboss with a heat tool.


Next you'll need one Scroll Border. Cut the border in half. Apply a layer of Emboss It Ink to both Scroll Border pieces. Sprinkle Glacier White Embossing Powder overtop of the scroll pieces and tap off the excess powder. Emboss with a heat tool. Apply a layer of Emboss It Ink to the now embossed scroll borders. Sprinkle White Satin Pearl Embossing Powder overtop of the scroll pieces and tap off the excess powder. Emboss with a heat tool.


The last chipboard element I needed for my card was the large Abstract Heart Frames. Using a blending tool with foam and Ground Espresso Distress Ink, blend the ink over the entire surface of the heart frame.


Once all the patterned papers have been layered together and the lace has been added, I then adhere one scroll border to the bottom right side of the heart frame and the other scroll border to the top left corner of the heart frame. Adhere the traced paper heart to the abstract heart frame. Foam square the abstract heart to the middle of the patterned papers. Adhere your sentiment to the middle of the patterned paper heart. Adhere a few pearls at the top of the word and at the bottom of the word. 


In the bottom right side of the heart, I adhered one extra large white flower, three large cream roses, three medium white flowers and three white small flowers as well as one of the chipboard hearts.


In the top left corner of the heart, I adhered one extra large white flower, three large cream roses, three medium white flowers and four white small flowers as well as the other chipboard heart.


Here's the finished Congrats Wedding Card.


Southern Ridge Trading Company Supplies Used:

- Classy Frame Set
- Roses: 2 extra large flowers, 20mm white flowers, 10mm white flowers and small white flowers

Other Supplies Used:

- Emerald Creek Craft Supplies: Glacier White Embossing Powder and White Satin Pearl Embossing Powder
- Tim Holtz for Ranger Ink: Distress Ink - Ground Espresso and Blending Tool with Foam
- Ranger Ink: Emboss It Ink Dabber
- Stamperia Patterned Paper
- Kaisercraft: Pearls - China
- Elizabeth Craft Designs - Words 1 - Celebration
- Tombow: Mono Multi Liquid Glue
- Misc: Lace, White Cardstock and Heat Tool

Until Next Time!

- Katelyn


Wednesday, February 7, 2018

Firefighter Valentine's Day Card with Erin Quiding-Sampson

After the big move and waiting for internet to be connected, I’m finally back creating with some SRTC chipboard! It feels so nice to have a place to craft again!!


I made a 5 ½ by 5 ½ Valentines day card. I used Southern Ridge Trading Company’s Firefighter Mix and Abstract Heart Frames.


I cut my 5 ½” by 11”card base out of recollections 110lb cardstock then scored the long side at 5.5.
I cut the inside panel and outside layer at 5 ¼ by 5 ¼

I used my water brush to do a quick wash with this Opaque white watercolour. I allowed it to dry then added more watercolours over to add a hint of colour to the firefighter and the heart.
I just added colour and wiped it off until it looked the way I wanted. Once I was happy with that, I put the card together and added Be Mine.

Southern Ridge Trading Company Products Used:

Thanks for stopping by
~Erin

Saturday, January 27, 2018

Love Tag with Katelyn Grosart

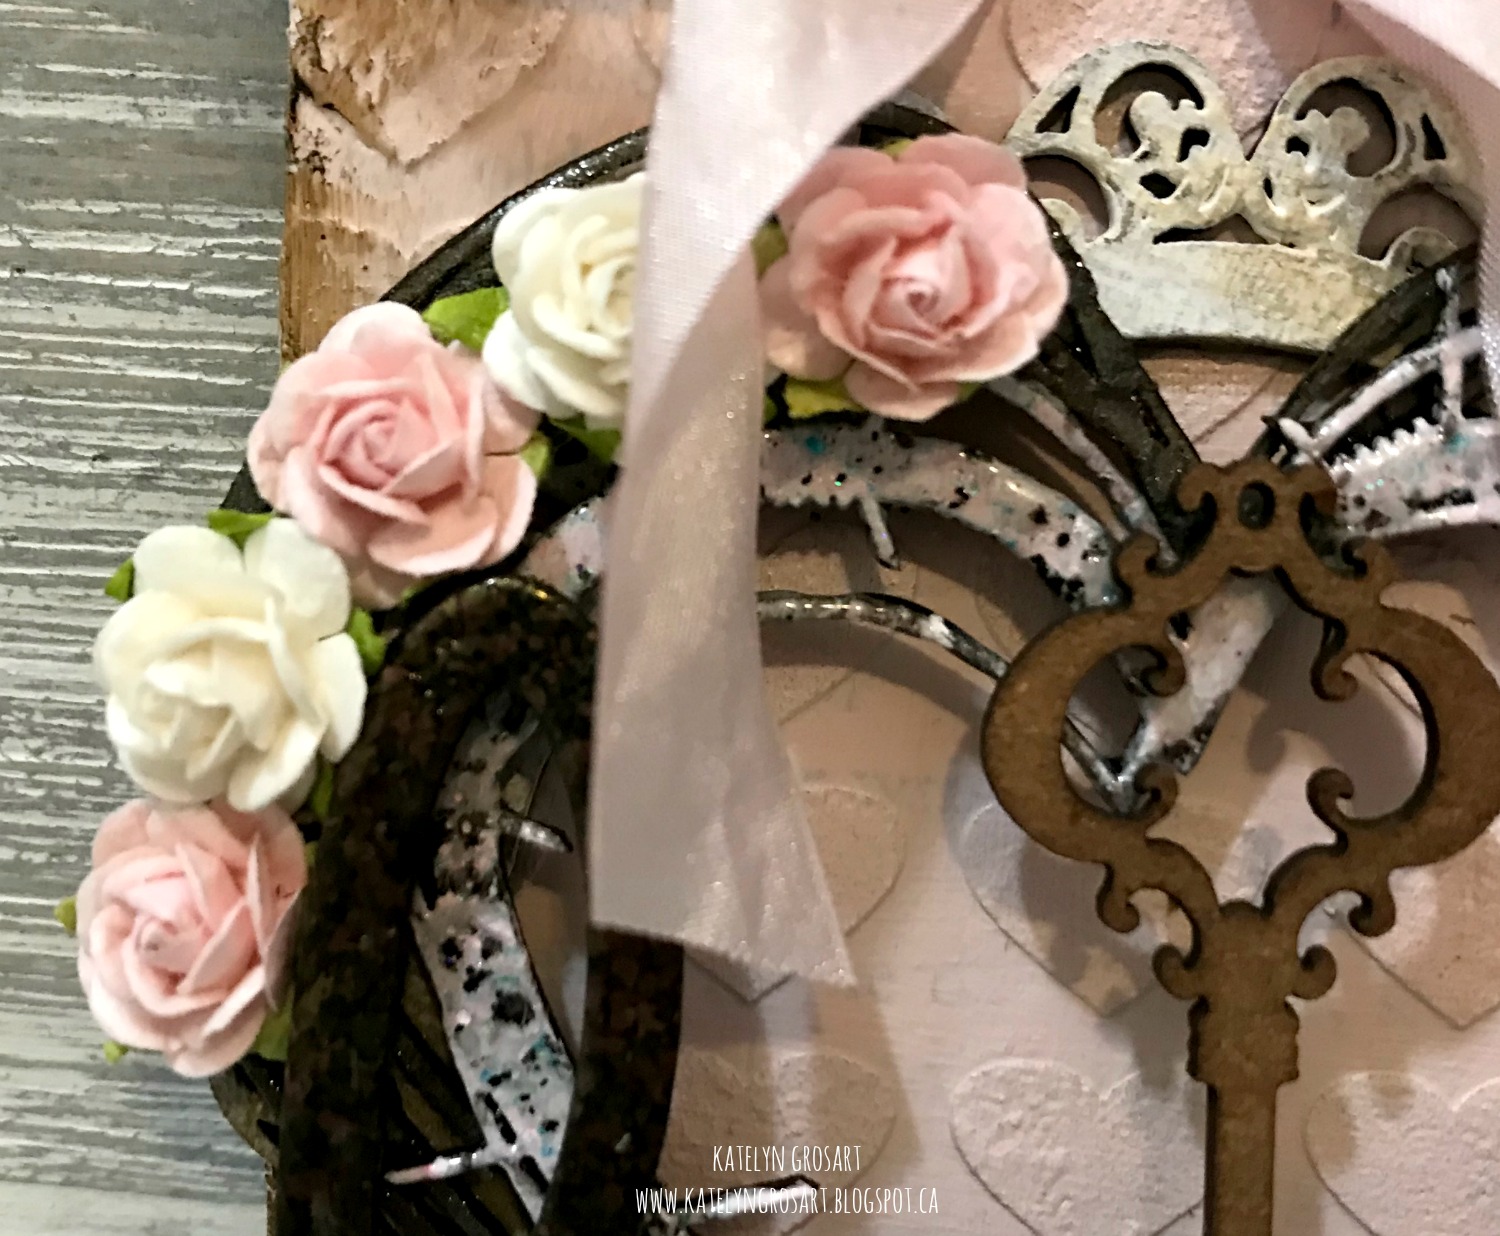
Hey Southern Ridge Trading Company fans, Katelyn here. Today, I've created for you a shabby chic Love Tag, that's perfect for Valentine's Day as it's only a few weeks away. You'll want to read below as I share with you how I created my Love Tag so that you can recreate it at home.


To start, trace the Chipboard Tag around a piece of book page. Use Distress Collage Medium - Matte to decoupage the book page onto the chipboard tag. Set aside to dry.


Once the book page has dried, place the Heart Stencil overtop of the bookpage. Using a palette knife, spread Embossing Paste over top of the stencil. Set the tag aside to dry.


With the embossing paste dry, apply a coat of Vintage Lace and Blush Paint to the entire surface of the tag.


Once the paint has dried on the tag, rub Walnut Stain and Vintage Photo Distress Crayon on the edges of the tag.


Take the Love Word out of the package. Apply a coat of Emboss It Ink to the word. Sprinkle Burnt Copper Leaves embossing powder over the entire surface of the word. Tap off the excess powder and emboss with your heat tool. 


Take one Vintage Scroll Key out of the package. Apply Vintage Photo Distress Ink to the entire surface of the key using a blending tool with foam.


Next, you'll need the Barbed Wire Heart Frame. Apply a coat of Emboss It Ink to the heart. Sprinkle Pastel Pink embossing powder over the entire surface of the heart. Tap off the excess powder and emboss with your heat tool. Once the Pastel Pink embossing powder has dried, apply a coat of Emboss It Ink to the now pink heart. Sprinkle Fractured Ice embossing powder over the entire surface of the pink heart. Tap off the excess powder and emboss with your heat tool.     


Take the small heart out of the Abstract Heart Frames package. Apply a coat of Mixed Media Medium to the heart. Quickly place the Mixed Media Transfer Foil in Patina overtop of the heart and rub the foil onto the heart. In the areas that didn't get foil, apply Black Soot Distress Ink using a blending tool and foam. 


Take out the small Doily Frame and apply two coats of Snowflake paint to the frame. Once the paint has dried, lightly rub Vintage Photo Distress Crayon randomly onto the frame.


Adhere a piece of lace to the bottom of the tag.


Adhere the doily frame to the middle of the tag. Adhere the abstract heart to the middle of the doily frame.


Adhere the barbed wire heart to the middle of the abstract heart. Adhere the key to the middle of the barbed wire heart.


Adhere the love word to the bottom of the hearts. To add some extra detail to the love, add three rhinestones. In the bottom right hand side of the hearts, adhere two cream roses and three pink roses. In the top left hand side of the hearts, adhere two cream roses and three pink roses.


To finish the Love Tag, tie a pink bow at the top of the tag.


Here are a few close up shots of my tag.


Here's the finished tag.


Southern Ridge Trading Company Supplies Used:

- Doily Circle Frame
- 10mm Roses: Cream and Pink

Other Supplies Used:

- Emerald Creek Craft Supplies: Burnt Copper Leaves Embossing Powder, Fractured Ice Embossing Powder and Pastel Pink Embossing Powder
- Paper Artsy: Fresco Finish Chalk Acrylics - Snowflake Vintage Lace and Blush 
- Ranger Ink: Emboss It Ink Dabber
- Tim Holtz for Ranger Ink: Distress Ink - Vintage Photo & Black Soot, Distress Crayon - Vintage Photo & Walnut Stain, Distress Collage Medium - Matte, Distress Collage Brush and Blending Tool with Foam
- Stampendous: Dreamweaver Stencil - Regular Embossing Paste
- Therm o web: Rebekah Meier - Mixed Media Medium and Mixed Media Transfer Foil - Patina
- Want 2 Scrap: Rhinestones
- Tombow: Mono Multi Liquid Glue
- Misc: Book Page and Light Pink Ribbon

Until Next Time!

- Katelyn