Showing posts with label Stamperia. Show all posts

Monday, December 23, 2019

Christmas Gift Tags with Katelyn Grosart

Hey Southern Ridge Trading Company fans, Katelyn here. With only 2 days until Christmas, I have been busy getting my gifts wrapped and wanted to add an extra little detail to the outside of the gift. So today, I'm excited to share with you my Christmas Gift Tags. To create my gift tags, I've used a variety of our popular Christmas chipboard pieces. You'll want to read below as I share with you how to recreate my Christmas Gift Tags at home.


To start, you'll need two Wood Christmas Ornaments. Apply two coats of Gathered Twigs Distress Stain to each of the ornaments. 


Next, you'll need some Christmas paper. Trace with ornaments around the patterned paper and fussy cut the paper ornaments out. Adhere the patterned papers to each of the ornaments. Ink the edges of the ornaments using Vintage Photo Distress Ink and a blending tool with foam.


Choose one of the snowflakes from the Snowflake 714 package. Apply two coats of Brushed Pewter Distress Stain to the snowflake.


From the Merry Deer package, choose one of the deers. Paint the deer white with two coats of Picket Fence Distress Paint. Once the paint has dried, ink the edges of the deer using Vintage Photo Distress Ink and a blending tool with foam.


From the Corrugated Stars, choose a large and small star. Apply Emboss It Ink to each of the stars. Sprinkle Charred Gold Embossing Powder over the entire surface of the stars. Tap off the excess powder and emboss with a heat tool. Ink the edges of the stars using Vintage Photo Distress Ink and a blending tool with foam.


You'll need six stars from the Itty Bitty Snowflakes package. 


On one of the ornaments, foam square the snowflake to the middle of the ornament. Adhere the small star overtop of the snowflake. Adhere the three itty bitty snowflakes as desired on the ornament. 


To finish this gift tag, tie a piece of jute twine to the top of the ornament.


On the other ornament, foam square the large star to the middle of the ornament. Adhere the deer overtop of the star. Adhere the three itty bitty snowflakes as desired on the ornament. 


To finish this gift tag, tie a piece of jute twine to the top of the ornament.


Here are a few closeup photos of the finished Gift Tags.


Here are the finished Christmas Gift Tags.


Southern Ridge Trading Company Supplies Used:


Other Supplies Used:

- Emerald Creek Craft Supplies: Charred Gold Embossing Powder
- Tim Holtz for Ranger Ink: Distress Paint - Picket Fence, Distress Stain - Gathered Twigs & Brushed Pewter, Distress Ink - Vintage Photo and Blending Tool with Foam
- Ranger Ink: Emboss It Dabber
- Stamperia: Christmas Rice Paper
- Misc: Jute Twine

Thanks so much for joining my today!

- Katelyn


Wednesday, February 20, 2019

Welcome Spring Card with Pam Bray


Hello to all of our Southern Trading Company Fans!!! 
Pam's back today wondering if you are ready to "Welcome Spring"!
In Memphis, TN it has been raining a lot but we are seeing the signs of Spring...
Robins, Cardinals and my favourite Bluebirds are coming home to build their nest. 
Of course the daffodils are trying to peek through the ground!
All a sure sign of Spring!!!
SO....
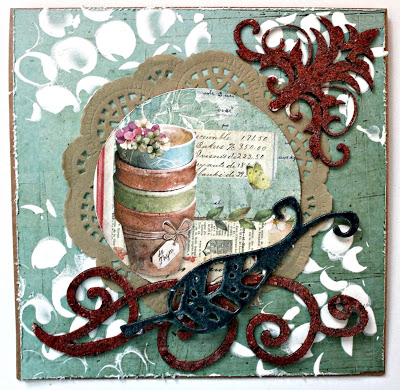
I decided to celebrate with creating a beautiful "Welcome Spring" Card using several of Southern Ridge Trading Company Chipboard Elements along with the Bubble Wrap Stencil. 


Begin by adhering a distress piece of pattern paper to the top of a 5 1/2" x 5 1/2" Kraft card base. 
Lay Bubble Wrap Stencil on top; apply white gesso using palette knife. Dry


Punch image from pattern paper with circle punch; adhere to top of paper doily. 
Adhere to top of card front. 


Emboss Swirly Flourish Element and  Demask Corners with Chunky Rust Baked Texture using embossing powder and embossing gun. 
Repeat with Patina Oxide Baked Texture on one of the feathers from the Tribal Feathers Mix.


Adhere embossed pieces to top of card front. 


Fussy cut small bluebird from pattern paper.
 Add to top of card with pop dots. 


Add fussy cut leaves to card along with ribbon and twine bows. 


Fussy cut "Welcome Spring" from pattern paper; layer to Kraft card stock. 
Add to front of card with pop dots. 
Add small metal brad to front of card. 


Southern Ridge Trading Company Supplies Used:


Other Supplies Used:

- Stamperia Garden Collection
- Gold Ribbon and Tan Twine
- Tan Paper Doily
- DecoArt Media White Gesso
- Palette Knife
- Metal Brad
- Kraft Card Stock
- Adhesive
- Pop Dots

- 5 1/2" x 5 1/2" Kraft Card Base

Thank you for stopping by today!
 I hope you are staying dry, warm and ready to create with your Southern Ridge Trading Company Chipboard Elements and Stencils!
 Enjoy Pam


Wednesday, August 29, 2018

Congrats Wedding Card with Katelyn Grosart

Hey Southern Ridge Trading Company fans, Katelyn here. For today's post, I'm thrilled to share with you this Congrats Wedding Card that was given away last weekend to the happy couple.  To embellish my Congrats Wedding Card, I featured a variety of our popular frames and border chipboard pieces. You'll want to read below as I share with you how I embellished the chipboard pieces for my card.


To start, you'll need to cut out the two hearts from the Classy frame. Apply a layer of Emboss It Ink to the two chipboard hearts. Sprinkle Glacier White Embossing Powder overtop of the hearts and tap off the excess powder. Emboss with a heat tool. Apply a layer of Emboss It Ink to the now embossed hearts. Sprinkle White Satin Pearl Embossing Powder overtop of the hearts and tap off the excess powder. Emboss with a heat tool.


Next you'll need one Scroll Border. Cut the border in half. Apply a layer of Emboss It Ink to both Scroll Border pieces. Sprinkle Glacier White Embossing Powder overtop of the scroll pieces and tap off the excess powder. Emboss with a heat tool. Apply a layer of Emboss It Ink to the now embossed scroll borders. Sprinkle White Satin Pearl Embossing Powder overtop of the scroll pieces and tap off the excess powder. Emboss with a heat tool.


The last chipboard element I needed for my card was the large Abstract Heart Frames. Using a blending tool with foam and Ground Espresso Distress Ink, blend the ink over the entire surface of the heart frame.


Once all the patterned papers have been layered together and the lace has been added, I then adhere one scroll border to the bottom right side of the heart frame and the other scroll border to the top left corner of the heart frame. Adhere the traced paper heart to the abstract heart frame. Foam square the abstract heart to the middle of the patterned papers. Adhere your sentiment to the middle of the patterned paper heart. Adhere a few pearls at the top of the word and at the bottom of the word. 


In the bottom right side of the heart, I adhered one extra large white flower, three large cream roses, three medium white flowers and three white small flowers as well as one of the chipboard hearts.


In the top left corner of the heart, I adhered one extra large white flower, three large cream roses, three medium white flowers and four white small flowers as well as the other chipboard heart.


Here's the finished Congrats Wedding Card.


Southern Ridge Trading Company Supplies Used:

- Classy Frame Set
- Roses: 2 extra large flowers, 20mm white flowers, 10mm white flowers and small white flowers

Other Supplies Used:

- Emerald Creek Craft Supplies: Glacier White Embossing Powder and White Satin Pearl Embossing Powder
- Tim Holtz for Ranger Ink: Distress Ink - Ground Espresso and Blending Tool with Foam
- Ranger Ink: Emboss It Ink Dabber
- Stamperia Patterned Paper
- Kaisercraft: Pearls - China
- Elizabeth Craft Designs - Words 1 - Celebration
- Tombow: Mono Multi Liquid Glue
- Misc: Lace, White Cardstock and Heat Tool

Until Next Time!

- Katelyn


Friday, June 22, 2018

Vintage Bicycles with Deb Antonick

I just fell in love with these new Stamperia Rice papers.
I chose to make 2 canvases so as not to waste any of this gorgeous paper.


To start, I applied a coat of Gesso to chipboard bikes and the 2 wood canvases.


Cut the paper to fit the larger wood canvas keeping to the upper right of the paper so as to utilize the flowers. Apply with Matte Medium.
Use a palette knife and a brick look stencil and apply modelling paste to the smaller Wood Canvas, and the upper right and lower left of the larger canvas over the paper. Let dry.
Emboss the chipboard Bicycles and the branches with the Emerald Creek Allure Burnt Copper Leaves embossing powder.


Paint over the texture with Razzleberry. Let dry.
Drybrush over the pink with Light Buttermilk. Let dry.


Adhere the remaining paper to a piece of Cardstock with Matte Medium. Let dry, then cut to create the upper right and lower left corners.
Adhere the paper with glue.


Shade around the edges on both of the wood canvases with DecoArt Media Fluid Acrylics Burnt Umber.
Stamp a piece of cardstock with the Dream stamp and trim to size. Adhere with Matte Medium. Outline with the Stabilo pencil or permanent marker.
Add brads to the wheels.
Adhere all the chipboard pieces with Pop Up Glue Dots.
Adhere flowers with Glue.


Finish the sides of the wood canvas with Razzleberry.


Southern Ridge Trading Company Supplies Used:

Other Supplies Used:
- 8x8 Wood Canvas
- 6x6 Wood Canvas
- Stamperia Paper: Peach Blossoms
- Emerald Creek Craft Supplies: Burnt Copper Leaves Embossing Powder
- DecoArt Acrylics: Razzleberry and Light Buttermilk
- DecoArt Media: Gesso, Burnt Umber and Matte Medium
- Stencil: TCW 6x6 Brick Stencil
- Stamp: Dream Forever CRV219 - Stampendous
- Imagine Crafts: StazOn Jet Black Permanent Ink Pad
- Aleene's Tacky Glue
- Stabilo pencil or permanent black marker
- Small flowers and four brads
- Palette Knife, Scissors and Heat Tool

By Deb Antonick