Showing posts with label Swooping Birds. Show all posts

Friday, February 8, 2019

Thanks Card with Monica Edwards

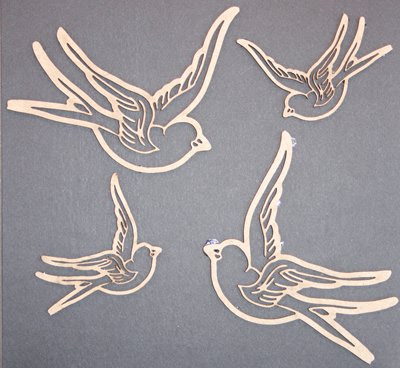
Hi everyone! Welcome back to a Southern Ridge Trading creation using Leafy Branches and Swooping Birds.  To make this card of thanks for a friend.


I painted the chipboard pieces with gesso first and then added another coat of white paint.  For the bird piece I glued it to a piece of white cardstock so you could see the image clearly.


Southern Ridge Trading Company Supplies Used:
- Leafy Branches

Other Supplies Used:

- Liquitex Gesso
- Simon Says Stamp Die : Thanks
- Neenah Cardstock : White
- Flowers
- Silver Mirror Paper

Hope you enjoyed my post
- Monica

Wednesday, August 22, 2018

Tea Bag Dispenser with Jessica Kaiser

Hello crafty friends!

It’s Jess here today to share a very "tea-lightful" project…….

a Tea Bag Dispenser!!


I had printed this tutorial off YEARS ago from Splitcoast Stampers, and recently came across my printout, so I decided to make it this week and accent it with BEAUTIFUL chipboard!!

Here are the pieces from Southern Ridge that I used:


Ok!  So this cute little project just needs a piece of cardstock that is 6x12 inches.  I followed the cutting guide HERE.  I used the gorgeous Swooping Birds and Tags chipboard items to decorate this sweet box.  To color my chipboard pieces, I used Nuvo Embellishment Mousse.  Simply sponge it on and it dries very quickly!  I also added a bit of blue spray inks to the tag (which I also added some "T-E-A" wooden letters). 


I used my Tombow Mono White Glue to adhere the chipboard pieces to my tea box. It is really an easy assemble - I'm definitely going to make a few gifts for the upcoming season!!!  I also accented the top with a flower chipboard piece (I believe it's been discontinued, but you can find a similar flower in the Deb's Strawberry Angel Kit).  Some pearls were added at the end along with a bit of ribbon and bakers twine. I really love how quickly this project came together and what a perfect gift giving idea this could be!!!


Now it’s your turn to head out and create your own Tea Box Gifts!  Thanks for checking out my project!

Jess


Tuesday, August 21, 2018

Altered Hat with Tracy Sagriff

Today's project is a little bit steampunk and a whole lot of shabby chic. The pretty colours and fun diecuts make this project come to life.


Begin by painting the entire hat with rose gold. Be sure to get the bottom of the brim.

Once dry paint use white paint from the brim of the hat to the edge of the faux hat band. Then paint the uppermost part of the brim white.

Distress  the paint using sandpaper or wire brushes. 

Use the rose gold paint and the stencil to create a pattern over the white paint.

Apply dollar store gems around the top and bottom of the faux hat band.

Paint the bird and pocketwatch pieces bronze.

Paint the leaves and flourish with green and turquoise.

Arrange rolled paper flowers and adhere to hat. 

Adhere the remaining pieces as desired.


Southern Ridge Trading Company Products Used:


Other Supplies Used:

- Plastic fedora or decoupage hat
- Rose Gold and White Acrylic Paint
- Stencil with desired pattern
- Cardstock
- Lace
- Homemade hatpins (optional)
- Bling

- Tracy S


Wednesday, April 4, 2018

Hangin' With My Gnomes Card with Jessica Kaiser

We are thrilled to welcome Jessica Kaiser to our Design Team. Jessica is up on the blog today sharing a super cut Hangin' With My Gnomes Card, that will be sure to inspire you. Sit back and relax and learn all about how she created her first project for us!

Hello crafty friends!


I'm SOOO excited to be here today to share with you my very first Southern Ridge Trading Company Design Team Project!

I had such a hard time choosing what to do first!  I had a bunch of ideas, but this "gnome" one just jumped out at me first. I have had this stamp set for YEARS and it has remained unused - and that is one of my New Year's crafty resolutions (to use my stash!) - so it just came together!

I used the following Southern Ridge items on this card:


I started by stamping my images and colouring with Nuvo Marker Pens. I fussy cut them out and set them aside.  I really wanted the mushrooms to have a "foresty" feeling, so I covered them with Versamark ink and heat embossed using SparkleNSprinkle Mojito Embossing Powder. I gently added some spots of SparkleNSprinkle Tangy Tangerine Embossing Powder using the Nuvo Embossing Pen and finally, for some special effects, I added some SparkleNSprinkle Magic Speckle Embossing Powder. I love how easy it is to transform chipboard using simply Versamark ink and Embossing Powders!  The details on these laser diecuts are incredible and the embossing powder adhered perfectly!  


Next, onto the Cedar Trees!  Because I was trying to blend the "realistic" forest patterned paper with my cartoon gnomes, I wanted to add another forest element. I chose the Cedar Trees to fit this bill I used the 2 smaller trees and covered them both with Versamark Ink - then embossed with SparkleNSprinkle Moss Star Embossing Powder (yes, there is glitter in the embossing powder already!).  I loved that it gave them some sparkle and dimension.  Finally, I chose to add one of the Swooping Bird Chipboard elements. I kind of tucked the sentiment in by his beak to make it look like he was carrying the sign. Once again, I covered the bird with Versamark Ink and embossed with SparkleNSprinkle Mediterranean Star Embossing Powder (another sparkly one!).  


I layered all the chipboard elements using foam squares and some Tombow Liquid Glue.  I tucked in my little fussy cut "gnomies" and stamped the cute sentiment on a piece of white cardstock, dovetailing the end.


I really had fun making this "ethereal meets real" card - I hope I gave you some fun ideas on how to use this variety of chipboard elements!

I can't wait to see you all again in two weeks or so to share my next creation!  Now, head on over to www.chipboard.ca to grab your fave chipboard! :)

Southern Ridge Trading Company Products Used:

Other Supplies Used:

- SparkleNSprinkle Embossing Powders (Mojito, Tangy Tangerine, Moss Star, Mediterranean Star, Magic Speckle) www.sparklensprinkle.net
- Imagine Crafts: Versafine Ink and Versamark Ink
- Stampin' Up! Patterned Paper
- Photoplay Summer Bucket List Patterned Paper
- Stampin! Up! "Gnome Sweet Gnome" & "Gnomenclature" Stamp Sets (retired)
- Tombow Mono Liquid Adhesive
- Foam Squares
- Tonic Studios: Nuvo Marker Pens
- White Cardstock

See ya soon!

Jess


Monday, May 22, 2017

Junk Journal Pages by Corina Finley


Hello Everyone!

As you can probably tell from my last few posts - I am addicted to Junk Journaling! I have had a love of creating hand bound books and mini Album but I never Junk Journaled! It is a whole new world that I am learning and my favourite embellishments (Southern Ridge chipboard) is working wonderfully! Just meant to be! 


The best part is that because they are gorgeous just as they are 'raw', not much needs to enhance there detail or beauty. For my pages that you will see below, I used 3 colours of Treasure Gold that was gifted to me at the Creativation Mega Show in Phoenix this past January. Southern Ridges Booth was next door to the wonderful and talented owners of Paper Artzy out of England. Using my finger tip, I applied the wax gilt to the chipboard pieces. It goes on so smooth and tries incredibly fast! And that is it!  


Here I used the vintage scissors from the Dressmaker Mix set. Perfect!


I love how this one turned out! I only applied glue to the base of the wing. This will allow me to use it as a tuck spot for other items.


Above, I used a small bird from the Swooping Birds set. Love it!

Southern Ridge Trading Company Products Used:

- Wings


Remember to take a look at the Southern Ridge Trading Company website - Chipboard.ca for great Chipboard designs for your next card or project!

Thanks for joining me today!

Take care,

Live, Laugh & Create!

Wednesday, April 27, 2016

"Start Something Wonderful" Wall Hanging by Katelyn Grosart


Katelyn here and I'm back on the blog today to share with you some more inspiration for our current monthly challenge. This month's challenge is all about Spring, so with that in mind, I created a beautiful wall hanging for you.


To begin my wall hanging, I needed to place the banner and the top of the banner piece on the patterned paper and then traced around each image. Once each image was traced,  I cut them out with my paper trimmer and scissors. After the large banner piece is cut out, I placed my doily stencil on the paper and put texture paste over top of the stencil. 


After the middle of the banner paper was stenciled and it had dried, I sprayed Wilted Violet Distress Spray Stain, Picket Fence Distress Spray Stain, Perfect Pearls in Perfect Pearls and Mister Huey First Kiss, randomly on the stenciled image. 


Now that the patterned paper banner is stenciled and sprayed, it was time to move onto to the chipboard pieces. I used two small Swooping Birds and painted them with two layers of Vintage Rose Prima Acrylic Paint.


The last chipboard piece that I used was the Med. Floral Frame which I covered with two layers of Dark Velvet Prima Acrylic Paint. Once the paint is dry, apply a layer of VersaMark over top of the entire frame. After the VersaMark had been applied, sprinkle Iridescent Shimmer Embossing Powder overtop of the entire floral frame and then emboss with the heat tool. 


The first finishing touch was adding the fussy cut flowers underneath the top left and bottom right hand of the un-adhered floral frame. Before adhering the floral frame and the "Start Something Wonderful" saying, I adhered a doily to the top left and a doily to the bottom right corners slightly showing the floral images underneath. Adhere the "Start Something Wonderful" saying to the middle of the doilies. Before adhering the floral frame I added the ribbon to the bottom of the banner an 1" from the scallop bottom and made a bow on the right hand side. After the ribbon has been tied at the bottom, adhere the floral frame and Swooping birds. After the swooping birds are adhered, add a variety of roses to the top left and bottom right corners. The last finishing touch I added was the white ribbon to the top of the banner. 


Southern Ridge Chipboard Pieces Used:


- 15mm Cream flowers
- 15mm Pink flowers

Other Supplies Used:

- Emerald Creek Craft Supplies: Iridiscent Shimmer Embossing Powder
- Ranger Ink: Texture Paste and Perfect Pearls Mist - Perfect Pearls
- Ranger Ink/Tim Holtz: Wilted Violet & Picket Fence Distress Spray Stain and Dusty ConcordDistress Ink
- Studio Calico: Mister Huey - First Kiss
- Prima: Vintage Rose & Dark Velvet Acrylic Paint
- Bo Bunny "Secret Garden": Secret Garden, Trellis, Garden Roses and Small Doilies
- Hug a Bug Seam Binding Ribbon: White
- Tsukineko/Imagine Crafts: VersaMark

Remember to play along in the monthly challenge over on the Southern Ridge Trading Company blog. Each month enter for your chance to win 4 designs from the online store - chipboard.ca -$20 (before tax) retail value of YOUR OWN CHOOSING! 

Until Next Time!
-Katelyn


Wednesday, April 13, 2016

Equestrian Layout by Karen Bearse

So I may have gotten a little carried away while playing on this layout. I haven’t done one in
quite a while. First off I completely forgot to take any step- out photos, I was just having too
much fun!


Secondly I may have gone a bit overboard with the glitter and the pink. Especially as it is not a favourite colour of mine!


The thing I like about this layout is by having a monotone background the photo takes center stage. Even though I was quite heavy handed there are no set rules and sometimes a girl needs to play!


I added modeling paste through stencils and painted my background and chippies with Glimmer Mist and Glam, as well as adding glitter and some embossing. 


The gear base wheel was too light so some doodling helped it from getting lost into the background.


I wanted hidden space for journaling so a tag was the solution. I left space behind my photo to tuck in the tag. Some distressing helped blend the tag with the photo.


The back of my tag gave me just enough room for a bit of the story. The photo was scanned and altered to add my title. This layout is from my athletic youth days. I am trying to scrapbook my story for my kids. I find as a scrapbooking Mom, the kids, activities, the stories of the present are what gets told. One day my kids will be perhaps interested and a bit surprised to hear my story. Take the time to art your story!

Southern Ridge Supplies Used:


Other Supplies Used:

Tattered Angels-Glimmer Mist,
Glimmer Glam & Glaze
7gypsies paper, stamps & metal embellishments
Prima-Art Stones
Ranger-distress inks, tag, stencils, embossing powder, metal hand, brads.

 Remember to play along in the monthly challenge over on the Southern Ridge Trading Company blog. Each month enter for your chance to win 4 designs from the online store - chipboard.ca -$20 (before tax) retail value of YOUR OWN CHOOSING! 

Thanks for joining me!!

-Karen

Thursday, March 10, 2016

Grungy Passport Mini Album with Karen Bearse

We are excited to welcome Karen Bearse to our Design Team. Karen is up on the blog today sharing a  beautiful grungy passport mini album that is sure to inspire you. Sit back and relax and learn all about how she created her first project for us!

First of all I would like to thank Southern Ridge Trading Co. for letting me be a part of their team. I am excited to play with these awesome chippies!


For my first project I made one of my favourite things, a mini album. Using the Eileen Hull Passport die from Sizzix with mat board as my base seemed a good place to start. Have you ever had an idea that was fairly simple but as you started to create inspiration took over? I love when that happens, only it makes for a tough tutorial! I will try and keep the steps simple. 


Cut 2 covers and a spine from white mat board. I placed my chippies onto the cover of my album for 
placement (list of supplies at end). After running my covers through an embossing folder it was time to add colour.


Spritz the outside pieces with various blue Glimmer Mists. When mist is dry, use a hard foam piece with just a bit of white acrylic paint. Carefully swipe across hitting just the high emboss points. Repeat until emboss pattern shows nicely. If you streak too much paint, just wipe quickly with a baby wipe to fix. Dry.


Now for the magic! Dab entire cover with Emboss It, or Embossing Ink, and UTEE (ultra thick embossing powder). Use a heat gun until UTEE melts completely. Let cool. Do 2 coats for the outside covers and 1 coat for the inside. 


For the spine I stamped with Distress ink & heat embossed with UTEE. Once that was cool the spine was covered in a light coat of Glimmer Glam, so the stamped image would show through. One of the things that is great about Glam (other than the glitter) is it acts like a glaze, so if I sprinkle copper embossing powder in random spots, it sticks. Once heat set it creates a very cool, shiny, looking spine. For the chippie gears, I spritzed with Chalkboard and sprinkled some emboss powder then heat set. The bird was painted with Glam and the hinges with Glam & sprinkled with a bit of copper emboss & heat set. Time to assemble.   If you want your piece to look like a book adhere spine to the outside of the front & back covers. To show more of the cover, adhere spine on the inside. Use a strong glue. 


Now for the signatures. One of the reason I love this book is it is so simple to put together. I made 3 
signatures (sections) layering 4 pieces of paper in each.


I did sew through the center of each signature but you don’t have to. It was just a matter of pulling wax thread through the spine, adding some beads and tying off the thread inside the middle section of each signature.


The final touch was to add a ribbon to hold the book closed using a metal gear. This book would be great as a mini art journal, scrap book, travel book… endless possibilities! 

Southern Ridge Chipboard Supplies:


- Iron Hinges 1.

 Remember to play along in the monthly challenge over on the Southern Ridge Trading Company blog. Each month enter for your chance to win 4 designs from the online store - chipboard.ca -$20 (before tax) retail value of YOUR OWN CHOOSING! 

Thanks for joining me!!

-Karen