Showing posts with label Star Wreath. Show all posts

Wednesday, June 12, 2019

Liberty Mixed Media Canvas with Pam Bray


Hi Pam here today sharing a fun and super easy mixed media canvas using a bit of Authentique Liberty paper, DecoArt Media paint, Dynasty Brushes, a 5" x 7" canvas along with Southern Ridge Trading Company Chipboard elements. 


Begin by painting the canvas with paint; creating details with paint and brushes: dry.  Spatter with paint; dry. 


Trim a bit off of the  Southern Ridge Trading Company Spring Fresh Swirl Corners adhere to front of prepared canvas. Add stickers and enamel dots. Punch 2 holes at to of canvas. 


Adhere Southern Ridge Trading Company Star Wreath to front of prepared canvas. Add stickers to canvas.


Finish canvas with fussy cut images from the pattern paper; layer on prepared canvas with pop dots. Add gemstones to tires along with metal stars. 


Add wire hanger and bow.

Southern Ridge Trading Company Supplies Used:


Other Supplies Used:

- DecoArt Media Paints: Burnt Umber, Primary Cyan, Cerulean Blue, Cadmium Red Hue, Titan Buff and Burnt Sienna
- Authentique: Liberty Details Sheet and Libber Right Pattern Paper
- 5" x 7" Canvas
- Metal Stars and Wire
- Gold Ribbon
- Hot Glue Gun and Glue Sticks

Thank you for stopping by today! Enjoy Pam


Wednesday, March 13, 2019

Believe in Yourself Scrapbook Layout with Laura Gilhuly

Good morning!
I have another layout to share with you today


This handsome guy is our oldest who graduated high school last year!


I embossed the chipboard Star Wreath with red and black then cut a section off and used it in the bottom corner.


The fabulous flowers were created using dies from Elizabeth Craft Designs


I also heat embossed the title piece 'Believe in yourself' with red and black embossing powder

Southern Ridge Trading Company Supplies Used:

Star Wreath
Believe in yourself

Thanks for stopping by,
Laura


Wednesday, September 20, 2017

Happy Holidays Wall Hanging with Katelyn Grosart

Hey there Southern Ridge Trading Company fans, Katelyn here. Fall feels like it has officially arrived here on the west coast of Canada. With the cool weather, I have definitely been in the mood to start creating Christmas projects. So today, I've created for you a beautiful Happy Holidays Wall Hanging, that's perfect to hang on your Christmas tree or give it as a gift to someone this holiday season. You'll want to read below as I share with you how I embellished the chipboard elements on my Happy Holidays Wall Hanging.


To start, pull out one Wood Small Marked Reindeer and one Sm. Wood Sleigh. Apply a coat of Candied Apple Distress Stain to the Sleigh. Once the stain has dried, apply a layer of Brushed Pewter Distress Stain overtop of the sleigh. Apply a coat of Ground Espresso Distress Stain to the Reindeer. After the stain has dried, apply a layer of Brushed Pewter Distress Stain overtop of the reindeer.


Take five snowflakes out of the Snowflakes 712 package. Apply two coats of Titanium White Paint on each snowflake. Once the paint has dried, apply a coat of Raw Umber Antiquing Cream to each snowflake. After the cream looks like it has dried, rub off excess cream. 


Next, you'll need one Lg. Wood Snowflake. Apply two coats of Titanium White Paint to the snowflake. Once the paint has dried, apply a coat of Raw Umber Antiquing Cream to the snowflake. After the cream looks like it has dried, rub off excess cream. 


Take the small Scribble Triangle Tree out of the package. Blend Fired Brick Distress Oxide Ink over the entire surface of the Christmas tree. With the ink dry, lightly rub White Gold Art Alchemy Metallique Wax over the edges and the middle of the tree. 


Pull the Happy Holidays Sentiment from the Wood Words of Christmas - Joy package. Apply a coat of Tarnished Brass Distress Stain to each word.


The last chipboard piece you need is the Star Wreath. Apply Emboss It Ink to the star wreath. With the ink on the wreath, sprinkle Charred Gold Embossing Powder over the entire star wreath. Tap off the excess powder and emboss with your heat tool. Let the wreath cool.  


To assemble the wall hanging, adhere an image to the middle of the wreath. In the top left hand corner, adhere two small snowflakes, the large snowflake the "Happy" word. To finish off the corner, adhere two cream roses and two brown roses.


In the bottom right hand corner, adhere the Christmas Tree, the sleigh, three snowflakes and the reindeer. To embellish the rest of the corner, adhere three cream roses and six brown roses.


To the left of the embellishments in the bottom right hand corner, adhere the "Holidays" word.


To finish your wall hanging, add a piece of ribbon to the top of the star wreath.


Southern Ridge Trading Company Supplies Used:

- 10mm Roses: Brown
- 15mm Roses: Cream


Other Supplies Used:

- Emerald Creek Craft Supplies: Charred Gold Embossing Powder
- Tim Holtz for Ranger Ink: Distress Ink - Walnut Stain, Distress Oxide Ink - Fired Brick and Distress Stain -  Brushed Pewter, Tarnished Brass, Candied Apple & Ground Espresso
- Ranger Ink: Emboss It Ink - Dabber
- DecoArt: DecoArt Fluid Acrylics - Titanium White and DecoArt Media - Antiquing Cream: Raw Umber
- Prima Marketing: Art Alchemy Metallique Wax -White Gold
- Tombow: Aqua Mono Liquid Glue
- Graphic 45: Winter Wonderland - Woodland Whimsy & Rustic Holiday
- Misc: Heat Tool

Until Next Time!

-Katelyn 


Monday, March 6, 2017

Shabby Chic Mini Album with Charlene Byrd

Hello Blogger friends,

Charlene here!

So in my mind I had great plans to create a wonderful new layout to share with you today but of course life doesn’t always happen the way it’s suppose to! We’ve been building an addition onto our house that was suppose to take about 8 weeks - we’re now at 5 months! And the basement of this addition goes from my old scrapbook studio to what’s going to be my new scrapbook studio. My existing studio has been under drop cloths for about a month now so designing has been challenging to say the least. Every time I want to work I have to uncover my desk...not that bad but a bit of a pain.

Anyway, when Karen told her design team that our chipboard packages would be arriving last week somehow I just knew that everything was going to happen all at the same time. I took on extra hours at my paying job so I worked a full week until Saturday afternoon and our contractor finally finished the drywall mudding on Friday so that meant that I could finally clean up all the dust that has accumulated in my entire house and start painting my new scrapbook studio. Yay! As I was painting early yesterday morning I realized that my design blog post needed to be published on Monday. YIKES!


So today I’m sharing with you a mini album that I put together and shared at the Creativation Show. You may have seen some of the pages that I had created previously but I designed the cover and bound the pages to show off the completed album at the show. I love the colours, the grundgy’ness and especially all the Southern Ridge chipboard that I used!


Southern Ridge Trading Company Chipboard:


Thanks for stopping by.

Happy Creating!!

Charlene


Wednesday, April 13, 2016

Equestrian Layout by Karen Bearse

So I may have gotten a little carried away while playing on this layout. I haven’t done one in
quite a while. First off I completely forgot to take any step- out photos, I was just having too
much fun!


Secondly I may have gone a bit overboard with the glitter and the pink. Especially as it is not a favourite colour of mine!


The thing I like about this layout is by having a monotone background the photo takes center stage. Even though I was quite heavy handed there are no set rules and sometimes a girl needs to play!


I added modeling paste through stencils and painted my background and chippies with Glimmer Mist and Glam, as well as adding glitter and some embossing. 


The gear base wheel was too light so some doodling helped it from getting lost into the background.


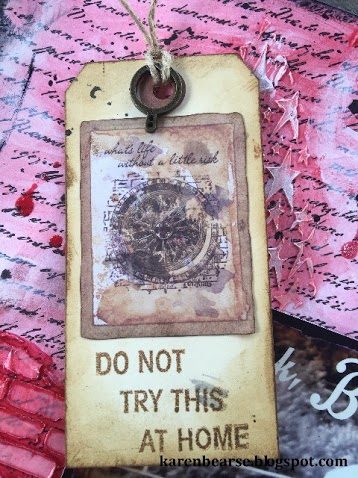
I wanted hidden space for journaling so a tag was the solution. I left space behind my photo to tuck in the tag. Some distressing helped blend the tag with the photo.


The back of my tag gave me just enough room for a bit of the story. The photo was scanned and altered to add my title. This layout is from my athletic youth days. I am trying to scrapbook my story for my kids. I find as a scrapbooking Mom, the kids, activities, the stories of the present are what gets told. One day my kids will be perhaps interested and a bit surprised to hear my story. Take the time to art your story!

Southern Ridge Supplies Used:


Other Supplies Used:

Tattered Angels-Glimmer Mist,
Glimmer Glam & Glaze
7gypsies paper, stamps & metal embellishments
Prima-Art Stones
Ranger-distress inks, tag, stencils, embossing powder, metal hand, brads.

 Remember to play along in the monthly challenge over on the Southern Ridge Trading Company blogEach month enter for your chance to win 4 designs from the online store - chipboard.ca -$20 (before tax) retail value of YOUR OWN CHOOSING! 

Thanks for joining me!!

-Karen