Showing posts with label Ranger Ink/Tim Holtz. Show all posts

Friday, April 21, 2017

Love Heart & Soul Mixed Media Canvas with Deb Riddell

Hello everyone, thank you for stopping by.  It’s Deb here today to share a mixed media canvas with you that I made using Southern Ridge’s Mare and Foal, Taneesha Heart and Heart Filigree Border chipboard pieces and Heart stencil.


This canvas would be a lovely gift for any Mom on Mother’s Day and all the horse lovers in your life would appreciate it too I think.  I’ve a few step out photos for you on how I created it, hope you will enjoy seeing them.

I started out with 6” x 8” flat artists canvas and added the word ‘love’ to the left side before coating it with gesso.  The letters for the word love were die cut with Tim Holtz’s Alpha Numeric ¾” dies, I layered four of each letter together for some dimension.


I then stenciled some hearts here and there onto the canvas through Southern Ridge’s Heart stencil with Ranger Opaque Texture paste.

After the texture paste dried, I added repeated washes of DecoArt Media fluid acrylics in Cobalt Turquoise Hue and Green Gold, spritzing with water for some drips and runs and drying in between.  A final wash of Golden Titan Buff and DecoArt Media Titanium White was followed with stamping with a fine script stamp and Distress Vintage Photo Archival ink and some spatters of diluted Titanium white.


The canvas was then given a coat of Distress Vintage Collage medium and the edges shaded with Vintage Photo and Walnut Stain Distress crayons.

The Mare and Foal chipboard pieces were painted with Distress Brushed Corduroy paint.


The horses were then stenciled with the Flourish layering stencil and Gloss Transparent Texture paste.  Once the paste had dried, the horses were coloured with Gathered Twigs Distress ink and the ink was rubbed off of the gloss texture medium with a soft cloth. I ended up darkening the horses slightly with some Walnut Stain Distress ink in the same manner before adding them to the canvas.

The Taneesha Heart and Heart Filigree Border were painted with Brushed Corduroy Distress paint and then stamped with Tim Holtz’s Ledger Script stamp and Distress Vintage Photo Archival ink.  They were given a coat of satin varnish and slightly shaded with Walnut Stain Distress crayon.


And finally, one of Tim Holtz’s Quote Chips was coloured with Old Paper and Shabby Shutters Distress crayons and edged with Walnut Stain crayon.

To assemble the canvas, the Taneesha Heart and Heart Filigree Border were centered top and bottom.


And the Quote Chip adhered to the right side of the canvas.


The Mare and Foal chipboard pieces were popped up on some small pieces of black fun foam and adhered overtop of the Taneesha Heart, perched on top of the Heart Filigree Border.


You can see the dimension in the picture below and also see some of the sheen from the gloss texture paste embossing on the horses.


I hope that you’ve enjoyed seeing my Love Heart & Soul mixed media canvas, I had a lot of fun creating it to share with you!


Southern Ridge Trading Company Supplies Used:


Other Supplies Used:

- Ranger Ink/Tim Holtz - Distress Ink, Distress Paint, Distress Collage Medium, Distress Crayons and Distress Archival Ink
- Ranger Ink: Gloss Transparent Texture paste and Opaque Texture paste
- Stampers Anonymous/Tim Holtz: Ledger Script stamp and Flourish layering stencil
- Sizzix/Tim Holtz: Alpha Numeric ¾” dies
- Advantus/Tim Holtz: Quote Chips
- DecoArt: Media Fluid Acrylics and Satin Varnish
- Golden: Artists Colors High Flow Acrylic Paint
- Miscellaneous: 6” x 8” flat artists canvas, black fun foam, wet adhesive and gesso

Thank you so much for stopping by today and as always, happy creating!

Deb xo


Friday, September 2, 2016

Happy Birthday Card with Katelyn Grosart

Thank you to everyone who participated in last month's monthly challenge. The response was great and we loved seeing all of your creations. Thank you to everyone who entered our challenge last month and stay tuned for the winner in Katelyn's post on Tuesday.

This month's will be an easy one because it's Your favourites! This could mean your favourite chipboard, ink, embellishments, etc.


Each month enter for your chance to win 4 designs from the
 SRTC online store $20 (before tax) retail value
of YOUR OWN CHOOSING! 

And ... it's a completely RANDOM DRAW!

RULES:

- Must follow the theme
 - Your item can be a card, mixed media piece or project, whatever you can call "ART".  
- You can use any image, embellishments and any chipboard pieces you like.
- As of now, there is no limit for entries
- Must be a new project
- Can be combined with 10 other challenges
- Please link back to our blog http://southernchipboard.blogspot.ca/
- Ends September.30th, 2016 at 6pm PST

**If you use product from SRTC, that will count as TWO entries but please make sure we know via your blog post attached via Mr. Linky below or a message below this post!! 

Katelyn has created a fabulous card for you today to start off the new challenge.

-------------------------------------------------------------------------------------------------

Hey there Southern Ridge Trading Company fans, Katelyn here, I'm up on the blog today to start off our new monthly challenge which is "Your Favourites".  For me, I will share with you today my favourite chipboard, flowers and some of the other products I love to use.  Today I've got a birthday  card for you that will be sure to inspire you especially since Fall seems to be in the air. Grab a cup of coffee or tea and learn how I transformed my chipboard pieces to create the perfect additions to my birthday card.


To start, you'll want to cut apart three leaves from the Skeleton Leaves set. You'll colour two of the leaves using a blending tool and Peeled Paint Distress Ink, apply the ink to the leaves. To cover the last leaf use a blending tool and Peeled Paint Distress Ink and apply the ink to the leaf. With all three leaves covered with ink, cover the leaves with fine clear embossing powder. Tap off the excess embossing powder and emboss with a heat tool. When embossing the leaves, try and leave some of the bubbles that are created while melting the embossing powder. Set aside the pieces to let them cool down.


From the Birthday Greetings, cut out which ever Happy Birthday you'd like.  From the Honeycomb Pattern, cut out two pieces that measures 2"x2", as you'll notice, I just used left over pieces for mine that's why the sizes are even. Apply VersaMark Ink to the two Honeycomb pattern pieces as well as the Happy Birthday word. Once the VersaMark has been applied to the pieces, sprinkle Burnt Copper Leaves Embossing Powder overtop of all three pieces. After the pieces have been covered, sprinkle off the excess and emboss with a heat tool. Set aside the pieces to let them cool down.


The last two pieces of chipboard you'll cover is the Skeleton Leaf Corners. Paint the scroll part on each corners with Spiced Marmalade Distress Paint. For the leaves on the corners, paint them with Peeled Paint Distress. You'll need to apply two coats to the scroll and to the leaves.


For the Honeycomb pattern, you'll first want to adhere the green tree patterned paper to the leaf patterned paper. Adhere the honeycomb pattern in the top right hand corner and the bottom left hand corner on the green tree paper. Once the honeycomb has been adhered, place the dot piece of patterned paper over top and rip the paper down so that the honeycomb pattern shows in both corners.


Before adhering the Skeleton Leaves, wrap a piece of light brown ribbon around the bottom of the card base and tie a bow in the bottom left hand corner. To add some interest in the bottom right and top left hand corners, add the leaves. I put one in the top left hand corner and two in the bottom left corner. Place the leaves however you desire.


For both the top left and bottom right hand corners, add brown flowers and peach flowers throughout the skeleton leaves corners as desired. Adhere the Happy Birthday in the middle of the card.


With all of the elements being adhered to the card, here is what it looks like with all of the elements together.


Southern Ridge Trading Company Supplies Used:

- 10mm Peach Roses
- 15mm Brown Roses

Other Supplies Used:

- Emerald Creek Craft Supplies: Fine Clear Gloss Embossing Powder, Burnt Copper Leaves Embossing Powder & 100lb White Cardstock
- Ranger Ink/Tim Holtz: Distress Ink - Vintage Photo and Distress Paint - Peeled Paint & Spiced Marmalade
- Tsukineko/Imagine Crafts: VersaMark
- Maja Design: Walking in the Forest - Colours of Fall, Maple & When Leaves are falling
- Hug a Bug Seam Binding Ribbon: Light Brown


Remember to play along in the monthly challenge over on the 
Southern Ridge Trading Company blog. Each month enter for your chance to win 4 designs from the online store - chipboard.ca -$20 (before tax) retail value of YOUR OWN CHOOSING! 

Until Next Time!

-Katelyn  


Friday, August 26, 2016

Wild and Free Card with Deb Riddell

Hello, Deb here again to share another project with you for our August Anything Goes challenge.  For today’s project I decided to make a card featuring the new Circle Decor Frame, the Small Bird Mix and the Intersecting Circles Stencil.


I’ve a few step by step photos on how I made it, enjoy!

I started out with a 6” x 6” piece of manila cardstock and coloured it with Tumbled Glass and Stormy Sky Distress inks along with some spritz and flick with water.


I then embossed the coloured cardstock using the intersecting circles stencil and my Sizzix Big Shot.  The sandwich I used to emboss with the stencil was: platform 1, standard cutting plate, silicone mat, the cardstock, the stencil and the impressions pad (the black hard plate that comes with the silicone mat).  After embossing, I highlighted the raised areas with Broken China Distress ink.

I then trimmed the embossed cardstock down to 5 ¾” square, tattered the edges and inked them with Stormy Sky Distress ink.


The circle decor frame was coloured with Weathered Wood Distress paint and after it had dried, I painted it again with Martha Stewart Multi-Surface Glitter Paint in Obsidian. I don’t know if this paint is available any longer but you could easily get the same effect by adding some glitter glue with your finger.

On to the small birds!  I chose three different sizes of birds from the mix and gave each a coat of gesso and after it had dried, painted them with DecoArt Americana Raw Umber acrylic paint.


After the acrylic paint had dried, I lightly sanded the edges of the birds (an emory board works beautifully to sand these small delicate chipboard pieces!) and finger painted each of them with the Martha Stewart Glitter Paint, this time using the colour Brownstone.  Again, if you can’t find that particular paint, glitter glue will do the trick.

I coloured a piece of 110 lb white cardstock with Weathered Wood Distress paint and after it had thoroughly dried, printed out my sentiment using my computer printer.  The font that I ended up using is called Mardian Demo (I printed it out with two different fonts initially to see which one I liked best).


After the printer ink had dried, I cut out a fishtail banner, painted the backside with the same Weathered Wood Distress paint and gently formed a curve into the banner as the paint dried.  The edges were inked with more Stormy Sky Distress ink.

Next I coloured four star brads with alcohol inks in Stone Wash, Stream and Mushroom.


And then I got on a roll and forgot to take any more in process pictures so will show you some close ups of the finished card, sorry about that!

I cut a piece of kraft coloured corrugated card 6” square and adhered the embossed cardstock to it and then used my Cropadile to punch holes in each corner and inserted the star brads.


The circle decor frame was centered onto the embossed cardstock and glued into place and the birds were adhered inside of the frame. The fishtail banner was then positioned along the bottom of the frame and glued onto the card front.


The whole assembly was then mounted onto a kraft coloured card blank and  I stamped a wee flying bird from a discontinued Crafty Secrets stamp set on the inside.


I hope that you have enjoyed seeing how I made my Wild and Free card, I love how it turned out!


Southern Ridge Trading Company Supplies Used:

Chipboard:

Stencils:

Other Supplies Used:

- Tim Holtz/Ranger - Distress ink, Distress paint, Alcohol ink, Distress Archival ink
- Sizzix - Big Shot
- Martha Stewart - Multi-Surface Glitter paint
- DecoArt - Americana Acrylic paint
- Michaels - Recollections Star brads, 65 lb kraft cardstock, 110 lb white cardstock, kraft corrugated cardstock
- Miscellaneous - Cropadile, glue, tape runner, scissors, paper trimmer, computer and printer, ruler, emory board

Hope that you will be inspired to join in our August Anything Goes challenge, you have a chance to win 4 designs from the online store - chipboard.ca - a $20.00 (before tax) retail value of YOUR OWN CHOOSING!  Can’t wait to see what you link up, have fun and happy creating!

Deb xo


Friday, August 12, 2016

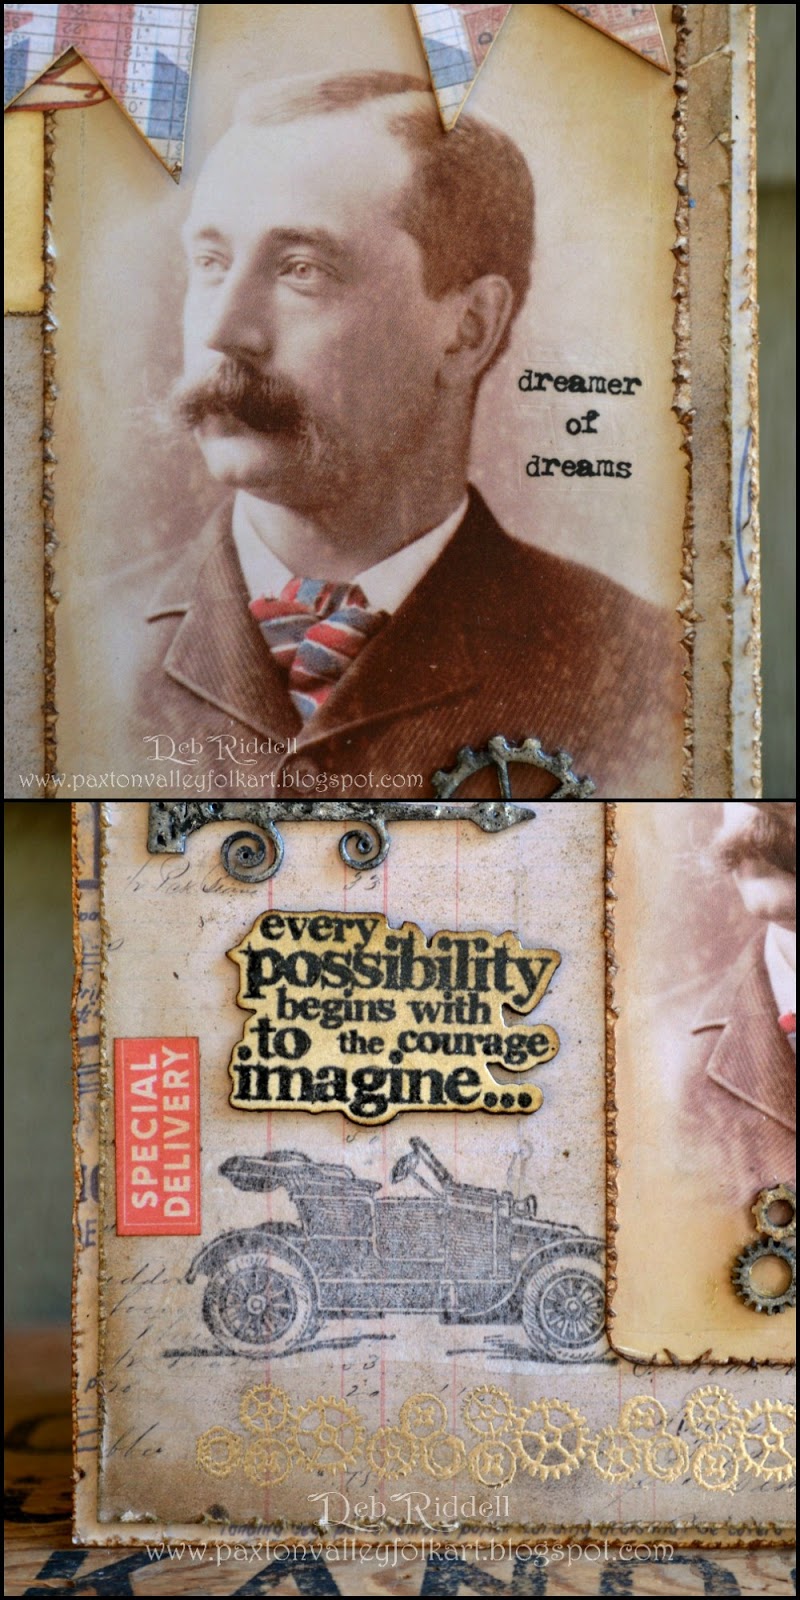
Courage to Imagine Mixed Media Plaque with Deb Riddell

Hello and thanks for stopping by!  It’s Deb here today to share a mixed media project with you for our Anything Goes challenge.  I decided to make a mixed media assemblage piece incorporating several Southern Ridge Trading Company chipboard embellishments in my favourite vintage style.


I’ve a few step by step photos on how I created it, read on for the how to!

I started out with a piece of vintage ledger scrapbook paper from Tim Holtz’s Regions Beyond paper stash, tattered and inked the edges with Vintage Photo Distress ink and then embossed a gear stamp from a Forever In Time Old Fashioned stamp set with Ranger Liquid Platinum embossing powder top and bottom.


I chose the ‘story’ card from Tim Holtz’s Flashcards set, tattered the edges and inked it with Vintage Photo Archival Distress ink.  The card has a shiny finish so the archival ink was a better choice than regular Distress ink.

I chose a gentleman’s photo from Tim Holtz’s Found Relatives cabinet cards, distressed and inked the edges and coloured it with Vintage Photo Archival ink as well.  I then coloured his tie with Barn Red and Faded Jeans Distress markers.  I wanted to use one of the cars from Tim’s Vintage Auto stamp set on my assemblage plaque but it was pointing in the wrong direction for my composition.  So I stamped the image onto some plain Tissue Wrap, cut around the image, turned it over and adhered it to my scrapbook paper background with Distress collage medium.  The tissue wrap all but disappears once the collage medium dries so it looks like it was stamped directly onto the scrapbook paper background.


I then layered the Flashcard and the Found Relative photo onto  the paper as well.

I chose one of the lovely scrolled hinges from Southern Ridges Iron Hinges 1 set and gave it a faux tarnished silver finish that I learned from Shelly Hickox at Stamp Tramp, click here to see her tutorial.


I then repeated that technique on two of the gears from Southern Ridges Mini Wood Gears set and used the Liquid Platinum instead of silver embossing powder on two more.  It’s a subtle colour difference but I really like both of the finishes.

Cardstock was coloured with several shades of grey and brown Distress ink (I used Pumice Stone, Hickory Smoke and Vintage Photo) and then the sentiment from Tim Holtz’s Possibilities was stamped with Black Soot Archival ink, clear embossed and cut out with the accompanying die.  I also die cut some black fun foam and layered it underneath the sentiment.


Three of Southern Ridge’s medium Plain Banners were covered with a Union Jack image from Tim Holtz’s Correspondence paper stash and the edges were inked with Vintage Photo Distress ink.  I also coloured some white button thread with Vintage Photo DI and strung the banners onto it.

The plaque was then assembled, I added the phrase ‘dreamer of dreams’ from Tim Holtz’s  Words Remnant Rubs to the cabinet photo.


Some ephemera images from the Idea-Ology Emporium Ephemera pack were also added here and there.

A small mirrored star was coloured with Mushroom alcohol ink and adhered to the ‘story’ Flashcard along with a plane from the Emporium Ephemera pack.


I do love the tarnished metal finishes on the hinge and gears!

And here are the Union Jack banners strung on the button thread at the top of the assemblage plaque, you can also another Remnant Rub, this one from the Elements pack, at the top.


I backed the completed plaque with another piece of scrapbook paper from the Correspondence paper stash, raising it up on some black fun foam for dimension and interest.

So that’s my Courage To Imagine mixed media assemblage plaque, I do hope that you have enjoyed seeing it and that it’s given you some ideas on different ways to use the wonderful chipboard embellishments from Southern Ridge Trading Company.


Southern Ridge Trading Company Supplies Used:


Other Supplies Used:

- Ranger/Tim Holtz - Distress ink, Distress Archival ink, Liquid Platinum embossing powder, Distress Collage Medium, Alcohol ink, Distress Embossing ink, UTEE
- Stampers Anonymous/Sizzix/Tim Holtz - Possibilities stamp and die set, Vintage Auto stamp set
- Advantus/Tim Holtz - Correspondence Paper Stash, Regions Beyond Paper Stash, Mirrored Stars, Emporium Ephemera, Words Remnant Rubs, Elements Remnant Rubs, Plain Tissue Wrap, Found Relatives Cabinet Cards, Flashcards
- Forever In Time - Old Fashioned stamp set
- Miscellaneous - silver embossing powder, button thread, black fun foam, scissors, paper trimmer, ruler, Scotch Quick Dry adhesive, black acrylic paint, paint brush, heat tool

Hope you have been inspired to join in our August challenge, Anything Goes, you have a chance to win 4 designs from the online store - chipboard.ca - a $20.00 (before tax) retail value of YOUR OWN CHOOSING!  Can’t wait to see what you link up, happy creating!
Deb xo