Showing posts with label Mini Dress Form Charms. Show all posts

Wednesday, May 10, 2017

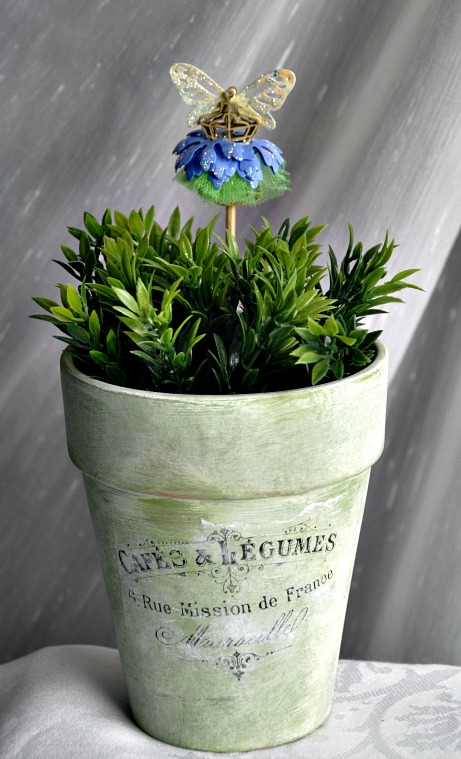
Garden Flower Pot Spikes with Ava Gavloski

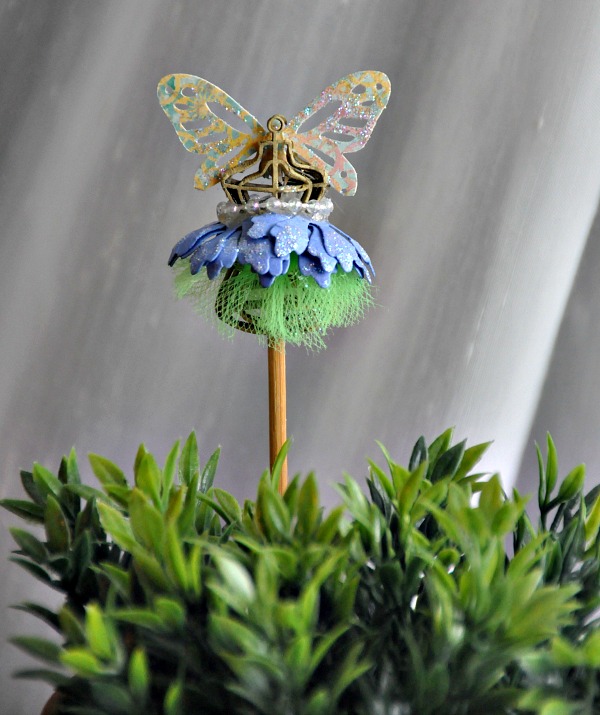
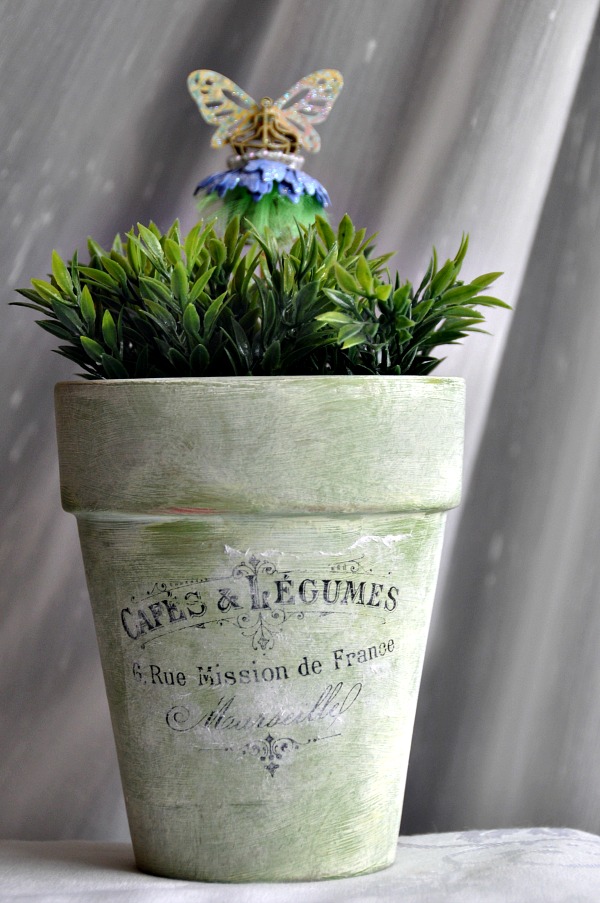
Hello and Welcome to a spring like inspirational blog post here at Southern Ridge Trading Co.  Ava here today to welcome spring with a Garden Fairy flower spike.  Spring is here and all the lovely bulbs and flower pots are gracing our tables and patios this season.  To-day’s project was designed from inspiration from Donna Salazar she is one of my favourite designers.  
Garden flower pot spikes are made from unlimited multi-medium materials, metal, wire, glass, wood, paper and chipboard (from Southern Ridge of course)....

fairyfullpot.jpg

This little miniature is so cute.  You can see the possibilities are endless.
I think you just might see another one from me as well.

A few step up photo’s of the process on how to get the look.

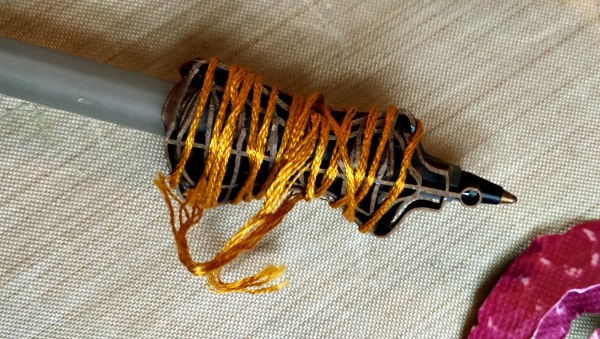
dressformwrap.jpg

Run the chipboard under the water tap just enough to soften the chipboard and mould around a pen to get a beveled shape.  Gently  shape around a pen and secure with soft embroidery floss.  Dry the chipboard.  This mini dress form charm can be found in the Miniatures section of the store.

Next, take some tulle and tie little bits of tulle on a longer waistband of tulle to use as a skirt for the dress form.

Die cut some floral flowers about 5 or 6 depending on the fullness of the skirt you would like your fairy to have.

Tip:  Be sure to get out a mouse pad and soften your petals by burnishing the petals with a rounded tip tool to get the petals to curl softly for your fairy skirt.

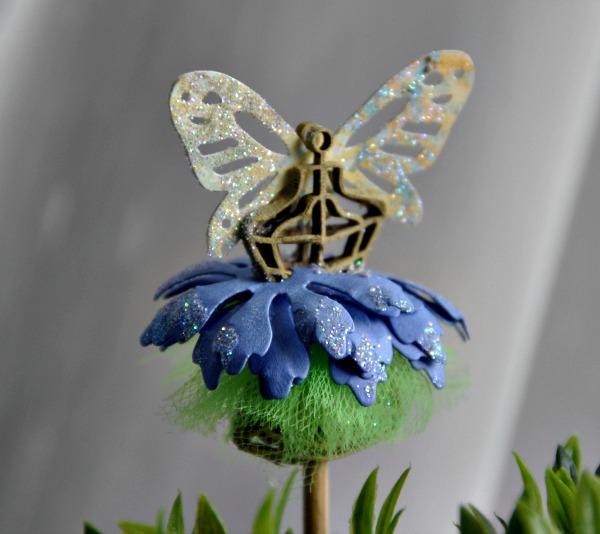
Assemble your dress form fairy with trimmed die-cut  butterfly wings, tied tutu around the waist and adhere the skirt made from the flower petals.

topcloseup.jpg

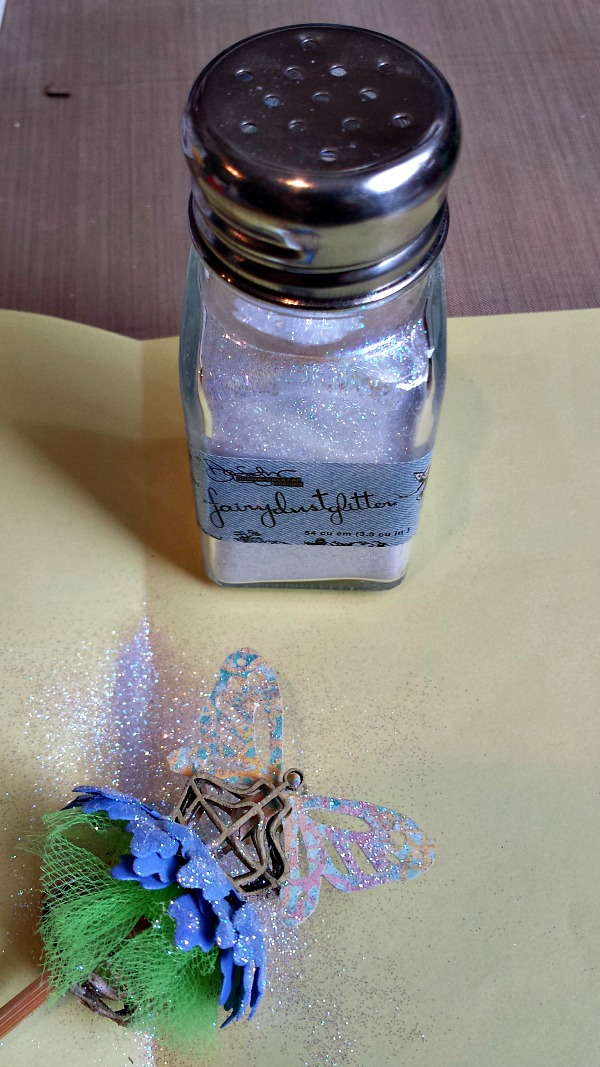
Be sure to add some fairy glitter dust to your dress and wings.

fairydustglitter.jpg

Think of the possibilities…. I want to make 10 of these with different pieces of chipboard from the store here.

dressformtop.jpg

Tell us here in the comments what would you make for your garden pots?
 
Which chipboard pieces would you have peeking out of your garden pots?

fairygrass.jpg


Southern Ridge Trading Company Supplies Used:


Other Supplies Used:

- Tulle
- Clearsnap: Fairy Dust Glitter
- Flower, Butterfly Die
- Tombow Adhesive
- Wooden Stick

Thanks for visiting us, Ava.

Friday, April 28, 2017

Vintage Happy Birthday Card with Katelyn Grosart

Hey there Southern Ridge Trading Company fans, Katelyn here. This week I visited one of our local scrapbook stores and found a couple of pieces of vintage looking paper. By using the vintage paper I picked up and some of the newly released chipboard pieces, I was able to create this beautiful Vintage Happy Birthday Card. Read below as I share with you how I created my Vintage Happy Birthday Card.


To start, pull out two of the Mini Dress Form Charms. Apply two coats of Antique Linen Distress Ink to each dress form. Once the paint has dried, apply Vintage Photo Distress Crayon to the sides of each dress form, rub the crayon wax in with your finger. After the Vintage Photo Distress Crayon has been applied, apply Walnut Stain Distress Crayon to the sides of each dress form, rub the crayon wax in with your finger. Set the dress forms aside.


Take out one of the small flowers from the package. Apply two coats of Antique Linen Distress Paint to the flower. Once the paint has dried, apply Vintage Photo Distress Crayon to the sides of the flower, rub the crayon wax in with your finger. After the Vintage Photo Distress Crayon has been applied, apply Walnut Stain Distress Crayon to the sides of the flower, rub the crayon wax in with your finger. Set the flower aside.


Apply two coats of Vintage Photo Distress Stain to the Happy Birthday sentiment. After the Distress Stain has dried, apply Walnut Stain Distress Crayon to the sides of the Happy Birthday Sentiment,  rub the crayon wax in with your finger. Set the Happy Birthday sentiment aside.


With a Blending Tool, blend Vintage Photo Distress Ink and Ground Espresso Distress Ink onto the Drifting Feather.  Apply Walnut Stain Distress Crayon to the sides of the feather and rub the crayon wax in with your finger. Set the feather aside.


Apply two coats of Walnut Stain Distress Stain to two of the Delicate Lace Bars. Once the bars have dried, trim the scroll part off to fit the film strip frame. Set the bars aside. 


Cut the Delicate Lace Doily in half and then into two quarters. Apply Emboss It Ink to each doily piece and sprinkle Burnt Copper Leaves Embossing Powder over each doily. Tap off the excess powder and emboss with your heat tool. 


The last chipboard piece you'll need is the Film Strip Section Frame.  Apply Emboss It Ink to the film strip frame and sprinkle Burnt Copper Leaves Embossing Powder over it. Tap off the excess powder and emboss with your heat tool. 


Trim your Found Relative to 3" x 4". Once the Found Relative has been cut down, take the Spun Sugar Distress Crayon and apply a bit to her cheeks. Rub the crayon wax with your fingers.


Before assembling your card front, you'll need to cut one piece of patterned paper that measures 4" x 5 1/4" and cut a second piece of patterned paper that measures 3 3/4" x 5". Distress the edges of each patterned paper piece with an edge distressor. Once the edges have been distressed, ink the edges of the patterned pieces using Vintage Photo Distress Ink and a Blending Tool.

Adhere one of the doily pieces in the top left hand corner of the 4" x 5 1/4" piece of patterned paper, making sure the doily sits 1/4" from the top of the patterned paper. Adhere the second doily piece in the bottom right hand corner of the 4" x 5 1/4" piece of patterned paper, making sure the doily sits 1/4" from the bottom of the patterned paper. Once the doilies have been adhered in the corners, adhere the 3 3/4" x 5" piece of patterned paper overtop of the 4" x 5 1/4". To finish the 3 3/4" x 5" patterned paper, roll the top left hand corner down slightly and the bottom right hand corner up slightly to expose part of the doily.


Adhere the Found Relative to the back of the Film Strip Frame. Adhere one of the delicate lace bars to the top of the film strip frame, showing half of the lace bar. Adhere the second delicate lace bar to the bottom of the film strip frame, showing half of the lace bar. 


Add foam squares to the back of the film strip frame. Adhere the film strip frame to the middle of the 3 3/4" x 5" piece of patterned paper.


In the bottom right hand corner of the film strip frame, adhere the drifting feather, the flower and a mini dress form charm. 


With the elements adhered on the right hand side of the film strip frame, adhere the Happy Birthday sentiment to the bottom middle of the film strip frame. You'll need to add foam squares to the left hand side of the sentiment in order to make it the same height as the right hand side.


To add some interest in the top left hand corner of the film strip frame, adhere the other mini dress form charm, one white carnation, two white roses and four brown roses. Once the flowers have adhered, to add some extra interest to them, apply Vintage Silk Opal Magic Wax with your finger to each flower.


Cut a cardbase out of Super Stock that measures 5 1/2" x 8 1/2", score at 4 1/4". You'll want to cut a piece of patterned paper that measures 4 1/4" x 5 1/2". Distress the edges of the patterned paper with an edge distressor. Once the edges have been distressed, ink the edges of the patterned paper piece using Vintage Photo Distress Ink and a Blending Tool. Adhere the 4 1/4" x 5 1/2" patterned paper piece to your cardbase. Adhere the cardfront to the 
4 1/4" x 5 1/2" patterned paper piece. 


Here are a some close ups of the finished Vintage Happy Birthday Card.


Here's the finished Vintage Happy Birthday Card.


Southern Ridge Trading Company Supplies Used:

- Happy Birthday 
- Flowers (coming soon)
- Flowers: White Carnations, 15mm White Roses and 10mm Brown Roses

Other Supplies Used:

- Emerald Creek Craft Supplies: Burnt Copper Leaves Embossing Powder
- Tim Holtz for Ranger Ink: Distress Ink - Vintage Photo and Ground Espresso, Distress Paint - Antique Linen, Distress Stain - Walnut Stain and Vintage Photo and Distress Crayons - Spun Sugar, Walnut Stain, Vintage Photo and Antique Linen
- Ranger Ink: Emboss It Ink - Clear (dabber)
- Prima Marketing: Art Alchemy Opal Magic Wax - Vintage Silk
- Stamperia: Vintage Patterned Paper
- Tim Holtz/Idea-ology: Found Relatives
- Creative Scrapbooker/Cathie Allan: Super Stock
- Tombow: Aqua Mono Liquid Glue
- Misc: Heat Tool 


Until Next Time!

-Katelyn 


Friday, April 14, 2017

Family Wall Hanging with Katelyn Grosart

Hey there Southern Ridge Trading Company fans, Katelyn here. Recently it seems as if I've been creating home decor projects and my creation for today definitely falls into the category. I created a beautiful Family wall hanging for you, that's perfect to hang on a wall or add in as part of an everyday home decor piece. Read below as I share with you how I transformed my chipboard pieces to create my Family Wall Hanging.


To start, you'll need one of the Mini Dress Form Charms. Apply two coats of Walnut Stain Distress Paint to the dress form. Set aside to dry.


Take one of the Drifting Feathers out of the package. Apply two coats of Vintage Photo Distress Paint to the feather. Once the Vintage Photo paint has dried, apply a light coat of Tarnished Brass Distress Paint overtop of the entire feather. Allow the paint to dry. After the paint has dried, start by going around the edges of the feather with the Vintage Photo Distress Crayon, rub the wax from the crayon in with your finger. Once the Vintage Photo crayon has dried on the feather, take the Walnut Stain Distress Crayon and go around the edges of the feather also, rub the wax from the crayon in with your finger. 


Next, you'll need the Oval Leaf Die. Apply two coats of Worn Lipstick Distress Paint to the Oval Leaf Die. Once the paint has dried, take a Vintage Photo Distress Crayon and go around the edges of the Oval Leaf Die, rub the wax from the crayon in with your finger. Set piece aside.


Cut a 1 1/2" x 2 1/2" piece of the Honeycomb Pattern chipboard. Apply two coats of Antique Linen Distress Paint to the honeycomb pattern. With the paint dry, apply the Antique Linen Distress Crayon to the honeycomb pattern, rub the wax from the crayon in with your finger. Once the Antique Linen crayon wax has dried, apply the Vintage Photo Distress Crayon to the honeycomb pattern, rub the wax from the crayon in with your finger.


From the Pussy Willows Chipboard, pull out with the three pussy willow piece. Apply two coats of Peeled Paint Distress Paint to the pussy willow piece. Once the paint has dried, using both the Peeled Paint and Walnut Stain Distress Crayon, apply the crayons to the pussy willow piece. Rub the wax from the crayon in with your finger.


Pull out the Family Fun Word chipboard piece. Start by covering the entire word with Antique Linen Distress Paint. Once the Antique Linen paint has dried, using a paint brush, apply two coats of Victorian Velvet Distress Paint to the bottom portion of the word. After the paint has dried, use the Vintage Photo Distress Crayon and go around the entire word. Rub the wax from the crayon in with your finger.


The last two pieces of chipboard that you'll need to paint are two butterflies from the Butterfly Mix chipboard, pick whichever two you desire. Apply two coats of Victorian Velvet Distress Paint to each butterfly. After the paint has dried, apply the Victorian Velvet Distress Crayon to parts of the butterfly, rub the wax from the crayon in with your finger.


The last chipboard piece you need is the small Vintage Oval Mirror Plain frame. Apply Emboss It Ink to the entire surface of the vintage oval mirror frame. With the ink on the frame, sprinkle Burnt Copper Leaves Embossing Powder over the entire surface of the frame. Tap off the excess powder and emboss with your heat tool. Once the frame has been embossed, let cool for a couple of minutes.


Using a 2 1/2" Stitched Oval, die cut the stitched oval out of patterned paper. Ink the edges of the stitched oval using Vintage Photo Distress Ink.


Take a plain white doily and ink the outside edges of the doily using Antique Linen Distress Ink.


Now I have some tips and tricks for adhering your wall hanging together. To start, you'll want to adhere your patterned paper to your canvas. Once the patterned paper has been adhered, adhere the Oval Leaf die to the middle of the patterned paper.

In the middle of the wall hanging, you'll adhere the doily, stitched oval, honeycomb pattern and the small oval frame. Once those elements have been adhered, adhere your brown, pink, light pink and white roses as desired in the top left hand corner. I found it was easiest to place the butterfly in the top left corner and then adhered it once I was happy with the placement of the Family word.


In the bottom right hand side of the wall hanging, you'll adhere the feather, pussy willow and dress form together. To add some extra interest I added a brown twine bow at the bottom of the feather and pussy willow. Adhere your brown, pink, light pink and white roses in the bottom right hand corner before adhering the feather, pussy willow and dress form element. Next, adhere the family word to the middle of the frame. With the word adhered, adhere the other butterfly in the right hand corner. After the Family word has been adhered, adhere the top left butterfly slightly onto the "F".  


Here's a close up of the Family Wall Hanging with ribbon on it. 


And here is the finished Family Wall Hanging piece.


Southern Ridge Trading Company Supplies Used:

- 10mm Roses: White, Brown, Light Pink and Pink
-  15mm Roses: White

Other Supplies Used:

- Emerald Creek Craft Supplies: Burnt Copper Leaves Embossing Powder
- Tim Holtz for Ranger Ink: Distress Ink - Vintage Photo and Antique Linen, Distress Paint -  Walnut Stain, Victorian Velvet, Antique Linen, Tarnished Brass, Worn Lipstick and Peeled Paint and Distress Crayons - Victorian Velvet, Antique Linen, Walnut Stain, Vintage Photo and Peeled Paint.
- Ranger Ink: Emboss It Ink - Clear (Dabber) 
- Tombow: Aqua Mono Liquid Glue
- Bo Bunny: Aryia's Garden - Delightful and Lovely
- Elizabeth Craft Designs: Stitched Ovals Die
- Misc: Heat Tool, Paint Brush, Cream ribbon and 5" x 7" Canvas


Until Next Time!

-Katelyn