Friday, October 31, 2014

Happy Halloween!!!


 Happy Halloween Southern Ridge fans!!
 I LOVE this season! It's such a fun time of the year for the kids and FYI, it's also Hubs and I's wedding anniversary!! 10 years this year! 

I wanted to share a super cute layout I made using this awesome Halloween Set (CEL-413)!!


I painted the amazing spiderweb with black paint and adhered it with a hot glue gun. I left the wisps that the glue gun created because It reminded me of spider webs ;)


The bat and the ghost are also a part of that amazing Halloween set! I painted the ghost white then sprinkled it with the distress glitter. The cute little bat got a bath in some black paint and the sprinkled with black stickles glitter!


I'm so happy with how this layout turned out and the Southern Ridge goodies definitely made this layout! 

Happy Halloween Everyone!! 

Blessings


Thursday, October 30, 2014

Christmas Stocking

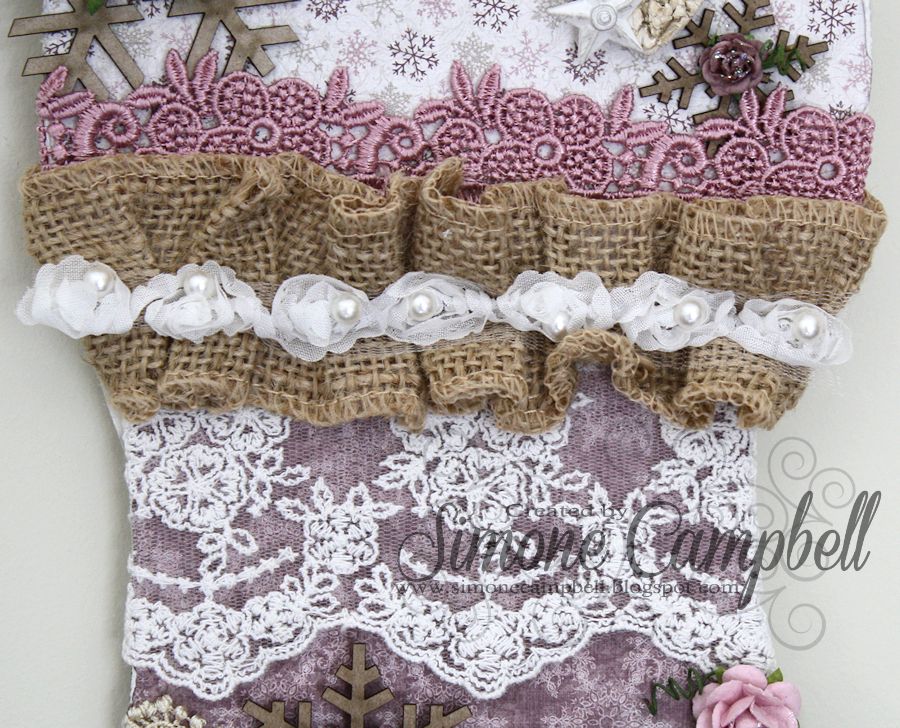
Ok have I got a loaded post for you!!  In September I had my sister (Simone) visiting and we created some gorgeous stockings (XMAS-472) using a chipboard piece from Southern Ridge Trading Company

Warning - PICTURE HEAVY

We'll start with her amazing piece and I'll tell you all about them then I'll post mine in another.  The papers were bought from Live and Love Crafts and were last year's Maja Papers called "Vintage Frost Basics".  That collection was STUNNING!!  


These laces are also from Live and Love Crafts (LLC from now on), except for the burlap which is Bo Bunny.  The ribbons with pearl centers actually came like this and are now a staple in my lace collection.  LOL! 


Simone used some snowflakes from Southern Ridge Trading Company (SEA-164) and just left them bare.  See?  You don't have to do a darn thing with them to look gorgeous on your projects!  She used some twine to wrap the loop part of her stocking to reinforce in the event the stocking is actually hung.  


More pretty snowflakes from SRTC - SEA-165 and SEA-166.  The bark heart is from LLC and so is the Melissa Frances resin star. 


Another gorgeous snowflake, resin star and lock, key was some old stash and that big gorgeous flower is Prima - "Tattered Treasures Wheat".


This PEACE is more chipboard from SRTC - XMAS-160 - and Simone painted it with cream colored acrylic paint first and then covered it in Snowdust Stickles.  It's sooooo pretty!!


And the completing piece on the toe is filled with more luscious flowers.  She even stickled a lot of the flowers and other pieces on her stocking.  The vintage berries and frosted berries were from LLC.


There you have it!  One beautiful gorgeous Christmas stocking!!  Didn't she do such an amazing job?!!  Oh and she even distressed the edges using my Zutter Distrezz-It-All.  I freakin' love that thing and use it every weekend I'm sure!!

Thanks for stopping by!!

Monday, October 27, 2014

Fall Layout

I hope that you are having a wonderful Monday morning and have been enjoying our talented designers! I'am excited to be back up on the Southern Ridge Trading Company blog sharing with you a fall layout. 

My favourite time of the year is Fall, so what better way then to document it through a layout.  I used the amazing chipboard leaves, NAT-393 off of the SRTC website. On the chipboard leaves I used three different colours of Inka Gold to colour them and I love that all three of them turned out differently, since you are never able to find the same leaf out in nature. 


Products used: SRTC - NAT- 393, Patterned Paper - Authentique "Grateful", Bazzill Cardstock, and Inka Gold in: Gold, Orange, and Gold Brown.


I hope you are feeling inspired to create something on this wonderful Monday morning. Thanks for stopping by the Southern Ridge Trading Company Blog and check back the rest of the week to see our other amazing designers and their projects.


Until Next Time!

-Katelyn

Friday, October 24, 2014

BELIEVE!!!!

Happy Friday to everyone! Gosh and welcome to another weekend!! We are so happy to see that you have dropped by today and hope to see you here often!!

Today I have used the most gorgeous piece from the Southern Ridge Trading Company...XMAS-467...and it is so beautiful that I wanted to feature it simply and without a lot of embellishments.


On the white card base, I used a sparkly red CS to mat the burlap. Then just a couple of red rhinestones for the deer noses and a SU striped ribbon tied into a single flat bow. As many of you know, this is not a typical card for me but I think the chipboard piece is much too beautiful to have anything take away from it. What do you think?


Thank you so much for coming by and we hope to see you again real soon!! Hugs from Jacque!! 

Tuesday, October 21, 2014

Boo!!!

Every year my kiddos have a theme to their Halloween.
Maybe it's because I started them out that way.
One year, we were the Wizard of Oz characters
One year pirates,
One year superheros. You get the idea.
Well, this year I have failed.
My kiddos have come into their own and have all gone different directions.
The devastation!!! 
So, I decided to theme my frame that will hold our family picture.
 
using
CEL-413
and the spooky house


I purchase the black frame.
Using cheesecloth, gesso and acrylic, I applied gesso to the cheesecloth
and dabbed it on the frame to give texture and lighten it up a bit.
Doing the same with the acrylic but covering less area.
 
 On the web, I've used black embossing power
 and then added Ranger Holographic embossing powder.
 
Versamark pen was used to draw where I wanted to roof and gates; then I embossed with purple metallic and copper glitter by Zing
Afterwards, I used Ranger DI to edge and emphasize the detail. Finally frantage was added.
 
The witch and black are black embossing

The text has red glitter emboss to give it a drippy effect.

I hope you and your family have a safe and Happy Halloween.

Spooky Hugs
Dorinda


Saturday, October 18, 2014

Balloon overload ...

            I made this fun 6x6" kids Birthday card using frame FRA-134 from Southern Ridge Trading Co,                               which I painted with acrylic paint and then added some white highlights to:
The idea came from wanting to frame the little Close to My Heart monsters and then for the balloon strings to be interactive with the frame. The middle monster is having a hard time holding into all those balloons ... lol
The balloons are just circle and oval punches, sponged around the edge and embossed in clear powder. It is compulsory when doing balloons to add the white light reflections - adding this suddenly made the balloons seem real and shiny. 

If you look up this frame, FRA-134 you will see that the frame on the website is larger than mine. Guess what, I trimmed it down ! I used my Tonic scissors and just cut off the large corner pieces as I felt they were too ornate for this project, but I loved everything else about the frame and its size. Having a chipboard piece/s doesn't mean you have to use it exactly as is ...

The pieces I cut off are awesome, I am thinking some sort of boarder, maybe in my art journal :
Thanks for stopping by, hope you found some inspiration and ideas here :)
Nikki x

Wednesday, October 15, 2014

Christmas Deer

Good Afternoon Bloggers! Sarah here with probably the only Christmas card I'll make all year! lol I'm not a card maker, but when I saw these awesome chipboard deer from Southern Ridge I knew I wanted to make a Christmas card with him! 

Now, I'll tell you all a little story about how this adorable deer came about...I started off wanting to paint him white...so I did...then I didn't like it on the background, so I thought he would be cool to be embossed with pewter embossing powder! So I went about making him...then my heat gun sparked and died :( Sooooo...I thought I'd try my Jamberry heater....it wasn't hot enough...but I've embossed with an iron before...only I don't own one! HA! The jig is up! I don't iron my clothes!@ lol I DO however own a flat iron...so...I thought I'd try that! I tested it out on a scrap piece of paper and it worked awesomely....but a piece of paper is a lot thinner than a piece of chipboard...sooooo....I tried it anyway...and it worked....kinda....but a little bit TOO good! lol it melted the embossing powder in places...So now I'm left with a pewter, whiteish dripping mess of a deer! lol My last resort was to cover it in glue and use this amazing Distress Glitter that I am ashamed to say I've had since it came out and haven't opened! Well, I think it kind of saved the day don't you?! I'm in love with my little deer again! And it doesn't look like the bad guy sidekick to the Terminator (ya know...melting molten metal? no? lol) 


The background was done using Hero Arts Daubers and just dabbing them on the background randomly...I think I'm in love with it! lol 


Well there you have it! I hope you like it! :)

Blessings