Thank you to everyone who participated in last month's monthly challenge. The response was great and we loved seeing all of your creations. Thank you to everyone who entered our challenge last month and stay tuned for the winner in Katelyn's post on Wednesday.
This month's will be an easy one because we are focusing on Anything Feminine!
Each month enter for your chance to win 4 designs from the
SRTC online store $20 (before tax) retail value
of YOUR OWN CHOOSING!
And ... it's a completely RANDOM DRAW!
RULES:
- Must follow the theme
- Your item can be a card, mixed media piece or project, whatever you can call "ART".
- Your item can be a card, mixed media piece or project, whatever you can call "ART".
- You can use any image, embellishments and any chipboard pieces you like.
- As of now, there is no limit for entries
- Must be a new project
- Can be combined with 10 other challenges
- Please link back to our blog http://southernchipboard.blogspot.ca/
- Ends May.31st, 2016 at 6pm PST
- As of now, there is no limit for entries
- Must be a new project
- Can be combined with 10 other challenges
- Please link back to our blog http://southernchipboard.blogspot.ca/
- Ends May.31st, 2016 at 6pm PST
**If you use product from SRTC, that will count as TWO entries but please make sure we know via your blog post attached via Mr. Linky below or a message below this post!!
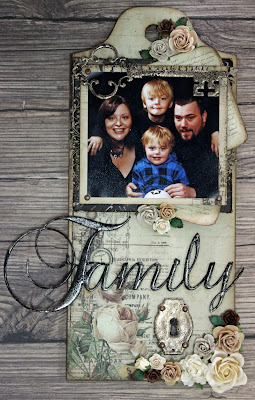
Corina is sharing with you today, a gorgeous Family Wall Hanger!
------------------------------------------------------------------------------------------------------
Hello & Welcome!
Thanks for joining me for an easy step by step tutorial on my Family Wall hanger. I love how it turned out! I am going to be creating another one for a girlfriend's birthday present. All she will have to do is place a picture of her family on the photo matte.
So lets get to the tutorial:
Apply a thin but even coat of Multi-Medium with a paint brush to the Ex-Large wooden tag and then place your chosen pattern paper face up. Apply even pressure so that there are no air bubbles caught between the paper and tag.
Using a craft knife and cutting matte, cut away all excess paper. Don't forget about the hole at the top.
I inked around the edges with Vintage Photo Distress Ink using a Ink Blending Tool.
I cut two mattes from the left over pattern paper and two pieces of Old Letter design pattern paper. I inked around the edges with Vintage Photo Distress Ink using a Ink Blending Tool. I also cut two pieces of cardboard smaller than the photo mattes.
The cardboard is placed under the mattes to give depth and dimension. I tucked in the Old Letters between the photo mattes and have them angled out the right hand side.
I selected my chipboard embellishments - This was the hardest part- so many possibilities!
I cut the small Vintage Oval Mirror Fancy frame into pieces, as I want to tuck these into the layers of the photo matte.
I used an Embossing Dauber to coat the chipboard embellishments, sprinkled with Fran-tage Embossing Powder, tapped off the excess powder and heat set each piece.
I used Multi-Medium to adhere the chipboard elements to my wall hanger. I placed my picture down first as the key overlaps it and added four copper mini brads to the key hole before gluing.
I picked out my flowers and also adhered these with Multi-Medium.
All finished!
Southern Ridge Chipboard used:
Family Word
Keyhole
Key
Ex-large Tag (wood)
Remember to play along in the monthly challenge over on the Southern Ridge Trading Company blog. Each month enter for your chance to win 4 designs from the online store - chipboard.ca -$20 (before tax) retail value of YOUR OWN CHOOSING!


What a lovely wall hanger Corina, love the layered elements behind your photo and the addition of the frantage to the chipboard elements looks beautiful. Thanks for sharing it! Deb xo
ReplyDeleteGorgeous wall hanging. Great treatment of the chipboard pieces... Love the fine lines and details of the chipboard pieces.
ReplyDeleteThank you for another lovely challenge and the great tutorial and inspiration too Karen x
ReplyDelete