Showing posts with label Barbed Wire Circle Frames - Small. Show all posts

Friday, June 15, 2018

Fly Away with Me Tag with Katelyn Grosart

Hey Southern Ridge Trading Company fans, Katelyn here. For today's post, I'm excited to share with you my Fly Away with Me Tag that's perfect to give to that special someone in your life.  My Fly Away with Me Tag features a variety of our chipboard pieces. You'll want to read below as I share with you how to embellish the chipboard pieces for my Fly Away with Me Tag at home.


To start, take one of the Fine Clock Face's out of the package. Apply a coat of Emboss It Ink to the clock face. Sprinkle Burnt Copper Leaves Embossing Powder over the entire surface of the clock. Tap off the excess powder and emboss with a heat tool. If the embossing powder didn't completely cover the clock, repeat the previous steps in the areas that need more embossing powder.


Next, you'll need a Barbed Wire Circle Frame - Small. Apply a coat of Emboss It Ink to the frame. Sprinkle Rocky Road Baked Texture Embossing Powder over the entire surface of the frame. Tap off the excess powder and emboss with a heat tool. If the embossing powder didn't completely cover the frame, repeat the previous steps in the areas that need more embossing powder.


From the Med. Gears, choose one of the gears. Apply a coat of Emboss It Ink to the gear. Sprinkle Hammered Metal Embossing Powder over the entire surface of the gear. Tap off the excess powder and emboss with a heat tool. 


Choose three small gears and two medium sized gears from the Mini Wood Gears. Apply a coat of Emboss It Ink to each of the gears. Sprinkle Rocky Road Baked Texture Embossing Powder over the entire surface of the gears. Tap off the excess powder and emboss with a heat tool. 


Cut apart one of the Scroll Borders. Blend Ground Espresso Distress Ink with a blending tool and foam onto the entire surface of both of the scroll pieces. 


The last chipboard piece you need is one Vintage Scroll Key. Apply two coats of Hickory Smoke Distress Paint to the key. Once the paint has dried, rub Black Soot Distress Crayon along the edges of the key.


Once all the patterned papers have been layered all together, I then added the two scroll border pieces diagonally on the tag. Adhere the clock face and gear together. Once they've been adhered, add your sentiment to the middle of the gear. Adhere the barbed wire circle frame overtop of the saying.


To finish around the frame, adhere two stamps, a hot air balloon and the vintage scroll key. Adhere three small gears in the top left of the tag and two small gears in the bottom right of the tag.


To finish off the tag, add a burgundy bow at the top of the tag.


Southern Ridge Trading Company Supplies Used:


Other Supplies Used:

- Emerald Creek Craft Supplies: Burnt Copper Leaves Embossing Powder, Hammered Metal Embossing Powder and Baked Texture by Seth Apter - Rocky Road Embossing Powder
- Tim Holtz for Ranger Ink: Distress Ink - Ground Espresso, Distress Crayons - Black Soot, Distress Paint - Hickory Smoke and Blending Tool with Foam
- Ranger Ink: Emboss It Ink Dabber
- Elizabeth Craft Designs: Fitted Circles
- Pion Design: The World Awaits - Tags, Vacation Memories, Destination Unknown and Adventure Awaits & Design Palette - Blue IX and Maroon II
- Tombow: Mono Multi Liquid Glue
- Misc: Burgundy Ribbon and Heat Tool

Until Next Time!

- Katelyn


Friday, August 25, 2017

There is Beauty in Simplicity ATC with Katelyn Grosart

Hey there Southern Ridge Trading Company fans, Katelyn here. I've started playing around with ATC cards and they are now one of my new favourite things to create with. I find that when I have smaller chipboard pieces left over, using them on an ATC card is a better alternative then having them sitting in the bin with my other chipboard pieces. So today, I've created for you a beautiful fall ATC card, that's perfect to give to that special someone in your life. You'll want to read below as I share with you how I created my There is Beauty in Simplicity ATC card.


To start, take the Skeleton Maple Leaf out of the package. Apply Emboss It Ink to the entire surface of the maple leaf. Sprinkle Weathered Wood Embossing Powder over top of the maple leaf. Tap off the excess powder and emboss with your heat tool. Set the maple leaf aside to cool.


Next, you'll need one of the Barbed Wire Circle Frames - Small.  Apply Emboss It Ink to the entire surface of the frame. Sprinkle Vintage Ivy Embossing Powder over top of the frame. Tap off the excess powder and emboss with your heat tool. Set the frame aside to cool.


Take out the small Abstract Frame.  Apply Emboss It Ink to the entire surface of the frame. Sprinkle Burnt Copper Leaves Embossing Powder over top of the frame. Tap off the excess powder and emboss with your heat tool. Set the frame aside to cool.


Pull out two Mini Wood Maple Leaves. Apply two coats of Candied Apple Distress Stain to each maple leaf. Let the stain dry. Once the stain has dried on both maple leaves, go over each piece with  the Walnut Stain Distress Crayon. Rub the crayon in with your finger.


Choose two Mini Wood Feathers from the package. Stain one of the feathers with Spiced Marmalade Distress Stain and stain the other feather with Pine Needles Distress Stain. Let the stain dry. Once the stain has dried on both feathers, go over each piece with the Walnut Stain Distress Crayon. Rub the crayon in with your finger.


Apply two coats of Spiced Marmalade Distress Paint to one of the Skeleton Leaves.  Once the paint has dried on the leaf, go over the leaf with the Walnut Stain Distress Crayon. Rub the crayon in with your finger.


Cut one piece of patterned paper that measures 2 1/2" x 3 5/8". Cut a second piece of patterned paper that measures 2 3/8" x 3 3/8". On the smaller piece of patterned paper, tear the top left hand side of the paper down and roll the edges over. On the bottom right hand side, tear the paper up and roll the edges over. Distress the edges of each piece of patterned paper. Ink the edges of the patterned paper pieces using Vintage Photo Distress Ink and a Blending Tool with Foam.


Cut a piece of kraft cardstock that measures 2 1/2" x 3 5/8". Distress the edges of the cardstock piece. Ink the edges of the cardstock piece using Vintage Photo Distress Ink and a Blending Tool with Foam.


Adhere the plaid piece of patterned paper to the brown damask piece of patterned paper. Adhere the brown damask piece of patterned paper to the piece of kraft cardstock.


Adhere the Abstract Frame to the plaid piece of patterned paper. Adhere the Barbed Wire Circle Frame to the middle of the Abstract Frame.


Adhere the orange skeleton leaf to the left hand side of the barbed wire frame. Adhere the weather wood skeleton leaf to the right of the orange skeleton leaf. 


Adhere a maple leaf and a feather in the bottom left hand corner of the ATC card. Adhere the other maple leaf and a feather in the top middle of the ATC card. 


Using glossy accents, adhere a Golden Tiger's Eye and two Carnelian gemstones in the top left and bottom right hand corners of the Abstract Frame. Stick the "there is beauty in simplicity" sentiment to the bottom portion of the two skeleton leaves. To finish off the bottom of the ATC card, wrap some twine four times at the bottom. 


Here are a few closeup shots of the finished There is Beauty in Simplicty ATC Card.


Here's my finished There is Beauty in Simplicity ATC card. I hope that I've inspired you to recreate my ATC card at home.


Southern Ridge Trading Company Supplies Used:


Other Supplies Used:

- Emerald Creek Craft Supplies: Burnt Copper Leaves, Vintage Ivy and Weathered Wood Embossing Powders & Golden Tiger's Eye and Carnelian Gemstones
- Tim Holtz for Ranger Ink: Distress Ink - Vintage Photo, Distress Paint -  Spiced Marmalade, Distress Stain - Spiced Marmalade, Candied Apple and Pine Needles and Distress Crayon - Walnut Stain
- Ranger Ink: Glossy Accents and Emboss It Ink - Dabber
- Idea-ology: Small Talk
- Tombow: Aqua Mono Liquid Glue
- Authentique: Bountiful - Bountiful One and Boutniful Seven
- Misc: Twine and Kraft Cardstock

Until Next Time!

-Katelyn 


Wednesday, November 23, 2016

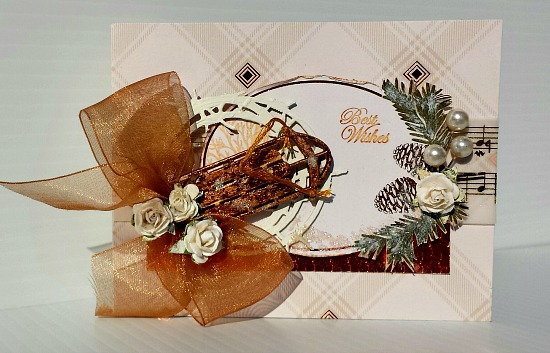
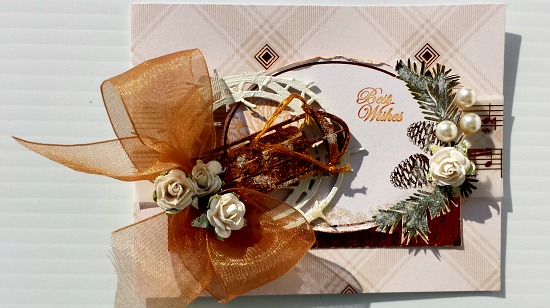
Best Wishes Christmas Card with Ava Gavloski

Ava here today with non-traditional coloured Christmas Card.  I used a couple of
Southern Ridge Trading Co. chippies on this card.  When I look at this card I think of romantic days gone-by from a different era, sorta vintage like.  

gavloski oct 16 angle.jpg

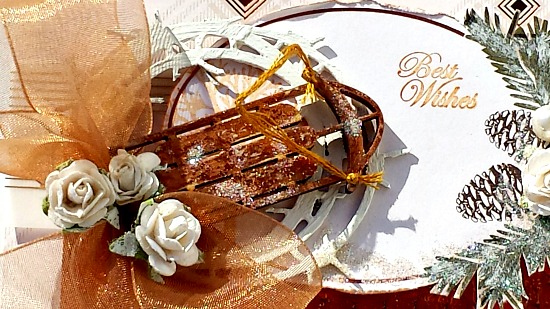
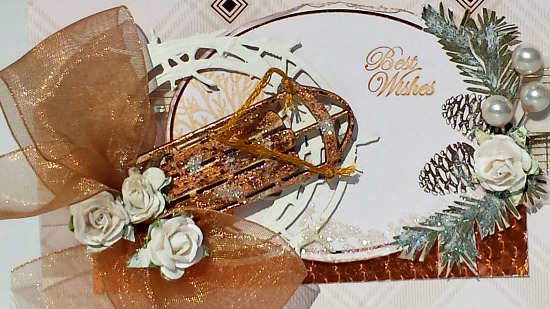
To get the Southern Ridge sled to have the well used vintage look, I burnished some of Therm-o-web’s Deco Foil onto the sled and then added a sprinkle of Twinkle Dust.  You can find the sled here in the store.  The sled is called a Sm Wood Sleigh.

Next up was Southern Ridge Barbed Wire Circle frame  which you can find in the store under the Western Rodeo Rustic tab.  I applied 2 coats of Deco Art Vintage white acrylic paint.

circle close.jpg

One of my go-to pattern paper companies is DCWV.  I used 4 sheets from their paper stacks called:  Scripts and Music Notes, Luxe Lodge and Classy copper.  The
classy copper feel of the paper collection really shows off the Southern Ridge Sled chipboard.

sled close.jpg

Embellishments just didn’t want to stop on this card.  Hopefully this vintage card will inspire you to try to make a few cards with this cute little sled from Southern Ridge Trading Co.

gavloski oct16.jpg

Southern Ridge Trading Co. Supplies Used:

Other Supplies Used:
- DCWV
- May Arts Ribbon
- Maya Road: Stick-pins
- Clearsnap: Twinkle Dust by Donna Salazar
- Deco Art Acrylic Paint
- Therm-o-Web Deco foil
- Sweet 'n Sassy Stamps

Remember to play along in the monthly challenge on the Southern Ridge Trading Company blog. Each month enter for your chance to win 4 designs from the online store - chipboard.ca -$20 (before tax) retail value of YOUR OWN CHOOSING! 

Thanks for visiting.


Wednesday, June 8, 2016

Clean and Simple Card by Ava Gavloski

Hello, Ava here, to share a Clean and Simple (CAS) card with you that lets the fine details of Southern Ridge Trading Co. Chipboard shine brightly.


Check out the detail in the fine detail cuts of this chipboard. 


My card base has been painted with a watercolour wash treatment using Deco Art Paints.  I wanted a sunset sky type of back ground for my card and the easel bottom of the card has some green incorporated to give it the presence of landscape.  I distressed the edges of the card front panel to give some rough texture to enhance the barbed wire circle chipboard.


The chipboard was covered with the Deco Art Paint wash blending 2 colours together and the cattails were treated with embossing powder.


This CAS card truly allowed Southern Ridge chipboard to shine brightly on this masculine card.  Get some chipboard and create a CAS card, you'll love the WOW factor.


Souther Ridge Chippies:


Other supplies:
Deco Art Media Fluid Acrylics
Sweet 'n Sassey Stamps
Clearsnap Colorbox Ink
Wow Embossing Powder


Remember to play along in the monthly challenge over on the 
Southern Ridge Trading Company blog. Each month enter for your chance to win 4 designs from the online store - chipboard.ca -$20 (before tax) retail value of YOUR OWN CHOOSING! 

- Ava