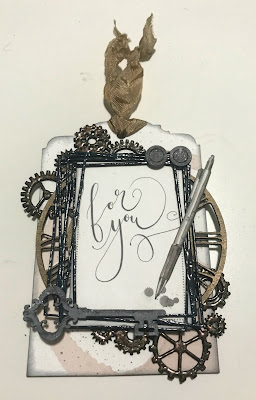
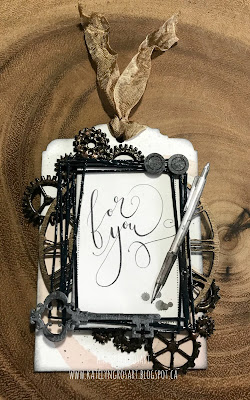
Hey Southern Ridge Trading Company fans, Katelyn here. For today's post, I've created this For You Tag that's perfect to add to a gift bag or to give to someone special in your life. You'll want to read below as I share with you how to recreate my For You Tag at home.
To start, cut two pieces off of the Multi Gears Pattern. Apply Emboss It Ink to the two chipboard pieces. Sprinkle Burnt Copper Leaves Embossing Powder over each chipboard piece. Tap off the excess powder and emboss with your heat tool. Set the chipboard pieces aside to cool.
Take the small Abstract Frame Set out of the package. Apply Emboss It Ink to the frame. Sprinkle Baked Texture - Deep Sea Embossing Powder over the frame. Tap off the excess powder and emboss with your heat tool. Set the frame aside to cool.
From the Vintage Scroll Keys, take one out from the package. Apply two coats of Hickory Smoke Distress Paint to the key. Once the paint has dried, rub Black Soot, Brushed Pewter and Pumice Stone Distress Crayons overtop of the paint.
Select two nuts from the Nuts & Bolts package. Apply two coats of Hickory Smoke Distress Paint to the nuts. Once the paint has dried, rub Black Soot, Brushed Pewter and Pumice Stone Distress Crayons overtop of the paint.
Cut the Fine Clock Face in half. Rub Bronze Age Art Alchemy Metallique Wax overtop of each of the clock pieces.
Take a Chipboard Tag out of the package. Place the chipboard tag onto the patterned paper piece and trace the tag. Cut the tag out. Ink the edges of the patterned paper tag using Black Soot Distress Ink and a blending tool with foam.
Ink the edges of the chipboard tag using Black Soot Distress Ink and a blending tool with foam.
From the Card Sheet Travel For You patterned paper piece, cut out the "For You" card and fussy cut the pen out of one of the other squares. Ink the edges of the "For You" card and the pen using Black Soot Distress Ink and a blending tool with foam.
Adhere the patterned paper tag to the chipboard tag. Punch a hole at the top of the tag.
In the top left hand corner of the tag, adhere one of the gear pattern pieces. In the bottom right hand corner, adhere the other gear pattern piece. Adhere the right hand side of the clock face in the middle and slightly right so that it hangs off of the tag. Adhere the left hand side of the clock face in the middle and right up against the left hand side of the tag.
Adhere the For You card to the middle of the clock face. Adhere the abstract frame overtop of the For You card.
Adhere the key to the bottom left hand side of the frame. Adhere the pen to the middle right hand side of the frame. Adhere the two nuts to the top right hand corner of the frame. To finish your tag, tie some ribbon to the top of the tag.
Here are a few close up photos of the finished tag.
And here's the finished tag.
Southern Ridge Trading Company Supplies Used:
Other Supplies Used:
- Tim Holtz for Ranger Ink: Distress Ink - Black Soot, Distress Crayons - Black Soot, Pumice Stone & Brushed Pewter, Distress Paint - Hickory Smoke and Blending Tool with Foam
- Ranger Ink: Emboss It Ink Dabber
- Emerald Creek Craft Supplies: Burnt Copper Leaves Embossing Powder and Baked Texture - Deep Sea Embossing Powder
- Prima Marketing: Art Alchemy Metallique Wax - Bronze Age
- Alexandre Renke: Coffee Cup with Pattern and Card Sheet Travel For You
- Tombow: Mono Multi Liquid Glue
- Misc: Ribbon and Heat Tool
Until Next Time!
- Katelyn


