Monday, July 30, 2018

May You Always Have a Shell Card with Katelyn Grosart

Hey there Southern Ridge Trading Company fans! For today's post, I'm excited to share with you my May You Always Have a Shell Card that's perfect to give to that special someone who loves the sea.  To embellish my card, I've featured a variety of our popular ocean themed wood and chipboard pieces. I would love for you to read below as I share with you how I created my card.


To start, take the coral and seahorse pieces off of the Ocean Mix 1 set. Apply two coats of Antique Linen Distress Paint to the coral. Once the paint has dried, ink the edges of the coral using Ground Espresso Distress Ink and a blending tool with foam. Apply two coats of Broken China Distress Paint to the seahorse. After the paint has dried, ink the edges of the seahorse using Ground Espresso Distress Ink and a blending tool with foam.


Take out three Mini Wood Starfish from the package. Apply two coats of Broken China Distress Paint to one of the starfish and apply two coats of Worn Lipstick Distress Paint to the other two starfish. After the paint has dried, ink the edges of all three starfish using Ground Espresso Distress Ink and a blending tool with foam.


From the Mini Wood Sand Dollar package, take two out. Ink the edges of each sand dollar using Ground Espresso Distress Ink and a blending tool with foam.


Take one Mini Wood Clam Shell out of the package. Apply Emboss It Ink to the clam shell. Sprinkle White Satin Pearl Embossing Powder overtop of the shell. Tap off the excess powder and emboss with a heat tool.


Take out the small Abstract Circle Frame from the Abstract Circle Frames set. Apply Emboss It Ink to the frame. Sprinkle Weathered Wood Embossing Powder overtop of the frame. Tap off the excess powder and emboss with a heat tool.


Cut two pieces off of the Fish Net Pattern. Using a blending tool with foam, blend Ground Espresso Distress Ink overtop of each piece. 


Take out one Mini Wood Flip Flop from the package. Apply two coats of Worn Lipstick Distress Paint to the flip flop. Once the paint has dried, ink the edges of the flip flop using Ground Espresso Distress Ink and a blending tool with foam.


Cut a piece of fish net.


Choose three shells for your card.


Cut a piece of shell patterned paper that measures 5 1/8" x 5 1/8". Cut a piece of coral patterned paper that measures 5" x 5". Distress the edges of each patterned paper piece. Ink the edges of both patterned papers using Ground Espresso Distress Ink and a blending tool with foam.


Cut a piece of seahorse patterned paper that measures 4 3/4" x 4 3/4". Cut a piece of shell patterned paper that measures 4 1/2" x 4 1/2". On the top right side of both pieces, tear the paper down a bit. On the bottom left side of both pieces, tear the paper up a bit. Distress the edges of both patterned paper pieces. Ink the edges of both patterned papers using Ground Espresso Distress Ink and a blending tool with foam.


Die cut a 3 3/4" stitched circle out of the cream with tan writing patterned paper. Die cut a 3 1/4" stitched circle out of shell patterned paper. Distress the edges of both circles. Ink the edges of the circles using Ground Espresso Distress Ink and a blending tool with foam.


From the images patterned paper, die cut the 2 3/4" stitched circle out of the May You Always saying. Distress the edges. Ink the edges of the circle using Ground Espresso Distress Ink and a blending tool with foam.


Now it's time to assemble your card.

Adhere the coral patterned paper to the blue shell patterned paper. Adhere one of the fish net pattern pieces 1/2" from the right and 1/4" from the top of the coral paper. Adhere the other fish net pattern pieces 1/2" from the left and 1/4" from the bottom of the coral paper.


Adhere the shell patterned to the seahorse patterned paper. Adhere the sea horse patterned paper to the coral paper.


Adhere the fish net to the middle of the shell patterned paper. Adhere the saying circle to the blue shell circle. Adhere the blue shell circle to the cream with tan writing circle. Foam square the cream with tan writing circle to the middle of the fish net. Adhere the abstract circle frame overtop of the saying circle.


In the top left corner of the circle, adhere the clam shell, the sand dollar and a pink starfish.


On the bottom right side of the circle, adhere the blue starfish, pink starfish, coral, seahorse, sand dollar and flip flop. 


On the top left side of embellishments add a seashell. In the bottom right side of the embellishments add the other two seashells.


To finish off your card, cut a cardbase that measures 5 1/4" x 10 1/2", score at 5 1/4". Adhere the cardfront to the cardbase.


Here are a few closeup photos of my card.


And here's the finished card.


 Southern Ridge Trading Company Supplies Used:


Other Supplies Used:

- Emerald Creek Craft Supplies: White Satin Pearl Embossing Powder and Weathered Wood Embossing Powder
- Tim Holtz for Ranger Ink: Distress Ink - Ground Espresso, Distress Paint - Antique Linen, Worn Lipstick & Broken China and Blending Tool with Foam
- Ranger Ink: Emboss It Ink Dabber
- Pion Design: Seaside Stories - Beach Blossoms, Message in a Bottle, Images from the Past: Seaside Stories 1, Under the Sea and Coral Reef
- Tombow: Mono Multi Liquid Glue
- Elizabeth Craft Designs: Stitched Circles
- Misc: Seashells, Netting and Heat Tool

Until Next Time!

- Katelyn


Wednesday, July 25, 2018

Winter In July Card with Jessica Kaiser

Hello crafty friends!

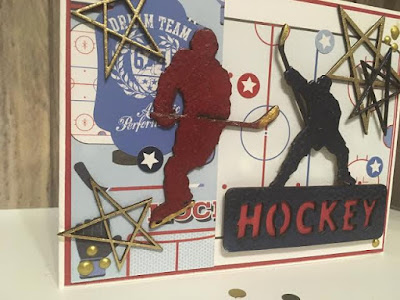
It’s Jess here today with another fabulous chipboard themed card!  I tried to keep with my "Christmas in July" theme - but the card ended up being more of a "winter in July" theme - HOCKEY!  How much more Canadian can you get than a hockey card?


Let me share how I made it!  These are the Southern Ridge products I used on this card:


I started by heat embossing my Hockey Players!  I used a dark navy blue for the focal "Hockey" guy, and a nice red for the other!  I typically use 2-3 layers of embossing powder on my chipboard pieces. I simply cover each piece with Versamark Ink, then sprinkle on my powder of choice and heat setting!  I repeat for each layer until I like the coverage.  I used a gold detail powder on my Small Primitive Stars (and one pretty Navy Blue one for contrast!).


I had a few "hockey" themed patterned papers kicking around, so I used them to create my background. I also adhered a small piece of red cardstock to the back of the "Hockey" word to make it stand out. 


I used some Nuvo Crystal Drops to accent the edges of the hockey stick and skate blades. It also accented the corners of the card! Here are a few more pictures of my card:


I did pop up the blue hockey player using Foam Squares to give it more of a focal point. SUCH a fun card!!!

Southern Ridge Trading Company Supplies Used:
Hockey

Other Supplies Used:
- White Cardstock
- SNS Dimensional Glue
- Echo Park: Hockey Paperpack & Stickers 
- 3D Foam Squares
- Red Cardstock

I hope you had some fun here on the blog today! I really enjoyed making this card - it's always nice to have some "boy" cards on hand!

See you again real soon!!


Jess


Tuesday, July 24, 2018

Moments In Time Mixed Media Clock with Tracy Sagriff

Can you imagine summer is almost half over. Sometimes I feel like I need a device to stop the clock and just savour the moment. This project reminded me to take those moments to enjoy the beauty around us.


Trace and cut a piece of foam board the size of the diameter of the clock face and another for the center circle.

Use gel medium to glue the wood and foam together.

Cover entire project with gecko

Adhere and the diecuts and flowers


Add an additional coat of gesso over new items

Use Faber Castel gelatos in a variety of shades of purple and blue to add colour directly to the project. Use a paintbrush and water to  move the pigment around.

Dilute white paint and glimmer glaze and use it to create spatters

Ink the edges with Distress Oxide Inks


Southern Ridge Trading Company Supplies Used:

- Moments in Time

Other Supplies Used:

- Flowers
- Lavender Acrylic Paint
- Lush Lilac Glimmer Glaze
- Gesso
- Tim Holtz for Ranger Ink: Distress Oxide Ink - Shaded Lilac and Faded Blue Jeans 
- White paint
- Gel medium
- Foam board

- Tracy


Monday, July 23, 2018

Remember This Scrapbook Layout with Charlene Byrd

Hello bloggers!
Charlene here! Thanks for joining me today!

Today I’m sharing a gorgeous layout with a precious picture of my sweet great niece. I love vintage style so this picture was so fun to work with.


The chipboard pieces were all coloured with Walnut Distress Stain.


I cut the key into 2 pieces so I could tuck them at the top and the bottom of the page.


I also cut the decorative border in half and then into 2 pieces (again so I could tuck it)

Southern Ridge Trading Company Products Used:

Other Products Used:
- Kaisercraft paper and diecuts
- Paper bag
- Lace
- Cheesecloth
- Flowers
- Pearls
- Buttons
- Paper doilies

Thanks for joining me today!
Until Next time
Charlene


Friday, July 20, 2018

Blue Winter with Sandy McTier

BlueWinter.jpg

Christmas in July!!!! Do you start painting your ornaments and gifts early or are you like me, waiting until the last minute to get a month’s worth of work done in a few days?? Here’s a sweet little winter scene, using SRTC deer chipboard to get you started on that holiday painting now!!

 Ornament Prep:
  • Using a 3/4" Wash brush, I painted the surface with DecoArt All Purpose Sealer and let completely dry.
  • Once dried, I gave it a light sanding. Then I painted on a smooth layer of DecoArt Media Gesso and let completely dry. Once dried, I gave it another light sanding, removing any dust.

Fawn Prep:
  • I painted the chipboard piece with Gesso using an IPC Large Oval Foam brush.

115.JPG

Ornament:
  • I spritzed the ornament with water and then spritzed it with DecoArt Shimmer Mister Turquoise.
  • I tilted it back and forth and up and down to get the paint to move. Then I dried it with a heat tool.
  • Next, I used a #8 Shader and painted thin trees in the background with DecoArt Media Titanium White – making some trunks shorter and some longer.
  • Then I added some strokes with Titanium White to give the appearance that the trees were evergreens.
  • I added in some snow using Titanium White and a side-to-side motion. The key is to not cover up too much of the blue as this will give some shadows to the snow.
  • Once I got the trees the way I liked them, I decided I wanted to add some water. So I painted in a stream using DecoArt Media Phthalo Blue, adding a snow bank around the stream with more Titanium White.
  • I repainted the branches on the two evergreen trees and while wet, sprinkled some DecoArt Glamour Dust on them.
  • I added a darker border around the edge of the ornament with DecoArt Media Paynes Grey.
  • I also painted some little stars in the background between the trees using a liner brush and Titanium White.

116.JPG


117.JPG


118.JPG


143.JPG


144.JPG


146.JPG


149.JPG


152.JPG

Fawn:
  • I painted the fawn with a mixture of DecoArt Media Quinacridone Gold and Titanium White and let dry. Then I…
  • Shaded him with DecoArt Media Raw Umber using a Dynasty 3/8" Angle brush.
  • Added white accents on his chest, tail, ears, snout and eye.
  • Painted his hooves, eye, nose, mouth and the edge of his ears with DecoArt Media Carbon Black.
  • Added a highlight on the eye, nose and hooves with Titanium White.
  • Dry brushed some Titanium White on the front of his legs.
  • Finally, I added some dots on his tail end with Titanium White. Then I let dry and painted a wash of Quinacridone Gold over them. I let dry again and repainted some of the dots with Titanium White.

148.JPG


158.JPG

Finishing Touches:
  • I let everything dry and then glued the deer on the ornament with E6000.
  • I varnished the piece with DecoArt Media Soft-Touch Varnish and added a ribbon.
  • Hang it on your Christmas tree or give it as a gift!
Southern Ridge Trading Company Supplies Used:

- Fawn

Other Supplies Used:

- Surface: Wooden Ornament – #207-0521 Vikingwoodcrafts.com
- Dynasty Brushes: Black Gold 3/4" Wash, IPC Large Oval Foam, #8 Shader, 3/8" Angle and a liner brush of choice. (All available from TheBrushGuys.com – use promo code: sandymc for an additional discount)
- DecoArt Americana All Purpose Sealer
- DecoArt Media Products: White Gesso & Fluid Acrylics – Titanium White, Phthalo Blue, Quinacridone Gold, Raw Umber, Paynes Grey and Carbon Black
- DecoArt Shimmer Mister: Shimmer Mister Turquoise
- DecoArt Media Varnish – Soft-Touch
- DecoArt Glamour Dust
- Misc. Supplies: E6000 Glue, Sanding Block, Palette Paper and Water Basin

©2018 Blue Winter, Sandy McTier Designs ~ all rights reserved