Monday, December 30, 2019

Winter Album with Nancy Nickel

Hello, everyone!

It's Nancy here today with a fun Winter themed Project. 

 We've been enjoying beautiful frosty days!
The temperatures have been very mild,
with blue skies and incredible hoar frost!

That was the inspiration for my project today.
I've used some fabulous chipboard pieces
to decorate the front cover of an 8 x 8 album.


I began by pouncing some Picket Fence paint around the edges of the album.
Just enough to give it a frosty appearance.
Then I added the paper that looks like falling snow. 
I fussy cut some swirls out of a coordinating paper, 
and added them to the bottom of the page.
I thought they made fabulous snow drifts!


I inked two of the fun silhouette pieces from the Winter Kids set.
I think I have always done my silhouettes in black
but this time I did dark blue to work with the papers.
Then I adhered them in place on the swirls/snow drifts.


For the title on my page I used the Winter from the Winter Words piece.
I inked just the word part, and then adhered it in place on the album cover.
Once it was in place, 
I used white Crystal Drops to colour the little snowflake,
as well as the snowy part.


In the photo below, you can see the great glossy finish on the snowy part.


Finally, I added three snowflakes, from the Snowflake set. 
I actually adhered them in place first,
and then covered them with the white Crystal Drops.


This was so much fun to make!
I can't wait to start filling it up!

Southern Ridge Trading Company Products Used:

-  Winter Kids 


Other Supplies Used:

- Binder from My Stash
 -  Tim Holtz Idea-ology: Vintage Shabby Paper Stash
- Tim Holtz for Ranger Ink: Distress Paint - Picket Fence and Distress Ink - Broken China
- Tonic Studio: Nuvo Crystal Drops - Simply White

* * * * *
Thanks so much for stopping in today!
I'll have another project share for you in the New Year!

* * * * *

Monday, December 23, 2019

Christmas Gift Tags with Katelyn Grosart

Hey Southern Ridge Trading Company fans, Katelyn here. With only 2 days until Christmas, I have been busy getting my gifts wrapped and wanted to add an extra little detail to the outside of the gift. So today, I'm excited to share with you my Christmas Gift Tags. To create my gift tags, I've used a variety of our popular Christmas chipboard pieces. You'll want to read below as I share with you how to recreate my Christmas Gift Tags at home.


To start, you'll need two Wood Christmas Ornaments. Apply two coats of Gathered Twigs Distress Stain to each of the ornaments. 


Next, you'll need some Christmas paper. Trace with ornaments around the patterned paper and fussy cut the paper ornaments out. Adhere the patterned papers to each of the ornaments. Ink the edges of the ornaments using Vintage Photo Distress Ink and a blending tool with foam.


Choose one of the snowflakes from the Snowflake 714 package. Apply two coats of Brushed Pewter Distress Stain to the snowflake.


From the Merry Deer package, choose one of the deers. Paint the deer white with two coats of Picket Fence Distress Paint. Once the paint has dried, ink the edges of the deer using Vintage Photo Distress Ink and a blending tool with foam.


From the Corrugated Stars, choose a large and small star. Apply Emboss It Ink to each of the stars. Sprinkle Charred Gold Embossing Powder over the entire surface of the stars. Tap off the excess powder and emboss with a heat tool. Ink the edges of the stars using Vintage Photo Distress Ink and a blending tool with foam.


You'll need six stars from the Itty Bitty Snowflakes package. 


On one of the ornaments, foam square the snowflake to the middle of the ornament. Adhere the small star overtop of the snowflake. Adhere the three itty bitty snowflakes as desired on the ornament. 


To finish this gift tag, tie a piece of jute twine to the top of the ornament.


On the other ornament, foam square the large star to the middle of the ornament. Adhere the deer overtop of the star. Adhere the three itty bitty snowflakes as desired on the ornament. 


To finish this gift tag, tie a piece of jute twine to the top of the ornament.


Here are a few closeup photos of the finished Gift Tags.


Here are the finished Christmas Gift Tags.


Southern Ridge Trading Company Supplies Used:


Other Supplies Used:

- Emerald Creek Craft Supplies: Charred Gold Embossing Powder
- Tim Holtz for Ranger Ink: Distress Paint - Picket Fence, Distress Stain - Gathered Twigs & Brushed Pewter, Distress Ink - Vintage Photo and Blending Tool with Foam
- Ranger Ink: Emboss It Dabber
- Stamperia: Christmas Rice Paper
- Misc: Jute Twine

Thanks so much for joining my today!

- Katelyn


Friday, December 20, 2019

Merry Christmas Card with Ruchi

Hello friends! Merry Christmas in advance and enjoy this festive season :) 
Ruchi here from Ruchi's Crafeteria and I'm back with my inspirational project.

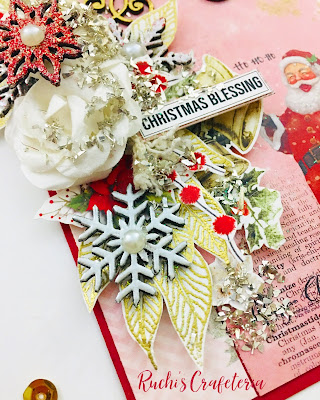
Today I've created a Christmas card with beautiful SRTC chipboards.


  • First I've created my card base and applied a piece of pattern paper from Dress My Craft- Christmas Bells paper collection.
  • Picked SRTC Delicate Lace Doily and Snowflakes chipboards and applied Prima White Gesso.
  • When Gesso dried, heat embossed them using Ranger- Gold and different WOW embossing powder.


  • Stamped and embossed some Mudra Craft Stamps- leaves and fussy cut them. 
  • Arranged all the elements like SRTC chipboards, flowers, stamped images, lace, fussy cut images together.
  • Lastly added sentiment and sprinkled Finnabair Glass Glitters.


That’s it for today!! Hope you like my today's project. Don’t forget to check SRTC shop for these chipboards and some other awesome designs.

Southern Ridge Trading Company Supplies Used:


Other Supplies Used:

- Dress My Craft: Christmas Bells Paper Collection
- Prima Marketing: White Gesso, Art Gel Medium and Finnabair Glass Glitter
- Imagine Crafts: Versamark Ink
- Ranger Ink: Embossing Powder
- WOW: Embossing Powders
- Mudra Craft Stamps: Leaves... stamp designed by me :)
- Lace, glue, cardstock, half pearls, double-sided tape are from my stash.  

Happy Holidays! 
See ya next time.
Till then happy crafting!!
Ruchi


Wednesday, December 18, 2019

Christmas Keepsake with Karen Jiles


Hi there, 

It’s Karen sharing a Christmas Keepsake that I created with the Skeleton Poinsettia and Words of Christmas Chipboard sets.  The chipboard sets were absolutely perfect for this Keepsake. I coupled them with some embellishment mousse and Christmas themed patterned papers. I loved the end result. Take a peek at my tutorial below.


Step 1: Adhere coordinating layers of patterned paper together using adhesive. 


Step 2: Add additional patterned paper layers and adhere to wooden frame using E6000. Set aside.


Step 3: Apply Cosmic Brown Embellishment Mousse to the Skeleton Poinsettia and 
Words of Christmas chipboard using a foam tool. Heat set the chipboard to dry. Note: To give the poinsettia some dimension, I reformed the chipboard with my finger.


Step 4: Adhere the mousse covered chipboard to the layered papers using E6000. Add a clear pebble, flowers and velvet ribbon.


Step 5: Add beaded pins and tap on gesso using a paintbrush.


Step 6: Continue embellishing as desired.

Southern Ridge Trading Company Supplies Used:


Other Supplies Used:

- Wooden Frame
- Patterned Paper
- Embellishment Mousse (Cosmic Brown)
- Foam Tool
- Scissors
- Beaded Pins
- Clear Pebble
- Velvet Ribbon
- Gesso (White)
- Paintbrush
- E6000
- Hot Glue
- Heat Gun

Thanks so much for stopping by today.
Karen


Sunday, December 15, 2019

Snowy Santa Card with Nancy Nickel

Hello, friends!

It's Nancy here today...with a fun Snowy Santa card!
I'll show you how easy it is to foil these fabulous chipboard pieces!

Here's my card:


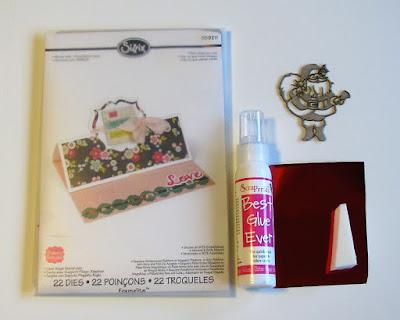
Here's what I used:
(Oops...the chipboard snowflakes aren't in the photo)


I began with adding some Best Glue Ever to the front of the chipboard Santa and snowflakes.
I did this by dabbing it on with a make-up sponge.
 Once the glue was tacky, I laid the red foil over the Santa,
 and burnished it really well with my fingers.
I peeled back the foil and was left with this fabulous red Santa!
I repeated the process with the two chipboard snowflakes.
Here's a close-up look at the fine detail of the chipboard.


Using the fun die set,
I cut the card base out in a combination of white cardstock,
and some fabulous red foil polka dot paper.


I then used the Best Glue Ever, along with the No-Clog Writing Tip, 
to adhere my chipboard pieces in place.


Here's what the card looks like closed.
Doesn't the foiled chipboard match the paper perfectly?


To finish off the inside of the card,
I added a strip of the polka dot paper, 
a strip of pretty red glitter ribbon,
and a couple of silver foiled snowflakes.


Southern Ridge Trading Company Products Used:


Other Supplies Used:

- Papers: Recollections - Cardstock, MAMBI - Let it Snow
- ScraPerfect: Best Glue Ever, No-Clog Writing Cap, Transfer Foils
- Die: Sizzix - Card, Regal Stand-Up
- Ribbon: Celebrate It

* * * * *
Thanks so much for stopping by today!
I'll be back soon with more creative fun!

* * * * *

Wednesday, December 11, 2019

Merry Christmas Tags with Ornaments with Pam Bray

  
Happy Holidays and Merry Christmas!!! Pam here today sharing a few fun tags with removable ornaments using Southern Ridge Trading Company holiday chipboard pieces! 


Begin by covering chipboard tags with pretty pattern papers and border strips!


Adhere Southern Ridge Snowflake Wreath Small  to bottom of prepared tags! (HINT: Make sure to lightly adhere the  Snowflake Wreath Small  to tag since they are to be removed for the ornament gift!)


Adhere pattern paper to center of two of the Southern Ridge Wood Christmas Ornaments! Add bows to top of each ornament. 


Paint and emboss bell and deer from Southern Ridge Deer Christmas Mix using embossing powder and embossing ink. Adhere to top of prepared ornaments. 


Adhere prepared embossed chipboard pieces to top of Snowflake Wreath Small .


Paint and emboss Joy and Noel from Southern Ridge Words of Christmas using embossing powder and embossing ink.


Adhere prepared words to pattern paper mats; adhere prepared mats to top of tags. 


Adhere number disc to bottom of tags. 


Die cut black card stock doilies; adhere under tag back!


Apply Marshmallow Rock Candy to snowflakes and doily;  heat set. Adhere to top of tag! 


Southern Ridge Trading Company Supplies Used:


Other Supplies Used:

- Wild Whisper Designs:  Fall and Winter Paper Collection and Pine Dreams Embossing Powder
- Emerald Creek Craft Supplies: Marshmallow Rock Candy Embossing Powder and Charred Gold Embossing Powder
- Doily Die Cuts
- May Arts: Natural and Red Twine, Red Ribbon
- Xyron Adhesive
- Snowflakes
- Embossing Ink
- White Paint
- Black Card Stock

I hope you have enjoyed the tutorial on how to create beautiful tags for your packages but REMEMBER to tell the recipient that the ornament comes off the tag for their tree!!! ALSO... the tags are perfect all year long...just change the Christmas theme to another. Add a magnet on the back of the ornament piece to create fun addition to your home. Enjoy Pam